2014-2019 Hiace · Service Manual ENGINE

REMOVAL

Removal / installation · Vehicles built Apr 2016 – Dec 2016

Versions by build date: Oct 2014 – Dec 2014 Jan 2015 – Mar 2016 Apr 2016 – Dec 2016 from Jan 2017


1. DRAIN ENGINE COOLANT

CAUTION:
Do not remove the radiator reservoir cap sub-assembly while the engine and radiator are still hot. Pressurized, hot engine coolant and steam may be released and cause serious burns.

HINT:
Collect the engine coolant in a container and dispose of it according to the local regulations.

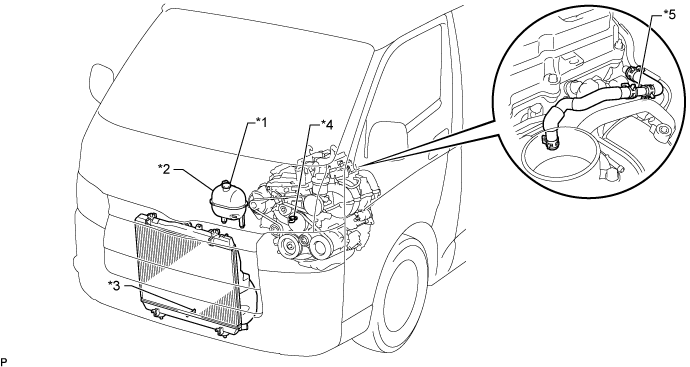
  1. Loosen the radiator drain cock plug and drain the engine coolant.

    A340634E01

    Text in Illustration 
    *1
    Radiator Reservoir Cap Sub-assembly
    *2
    Radiator Reservoir Assembly
    *3
    Radiator Drain Cock Plug
    *4
    Cylinder Block Water Drain Cock Plug
    *5
    2-Way
    -
    -

  1. Remove the radiator reservoir cap sub-assembly.

  1. Loosen the cylinder block water drain cock plug and drain the engine coolant from the engine.


2. PRECAUTION

NOTICE:
After turning the ignition switch off, waiting time may be required before disconnecting the cable from the battery terminal. Therefore, make sure to read the disconnecting the cable from the battery terminal notice before proceeding with work (Click here).


3. DISCONNECT CABLE FROM NEGATIVE BATTERY TERMINAL

NOTICE:
When disconnecting the cable, some systems need to be initialized after the cable is reconnected (Click here).


4. REMOVE INTAKE AIR CONNECTOR

  1. A102437
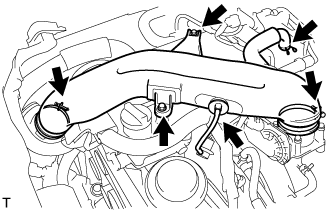
    Slide the clamp and disconnect the No. 2 PCV hose from the cylinder head cover sub-assembly.

  1. Disconnect the vacuum hose from the intake air connector.

  1. Loosen the 2 hose clamps.

  1. Remove the 2 bolts and intake air connector.


5. REMOVE FAN AND GENERATOR V BELT
(Click here)

6. REMOVE FAN PULLEY
  1. Remove the 4 nuts, fan pulley and fan spacer.


7. REMOVE GENERATOR ASSEMBLY

  1. A311548
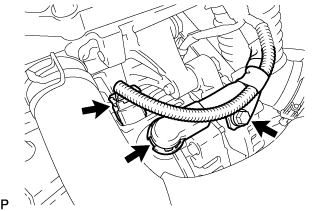
    Disconnect the generator connector.

  1. Remove the terminal cap.

  1. Remove the nut and disconnect the wire harness from terminal B.

  1. Remove the bolt and disconnect the wire harness clamp.

  1. A311549
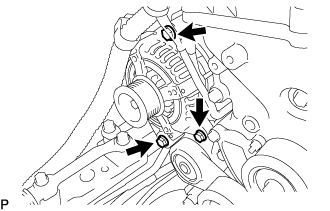
    Remove the 3 bolts and generator assembly.


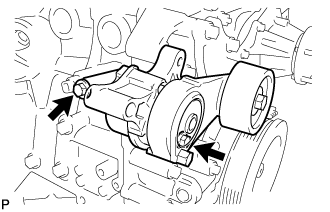
8. REMOVE V-RIBBED BELT TENSIONER ASSEMBLY

  1. A232341
    Remove the 2 bolts and V-ribbed belt tensioner assembly.


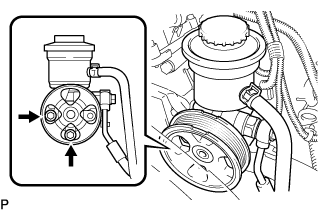
9. DISCONNECT VANE PUMP ASSEMBLY

  1. A102130E01
    Disconnect the oil pressure switch connector.

  1. Remove the 2 bolts and disconnect the vane pump assembly from the engine.

  1. Support the vane pump assembly securely.


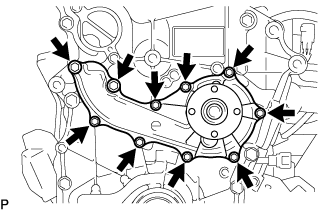
10. REMOVE ENGINE WATER PUMP ASSEMBLY

  1. A346125E01
    Remove the 10 bolts, engine water pump assembly and gasket.

← REMOVAL (Jan 2015 – Mar 2016)REMOVAL (from Jan 2017) →