INSTALLATION
Removal / installation · Vehicles built from Jan 2017
Versions by build date: Oct 2014 – Dec 2014 Jan 2015 – Mar 2016 Apr 2016 – Dec 2016 from Jan 2017
| 1. INSTALL GLOW PLUG |

Using a deep socket wrench (12 mm), install the 4 glow plugs.
- Torque:
- 13 N*m{ 133 kgf*cm , 10 ft.*lbf }
| 2. INSTALL GLOW PLUG NO.1 CONNECTOR |
Install the glow plug No.1 connectors with the 4 nuts.
- Torque:
- 2.2 N*m{ 22 kgf*cm , 16 in.*lbf }
Install the 4 grommets.
| 3. INSTALL INTAKE MANIFOLD |
Install a new gasket and the intake manifold with the 4 bolts and 2 nuts.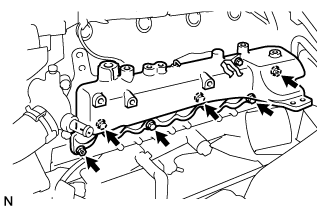

- Torque:
- 29 N*m{ 296 kgf*cm , 21 ft.*lbf }
Install the manifold stay with the bolt and nut.
- Torque:
- 19 N*m{ 194 kgf*cm , 14 ft.*lbf }
Connect the ground cable with the bolt.
| 4. INSTALL NOZZLE LEAKAGE PIPE ASSEMBLY NO.2 |
Temporarily install the nozzle leakage pipe with the 2 bolts.
Install the new gasket and union bolt to the nozzle leakage pipe.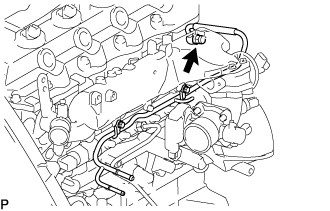
- Torque:
- 21 N*m{ 214 kgf*cm , 15 ft.*lbf }
Tighten the 2 bolts.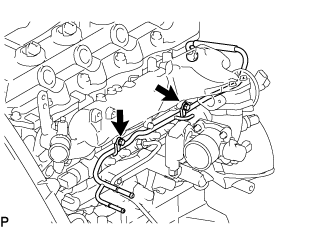
- Torque:
- 13 N*m{ 133 kgf*cm , 10 ft.*lbf }
| 5. INSTALL FUEL INLET PIPE SUB-ASSEMBLY |
- NOTICE:
- When replacing the fuel supply pump, common rail, cylinder block, cylinder head, cylinder head gasket, or timing gear case with a new one, replace the fuel inlet pipe.
- Be careful not to adhere dusts, dirt or any other materials onto the joint area of the fuel inlet pipe.
- When replacing the fuel supply pump, common rail, cylinder block, cylinder head, cylinder head gasket, or timing gear case with a new one, replace the fuel inlet pipe.
Temporarily install the fuel inlet pipe.
Using SST, tighten the injection pipe on the common rail side.
- SST
- 09023-12701
- Torque:
- 32 N*m{ 326 kgf*cm , 24 ft.*lbf } for use with SST
Using SST, tighten the injection pipe on the supply pump side.
- SST
- 09023-12701
- Torque:
- 32 N*m{ 326 kgf*cm , 24 ft.*lbf } for use with SST
| 6. INSTALL INJECTION PIPE |
- SST
- 09023-12701
- NOTICE:
- When replacing the fuel injector, common rail, or cylinder head with a new one, replace injection pipes No. 1, No. 2, No. 3, and No. 4.
- Keep clean the joint of the injection pipe.
- When replacing the fuel injector, common rail, or cylinder head with a new one, replace injection pipes No. 1, No. 2, No. 3, and No. 4.
Install the injection pipes.
Temporarily install the 4 injection pipes.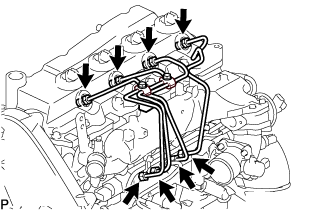
Install the injection pipe clamp No.3 in 2 nuts.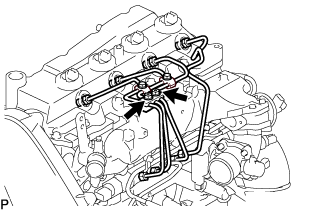
- Torque:
- 5.0 N*m{ 51 kgf*cm , 44 in.*lbf }
Fasten the union sequentially, from the injection pipe common rail to the injector, using SST.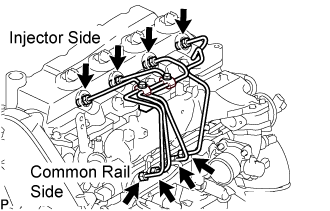
- SST
- 09023-12701
- Torque:
- Use union nut wrench and torque wrench:
- 32 N*m{ 326 kgf*cm , 24 ft.*lbf }
| 7. INSTALL OIL LEVEL GAUGE GUIDE |
Install a new O-ring to the oil level gauge guide.
Apply a light coat of engine oil to the O-ring.
Install the oil level gauge guide with the bolt.
- Torque:
- 8.0 N*m{ 82 kgf*cm , 71 in.*lbf }
Install the oil level gauge.
| 8. INSTALL INTAKE AIR CONNECTOR (w/o EGR Valve) |
Temporarily install 2 new gaskets and intake air connector No.2 to the intake air connector.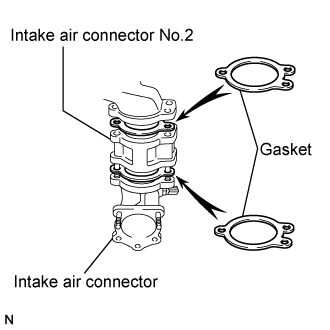
Temporarily tighten the intake air connector assembly with the bolt and 2 nuts.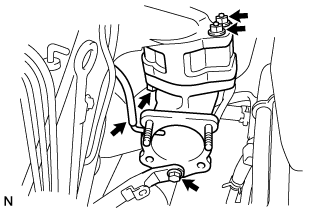
Tighten the manifold stay with the bolt.
Tighten the intake air connector with the bolt and 2 nuts.
Install the vacuum hose to the intake air connector.
| 9. INSTALL ELECTRIC EGR CONTROL VALVE ASSEMBLY (w/ EGR Valve) |
Temporarily tighten the EGR valve assembly with the sensor.
Install 2 new gaskets and the EGR valve to the intake air connector as shown in the illustration.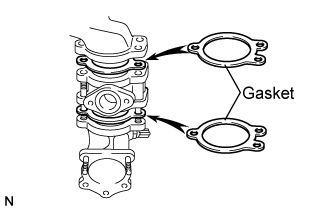
Temporarily tighten the intake air connector with EGR valve assembly to the intake manifold with the bolt and the 2 nuts.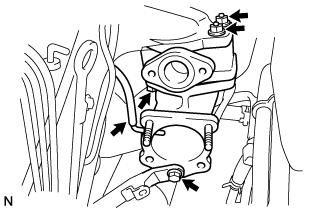
Install the vacuum hose to the intake air connector.
Temporarily tighten the manifold stay with the bolt.
Connect the EGR valve position sensor connector.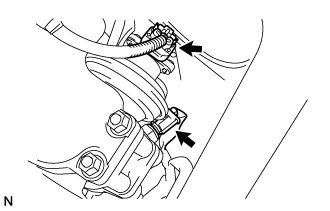
Connect the intake air temperature sensor connector.
Install the vacuum regulating valve.
Install the vacuum regulating valve with the 2 bolts.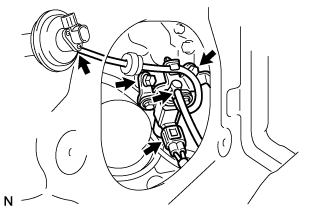
- Torque:
- 20 N*m{ 204 kgf*cm , 15 ft.*lbf }
Connect the 2 vacuum hoses and the regulating valve connector.
| 10. INSTALL ENGINE SERVICE HOLE COVER NO.2 |
Install the engine service hole cover No.2 with the 3 bolts.
- Torque:
- 13 N*m{ 133 kgf*cm , 10 ft.*lbf }
Return the carpet.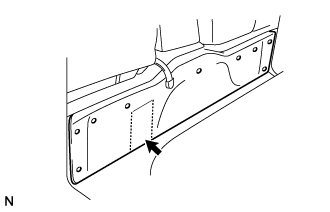
| 11. INSTALL EGR PIPE SUB-ASSEMBLY NO.1 (w/ EGR Valve) |
Install 2 new gaskets to the cylinder head and the EGR pipe sub-assembly No.1 as shown in the illustration.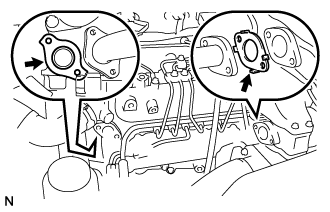
Install the EGR pipe with the 2 bolts and the 2 nuts.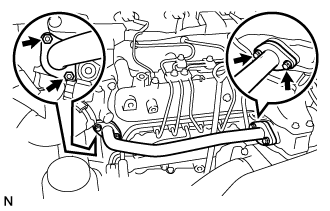
- Torque:
- 13 N*m{ 133 kgf*cm , 10 ft.*lbf }
Connect the fuel pressure sensor connector.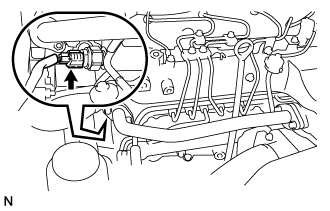
| 12. INSTALL DIESEL THROTTLE BODY ASSEMBLY |
- NOTICE:
- After removing and installing, or replacing the throttle body, be sure to perform the operation check.
Install a new gasket to intake air connector.
Install the throttle body with the 2 bolts and the 2 nuts.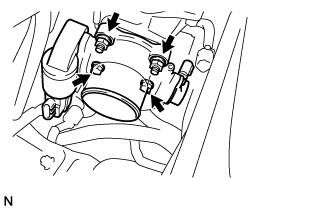
- Torque:
- 20 N*m{ 204 kgf*cm , 15 ft.*lbf }
Connect the 2 throttle body connectors.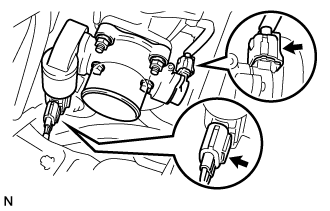
| 13. INSTALL AIR HOSE NO.4 |
Install the air hose No.4 with the 2 clamps.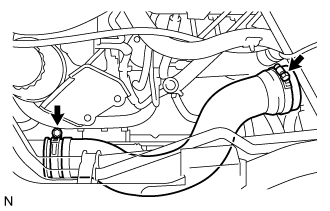
- Torque:
- 6.0 N*m{ 61 kgf*cm , 53 in.*lbf }
| 14. CONNECT OIL RETURN HOSE (w/ Inter Cooler) |
Connect the oil return hose with the clip.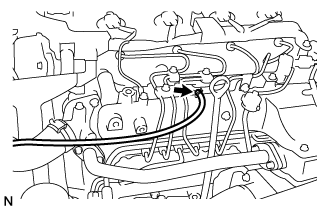
| 15. INSTALL VANE PUMP OIL RESERVOIR ASSEMBLY |
Install the vane pump oil reservoir assembly with the 2 bolts.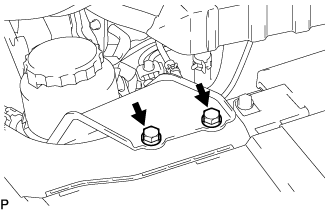
- Torque:
- 8.0 N*m{ 82 kgf*cm , 71 in.*lbf }
| 16. INSTALL ENGINE SERVICE HOLE SUB COVER ASSEMBLY |
Install the engine service hole sub cover with the 5 bolts.
- Torque:
- 13 N*m{ 133 kgf*cm , 10 ft.*lbf }
| 17. INSTALL FRONT DOOR SCUFF PLATE RH |
| 18. INSTALL FRONT SEAT ASSEMBLY RH (for Hi-back Seat Type) |
Perform the same procedure as above on the opposite side. (Click here)
| 19. INSTALL FRONT SEAT ASSEMBLY RH (for Low-back Seat Type) |
Perform the same procedure as above on the opposite side. (Click here)
| 20. CONNECT NEGATIVE BATTERY CABLE |
| 21. INSPECT FUEL LEAK |
PERFORM ACTIVE TEST
Connect the GTS to the DLC3.
Turn the ignition switch on.
Turn the GTS on.
Enter the following menus: Powertrain / Engine and ECT / Active Test.
Perform the Active Test.
Tester Display
Test Details
Control Range
Diagnostic Notes
Test the Fuel Leak
Pressurizes common rail internal fuel pressure, and checks for fuel leaks
Stop/Start
- Fuel pressure inside common rail pressurized to specified value and engine speed increased to 2,000 rpm when ON is selected
- Above conditions preserved while test is ON
- Fuel pressure inside common rail pressurized to specified value and engine speed increased to 2,000 rpm when ON is selected
| 22. INSPECT FUNCTION OF THROTTLE BODY |
Inspect the throttle control motor.
Using an ohmmeter, measure the resistance between the terminals.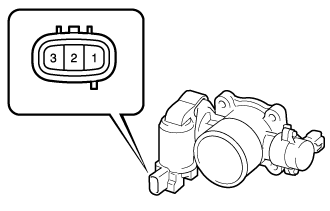
- Standard resistance:
Tester Connection
Specified Condition
1 (DUTY) - Body ground
Infinity
| 23. PERFORM INITIALIZATION |
Some system need initialization when reconnecting the battery cable. (Click here)