INSTALLATION
Removal / installation · Vehicles built Oct 2014 – Dec 2016
Versions by build date: Oct 2014 – Dec 2016 from Jan 2017
| 1. INSTALL THERMOSTAT |

Install a new gasket to the thermostat.
Install the thermostat with the jiggle valve facing up.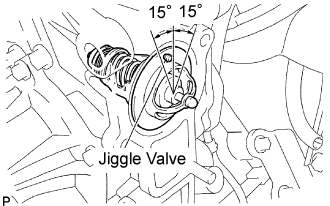

- HINT:
- The jiggle valve may be set within 15° on either side of the prescribed position.
| 2. INSTALL WATER INLET |
Install the water inlet with the 3 bolts.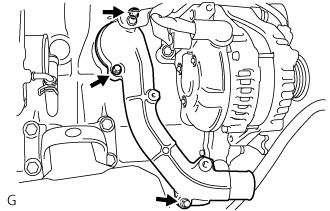
- Torque:
- 13 N*m{ 133 kgf*cm , 10 ft.*lbf }
| 3. CONNECT ENGINE WIRE |
Connect the engine wire to the bracket.
| 4. INSTALL VENTILATION PIPE |
Install the ventilation pipe with the bolt.
- Torque:
- 20 N*m{ 204 kgf*cm , 15 ft.*lbf }
| 5. INSTALL COMPRESSOR OUTLET ELBOW |
Install the compressor outlet elbow with the 2 bolts and 2 clamps.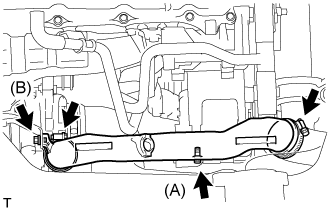
- Torque:
- Bolt (A):
- 12 N*m{ 122 kgf*cm , 9 ft.*lbf }
- Bolt (B):
- 32 N*m{ 326 kgf*cm , 24 ft.*lbf }
| 6. INSTALL AIR CLEANER HOSE ASSEMBLY |
Install the air cleaner hose assembly with the clamp.
| 7. INSTALL AIR TUBE ASSEMBLY |
Install the air tube assembly with the 2 clamps and 2 bolts.
| 8. INSTALL COMPRESSOR AND MAGNETIC CLUTCH (w/ Air Conditioning System) |
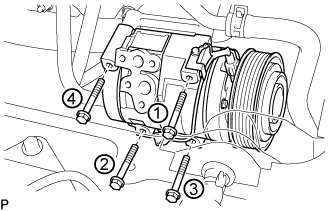 |
Provisionally tighten the compressor and magnetic clutch with the 4 bolts.
Tighten the compressor and magnetic clutch with the 4 bolts.
- Torque:
- 25 N*m{ 255 kgf*cm , 18 ft.*lbf }
- NOTICE:
- Tighten the bolts in the order shown in the illustration to install the compressor and magnetic clutch.
| 9. INSTALL FAN & GENERATOR V BELT |
Rotate the V-ribbed belt tensioner pulley clockwise, and then install the fan and generator V belt.
- NOTICE:
- Make sure that the fan and generator V belt is set properly on each pulley.
Check that the indicator mark of the V-ribbed belt tensioner (Click here).
| 10. INSTALL FENDER APRON MUDGUARD SEAL RH |
| 11. INSTALL ENGINE SERVICE HOLE SUB COVER SUB-ASSEMBLY |
Install the engine service hole sub cover with the 5 bolts.
- Torque:
- 13 N*m{ 133 kgf*cm , 10 ft.*lbf }
| 12. INSTALL FRONT DOOR SCUFF PLATE RH |
| 13. INSTALL FRONT SEAT ASSEMBLY RH (for Hi-back Seat Type) |
- HINT:
- Perform the same procedure as RH side on the LH side.
| 14. INSTALL FRONT SEAT ASSEMBLY RH (for Low-back Seat Type) |
- HINT:
- Perform the same procedure as RH side on the LH side.
| 15. CONNECT BATTERY NEGATIVE CABLE |
| 16. ADD ENGINE COOLANT |
Firmly tighten the drain plugs.
Fill the radiator reservoir assembly with engine coolant to the top of the inlet.
- Standard Capacity:
Item
Specified Condition
w/o Heater
13.2 liters (13.9 US qts, 11.6 Imp. qts)
w/ Front Heater
14.2 liters (15.0 US qts, 12.5 Imp. qts)
w/ Front and Rear Heaters
16.2 liters (17.1 US qts, 14.3 Imp. qts)
- NOTICE:
- Do not substitute plain water for engine coolant.
- HINT:
- Use of improper coolants may damage the engine cooling system.
- Use only Toyota Super Long Life Coolant or similar high quality ethylene glycol based non-silicate, non-amine, non-nitrite, and non-borate coolant with long-life hybrid organic acid technology (coolant with long-life hybrid organic acid technology consists of a combination of low phosphates and organic acids).
- Use of improper coolants may damage the engine cooling system.
Loosen the bleeder plug of the outlet housing.
When air is bled and the engine coolant drains out, firmly tighten the bleeder plug.
- Torque:
- 8.0 N*m{ 82 kgf*cm , 71 in.*lbf }
Add engine coolant up to the B line mark in the radiator reservoir assembly and install the radiator reservoir cap sub-assembly.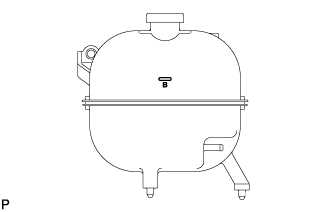
Warm up the engine until the thermostat opens.
While the thermostat is open, circulate the engine coolant for several minutes.
- HINT:
- The thermostat open timing can be confirmed by pressing the No. 3 radiator hose by hand, and checking when the engine coolant starts to flow inside the hose.
After the engine cools down, check that the engine coolant level is between the LOW and FULL level marks.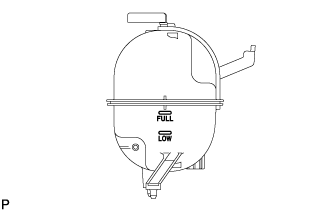
| 17. CHECK FOR ENGINE COOLANT LEAKAGE |
- CAUTION:
- Do not remove the radiator cap while the engine and radiator are still hot. Pressurized, hot engine coolant and steam may be released and cause serious burns.
Fill the radiator with coolant and attach a radiator cap tester to the radiator.
Warm up the engine.
Using a radiator cap tester, increase the pressure inside the radiator to 137 kPa (1.4 kgf/cm2, 19.9 psi), and check that the pressure does not drop.
- HINT:
- If the pressure drops, check the hoses, radiator or water pump for leaks. If no external leaks are found, check the heater core, cylinder block and cylinder head.
| 18. INSTALL ENGINE UNDER COVER NO.1 |