INSTALLATION
Removal / installation · Vehicles built from Jan 2017
Versions by build date: Oct 2014 – Dec 2014 Jan 2015 – Dec 2016 from Jan 2017
| 1. TEMPORARILY TIGHTEN BRAKE PEDAL SUPPORT ASSEMBLY |

Using the 5 bolts and nut, temporarily install the brake pedal support assembly to the dash panel.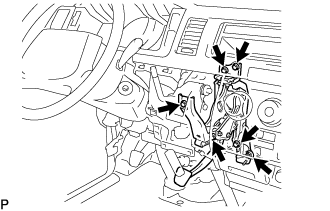

| 2. INSTALL ACCELERATOR PEDAL ROD ASSEMBLY |
Install the accelerator pedal rod assembly with the 2 nuts.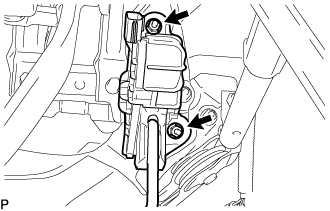
- Torque:
- 5.0 N*m{ 51 kgf*cm , 44 in.*lbf }
| 3. CONNECT WIRE HARNESS |
Connect the 2 connectors.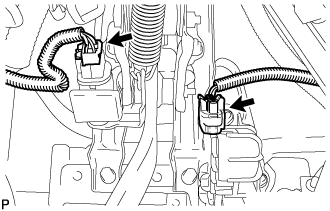
| 4. INSTALL BRAKE BOOSTER GASKET |
| 5. INSTALL BRAKE BOOSTER ASSEMBLY |
Install the brake booster assembly with the 4 nuts.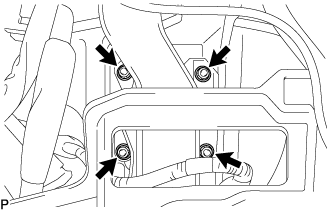
- Torque:
- 14 N*m{ 145 kgf*cm , 10 ft.*lbf }
Connect the vacuum hose with the clip.
for 2KD-FTV, 5L-E engine type:
Connect the vacuum warning switch connector to the brake booster assembly.
Attach the clamp to the bracket.
| 6. FULLY TIGHTEN BRAKE PEDAL SUPPORT ASSEMBLY |
Fully tighten the 5 bolts and nut.
- Torque:
- 31 N*m{ 316 kgf*cm , 23 ft.*lbf }
Fully tighten the nut.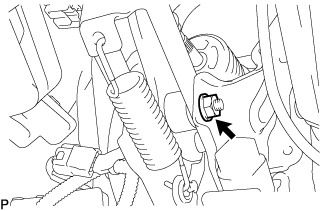
- Torque:
- 23 N*m{ 239 kgf*cm , 17 ft.*lbf }
| 7. INSTALL BRAKE TUBE |
for Automatic transmission:
Connect the 2 tubes to the clamp.
for Manual transmission:
Connect the 3 tubes to the clamp.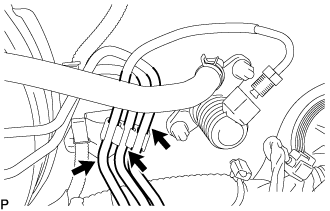
Using a union nut wrench, connect the clutch tube to the clutch master cylinder.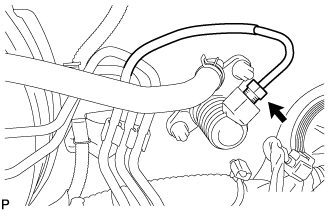
- Torque:
- 25 N*m{ 255 kgf*cm , 18 ft.*lbf }
- NOTICE:
- Use the formula to calculate special torque values for situations where a union nut wrench is combined with a torque wrench (Click here).
| 8. INSTALL MASTER CYLINDER PUSH ROD CLEVIS |
Apply a light coat of lithium soap base glycol grease to the clevis pin.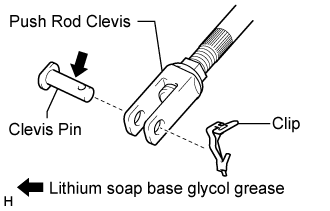
Install the push rod clevis to the brake pedal support assembly with the clevis pin and a new clip.
| 9. INSTALL INSTRUMENT PANEL FINISH PANEL LOWER |
| 10. INSTALL WINDSHIELD WASHER JAR ASSEMBLY (for LHD with Standard Body) |
| 11. INSTALL HEADLIGHT ASSEMBLY RH (for RHD with Standard Body) |
- HINT:
- Install of the headlight assembly RH is the same as the headlight assembly LH.
for Halogen Headlight:
(Click here)
for LED Headlight:
(Click here)
| 12. INSTALL HEADLIGHT ASSEMBLY RH (for RHD with Wide Body) |
- HINT:
- Install of the headlight assembly RH is the same as the headlight assembly LH.
for Halogen Headlight:
(Click here)
for LED Headlight:
(Click here)
| 13. INSTALL RADIATOR GRILLE (for LHD with Standard Body) |
| 14. INSTALL BRAKE MASTER CYLINDER |
- HINT:
- When installing the brake master cylinder, the brake booster push rod does not need to be adjusted.
Install a new O-ring to the brake master cylinder sub-assembly.
for 1KD-FTV, 2KD-FTV and 5L-E:
Install the brake master cylinder and bracket to the booster with the 2 nuts.
- Torque:
- 13 N*m{ 130 kgf*cm , 9 ft.*lbf }
- NOTICE:
- Check that the stopper of the harness clamp bracket is securely holding on the brake master cylinder assembly.
for 1TR-FE, 2TR-FE:
Install the brake master cylinder to the brake booster with the 2 nuts.
- Torque:
- 13 N*m{ 130 kgf*cm , 9 ft.*lbf }
for Manual Transmission:
Connect the clutch tube to the brake master cylinder reservoir sub-assembly with the clip.
w/o VSC:
Using a union nut wrench, connect the 2 brake tubes to the brake master cylinder.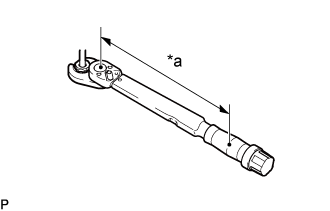
- Torque:
- Specified tightening torque:
- 15 N*m{ 155 kgf*cm , 11 ft.*lbf }
Text in Illustration *a
Torque Wrench Fulcrum Length
- HINT:
- Calculate the torque wrench reading when changing the fulcrum length of the torque wrench (Click here).
- When using a union nut wrench (fulcrum length of 22 mm (0.8661 in.)) + torque wrench (fulcrum length of 162 mm (6.3779 in.)): 13 N*m (137 kgf*cm, 10 ft.*lbf)
- Calculate the torque wrench reading when changing the fulcrum length of the torque wrench (Click here).
w/ VSC:
Using a union nut wrench, connect the 2 brake tubes to the brake master cylinder.
- Torque:
- Specified tightening torque:
- 25 N*m{ 255 kgf*cm , 18 ft.*lbf }
Text in Illustration *a
Torque Wrench Fulcrum Length
- HINT:
- Calculate the torque wrench reading when changing the fulcrum length of the torque wrench (Click here).
- When using a union nut wrench (fulcrum length of 20 mm (0.7874 in.)) + torque wrench (fulcrum length of 180 mm (7.0866 in.)): 23 N*m (229 kgf*cm, 17 ft.*lbf)
- Calculate the torque wrench reading when changing the fulcrum length of the torque wrench (Click here).
Connect the level warning light switch connector.
Attach the brake fluid level warning switch connector clamp.
| 15. ADD BRAKE FLUID |
- Fluid:
- SAE J1703 or FMVSS No. 116 DOT3 or equivalent
- NOTICE:
- Do not remove the filter from the brake master cylinder reservoir and be sure to fill with new brake fluid to avoid any potential contamination of the brake system. Contamination, for example by dirt particles or mineral oil, could lead to functional brake problems.
| 16. BLEED BRAKE MASTER CYLINDER |
- HINT:
- If the master cylinder has been disassembled or if the reservoir becomes empty, bleed the air from the master cylinder.
Using a union nut wrench, disconnect the brake lines from the master cylinder.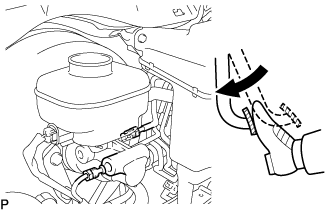
Slowly depress the brake pedal and hold it there.
Block the outer holes with your fingers, and release the brake pedal.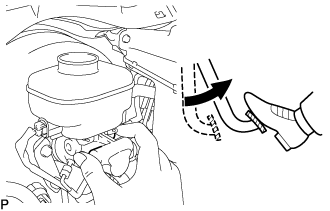
Remove your fingers. Slowly depress the brake pedal and hold it again. Block the outer holes with your fingers and release the brake pedal. Repeat this procedure 3 or 4 times.
Using a union nut wrench, connect the brake lines to the master cylinder.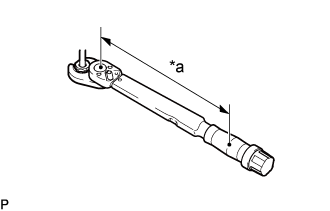
- Torque:
- Specified tightening torque:
- 15 N*m{ 155 kgf*cm , 11 ft.*lbf }
Text in Illustration *a
Torque Wrench Fulcrum Length
- HINT:
- Calculate the torque wrench reading when changing the fulcrum length of the torque wrench (Click here).
- When using a union nut wrench (fulcrum length of 22 mm (0.8661 in.)) + torque wrench (fulcrum length of 162 mm (6.3779 in.)): 13 N*m (137 kgf*cm, 10 ft.*lbf)
- Calculate the torque wrench reading when changing the fulcrum length of the torque wrench (Click here).
| 17. BLEED BRAKE LINE |
Connect the vinyl tube to the bleeder plug.
Depress the brake pedal several times and loosen the bleeder plug with the pedal held down.
At the point where the fluid stops coming out, tighten the bleeder plug and release the brake pedal.
Repeat this procedure until the air in the brake fluid is completely bled out.
Tighten the bleeder plug.
Front bleeder plug:
- Torque:
- 11 N*m{ 110 kgf*cm , 8 ft.*lbf }
Rear bleeder plug:
- Torque:
- 11 N*m{ 112 kgf*cm , 8 ft.*lbf }
Repeat the above procedure to bleed the air out of the brake line for each wheel.
| 18. INSPECT BRAKE FLUID LEVEL |
Check the fluid level and add fluid if necessary.
- Fluid:
- SAE J1703 or FMVSS No.116 DOT3 or equivalent
- NOTICE:
- Do not remove the filter from the brake master cylinder reservoir and be sure to fill with new brake fluid to avoid any potential contamination of the brake system. Contamination, for example by dirt particles or mineral oil, could lead to functional brake problems.
| 19. CHECK BRAKE FLUID LEAKAGE |
| 20. VEHICLE PREPARATION FOR HEADLIGHT AIMING ADJUSTMENT |
for Halogen Headlight:
(Click here)
for LED Headlight:
(Click here)
| 21. PREPARATION FOR HEADLIGHT AIMING (USING A SCREEN) |
for Halogen Headlight:
(Click here)
for LED Headlight:
(Click here)
| 22. INSPECT HEADLIGHT AIMING |
for Halogen Headlight:
(Click here)
for LED Headlight:
(Click here)
| 23. ADJUST HEADLIGHT AIMING |
for Halogen Headlight:
(Click here)
for LED Headlight:
(Click here)
| 24. INSPECT BRAKE PEDAL HEIGHT |
Check brake pedal height.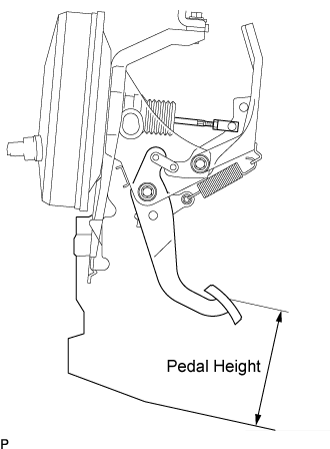
- Pedal height from floor:
- 151 to 161 mm (5.945 to 6.339 in.) for left hand drive
- 154 to 164 mm (6.063 to 6.457 in.) for right hand drive
| 25. ADJUST BRAKE PEDAL HEIGHT |
Disconnect the stop light switch connector.
Turn the stop light switch assembly counter-clockwise and remove it.
Remove the brake booster (Click here).
Loosen the push rod lock nut.
Adjust the pedal height by turning the pedal push rod clevis.
Tighten the push rod lock nut.
- Torque:
- 26 N*m{ 260 kgf*cm , 19 ft.*lbf }
Install the brake booster (Click here).
Insert the stop light switch into the adjuster until it slightly touches the cushion.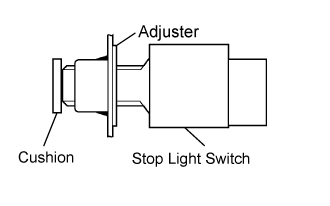
- CAUTION:
- Do not depress the brake pedal.
Turn the stop light switch assembly clockwise by approximately 90°.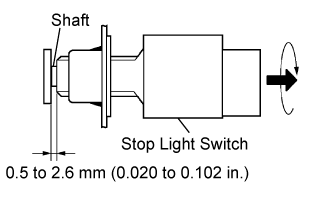
- CAUTION:
- Do not depress the brake pedal.
Connect the stop light switch connector.
Check the clearance of the shaft.
- Clearance:
- 0.5 to 2.6 mm (0.020 to 0.102 in.)
| 26. INSPECT BRAKE PEDAL FREE PLAY |
Stop the engine and depress the brake pedal several times until there is no more vacuum left in the booster.
Push in the pedal until the beginning of the resistance is felt. Measure the distance as shown in the illustration.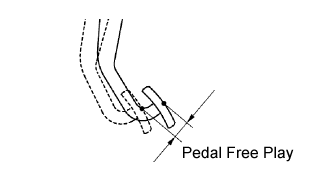
- Pedal free play:
- 1.0 to 6.0 mm (0.039 to 0.236 in.)
| 27. INSPECT BRAKE PEDAL RESERVE DISTANCE |
Stop the engine and depress the brake pedal several times until there is no more vacuum left in the booster.
Release the parking brake handle.
With the engine running, depress the pedal and measure the pedal reserve distance as shown in the illustration.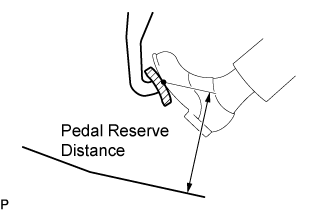
- Pedal reserve distance from floor:
- More than 117 mm (4.61 in.) at 500 N (51 kgf, 112.5 lbf) for left hand drive
- More than 120 mm (4.72 in.) at 500 N (51 kgf, 112.5 lbf) for right hand drive
- NOTICE:
- Remove the floor mat before measuring the distance.