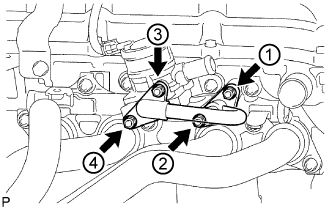
Install the air switching valve assembly with 2 new nuts.
Torque:
20 N*m{
204 kgf*cm
, 15 ft.*lbf
}
Connect the air switching valve connector.
2.
INSTALL NO. 4 INTAKE PIPE
Install 2 new gaskets and the No. 4 intake pipe with 4 new nuts in the order shown in the illustration. Tighten the nuts labeled 1 and 3 to the torque specification again.
Torque:
20 N*m{
204 kgf*cm
, 15 ft.*lbf
}
Check that the nuts are tightened to the torque specification.
NOTICE:
Tightening the nuts only once is not enough to tighten them to the torque specification.
3.
INSTALL NO. 1 EXHAUST MANIFOLD HEAT INSULATOR
Install the No. 1 exhaust manifold heat insulator with the 4 bolts.
Torque:
12 N*m{
122 kgf*cm
, 9 ft.*lbf
}
4.
INSTALL AIR PUMP INLET PIPE
Install the air pump inlet pipe with the 2 bolts.
Torque:
18 N*m{
184 kgf*cm
, 13 ft.*lbf
}
Connect the No. 5 air hose, and slide the clamp to secure the hose.
Connect the No. 6 air hose, and slide the clamp to secure the hose.
5.
INSTALL BATTERY SERVICE HOLE COVER
6.
INSTALL ENGINE SERVICE HOLE SUB COVER SUB-ASSEMBLY
Install the engine service hole cover sub-assembly with the 5 bolts.