2014-2019 Hiace · Service Manual BODY

REMOVAL

Removal / installation · Vehicles built Jan 2015 – Mar 2016

Versions by build date: Oct 2014 – Dec 2014 Jan 2015 – Mar 2016 Apr 2016 – Dec 2016 from Jan 2017


1. PRECAUTION

NOTICE:
After turning the ignition switch off, waiting time may be required before disconnecting the cable from the negative (-) battery terminal. Therefore, make sure to read the disconnecting the cable from the negative (- ) battery terminal notices before proceeding with work (Click here).


2. DISCONNECT CABLE FROM NEGATIVE BATTERY TERMINAL

NOTICE:
When disconnecting the cable, some systems need to be initialized after the cable is reconnected (Click here).


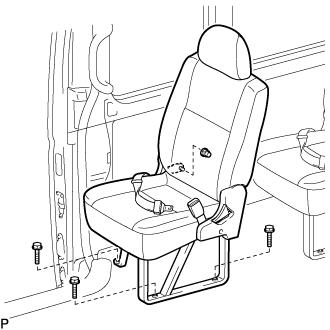
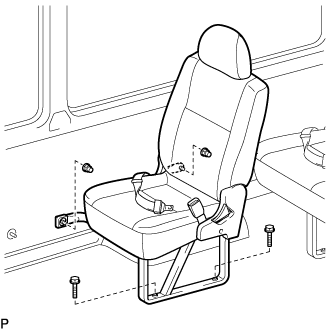
3. REMOVE REAR NO. 1 SEAT ASSEMBLY

  1. B107585
    First row:

    1. Remove the 3 bolts, nut and rear No.1 seat assembly.

  1. B107586
    Second row:

    1. Remove the 2 bolts, 2 nuts and rear No.1 seat assembly.


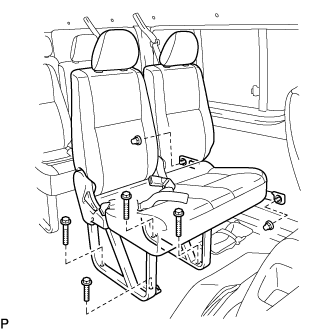
4. REMOVE REAR NO. 2 SEAT ASSEMBLY

  1. B107603
    Remove the 4 bolts, 2 nuts and rear No.2 seat assembly.

    HINT:
    1. Use the same procedure for the second row.
    2. Use the same procedure for the third row.


5. REMOVE REAR NO. 3 SEAT ASSEMBLY
  1. for Bench Type Seatback:
    Remove the rear No. 3 seat assembly (Click here).

  1. for Separate Type Seatback:
    Remove the rear No. 3 seat assembly (Click here).


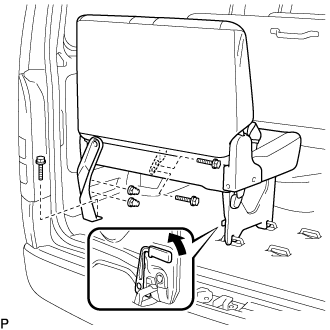
6. REMOVE REAR NO. 4 SEAT ASSEMBLY

  1. B107625
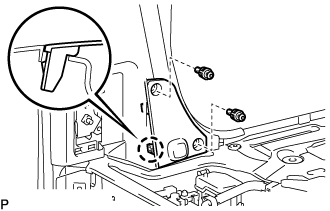
    Remove the 3 bolts and 2 nuts.

  1. Pull the lever in the direction indicated by the arrow in the illustration, release the 2 locks, and remove the rear No.4 seat assembly.


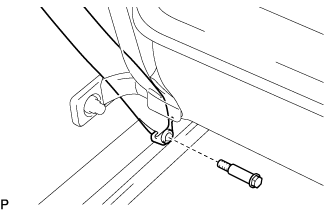
7. REMOVE REAR SEAT BELT ASSEMBLY OUTER

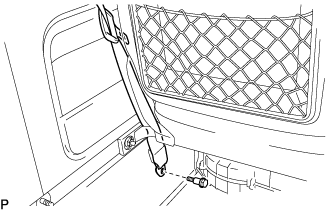
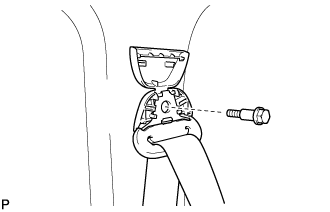
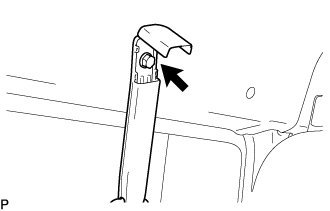
  1. B107659
    Remove the bolt and disconnect the floor side of the rear seat belt assembly outer.

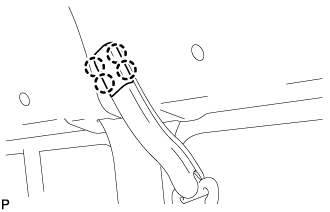
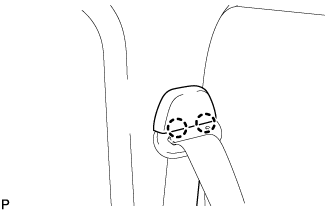
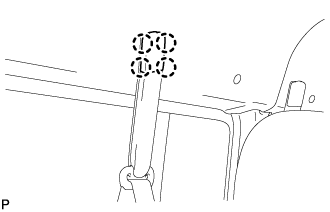
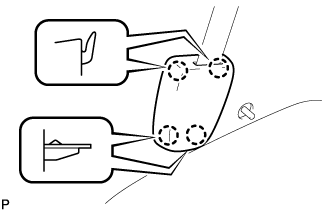
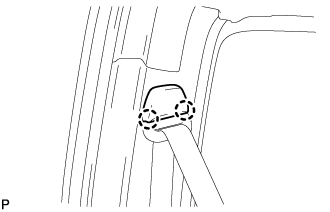
  1. B107660
    Using a screwdriver, detach the 4 claws and open the shoulder side cover of the rear seat belt assembly outer.

    HINT:
    Tape the screwdriver tip before use.

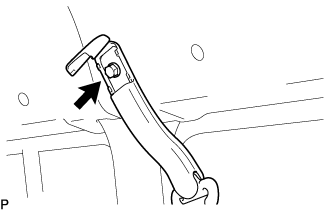
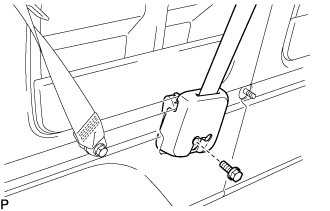
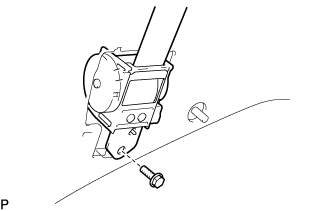
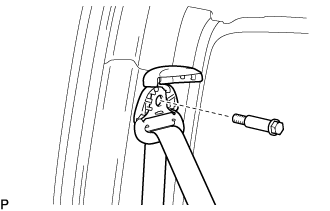
  1. B107661
    Loosen the bolt and disconnect the shoulder side of the rear seat belt assembly outer.

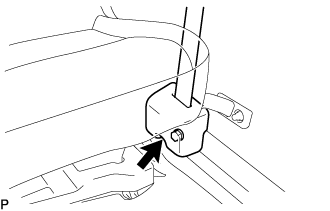
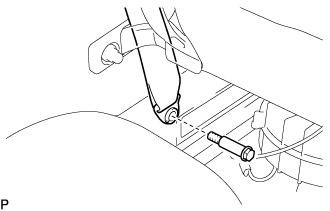
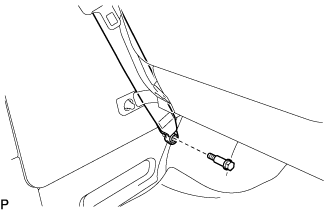
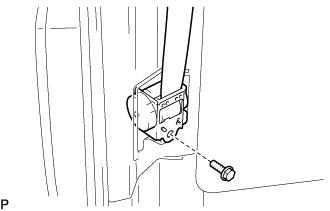
  1. B107662
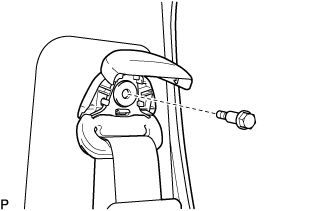
    Loosen the bolt and remove the rear seat belt assembly outer.

  1. for Rear No. 1 Seat Bench Seat Type:

    1. B357157
      w/ Cover:
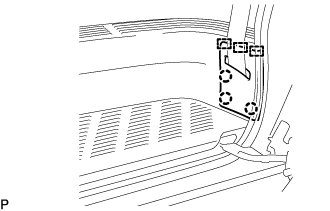
      Detach the 3 claws and 3 guides, and then remove the side trim cover.

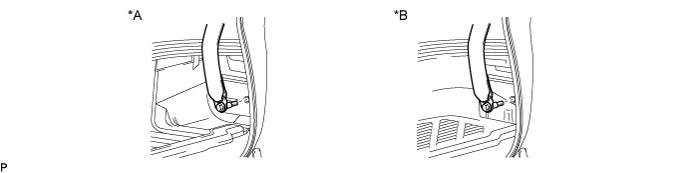
    2. Loosen the bolt and disconnect the floor side of the rear seat belt assembly outer.

      B357158E01

      Text in Illustration 
      *A
      w/o Cover
      *B
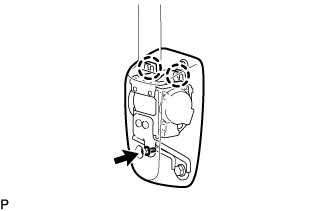
      w/ Cover

    3. B357159
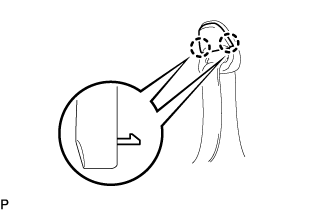
      Using a screwdriver, detach the 2 claws and open the shoulder side cover of the rear seat belt assembly outer.

      HINT:
      Tape the screwdriver tip before use.

    4. B357160
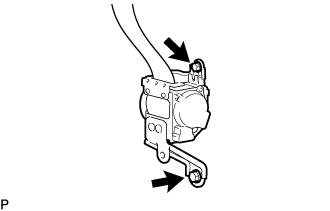
      Loosen the bolt and disconnect the shoulder side of the rear seat belt assembly outer.

    5. B357161
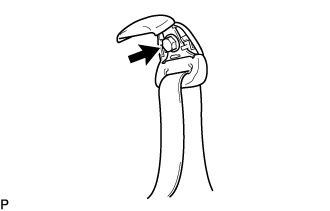
      Loosen the bolt.

    6. Detach the 2 claws and remove the retractor cover of the rear seat belt assembly outer.

    7. B357162
      Remove the 2 bolts and rear seat belt assembly outer.

  1. w/ Cover:

    1. Remove the bolt from the floor side of the rear seat belt assembly outer.

    2. Remove the side trim cover from the rear seat belt assembly outer.


8. REMOVE REAR NO. 2 SEAT BELT ASSEMBLY OUTER

  1. B105614
    Remove the bolt and disconnect the floor side of the rear No. 2 seat belt assembly outer.

  1. B105615
    Using a screwdriver, detach the 2 claws and open the shoulder side cover of the rear No. 2 seat belt assembly outer.

    HINT:
    Tape the screwdriver tip before use.

  1. B105616
    Remove the bolt and disconnect the shoulder side of the rear No. 2 seat belt assembly outer.

  1. B105617
    Remove the bolt and rear No. 2 seat belt assembly outer.


9. REMOVE REAR NO. 3 SEAT BELT ASSEMBLY OUTER

  1. B107664
    Remove the bolt and disconnect the floor side of the rear No. 3 seat belt assembly outer.

  1. B107665
    Using a screwdriver, detach the 4 claws and open the shoulder side cover of the rear No. 3 seat belt assembly outer.

    HINT:
    Tape the screwdriver tip before use.

  1. B107666
    Loosen the bolt and disconnect the shoulder side of the rear No. 3 seat belt assembly outer.

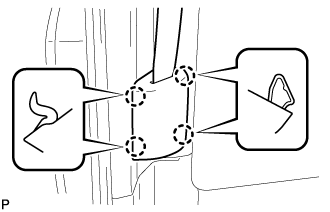
  1. B107667
    Using a screwdriver, detach the 4 claws and remove the retractor cover of the rear No. 3 seat belt assembly outer.

    HINT:
    Tape the screwdriver tip before use.

  1. B107668
    Remove the bolt and rear No. 3 seat belt assembly outer.


10. REMOVE REAR NO. 4 SEAT BELT ASSEMBLY OUTER

  1. B107670
    Remove the bolt and disconnect the floor side of the rear No. 4 seat belt assembly outer.

  1. B107671
    Using a screwdriver, detach the 2 claws and open the shoulder side cover of the rear No. 4 seat belt assembly outer.

    HINT:
    Tape the screwdriver tip before use.

  1. B107672
    Remove the bolt and disconnect the shoulder side of the rear No. 4 seat belt assembly outer.

  1. B107673
    Using a screwdriver, detach the 4 claws and remove the retractor cover of the rear No. 4 seat belt assembly outer.

    HINT:
    Tape the screwdriver tip before use.

  1. B107674
    Remove the bolt and rear No. 4 seat belt assembly outer.


11. REMOVE FRONT DOOR SCUFF PLATE LH

  1. B115746
    Detach the 5 clips and remove the front door scuff plate LH.


12. REMOVE FRONT DOOR SCUFF PLATE RH

HINT:
Use the same procedures described for the LH side.


13. REMOVE FRONT DOOR OPENING TRIM LH

14. REMOVE FRONT DOOR OPENING TRIM RH

15. DISCONNECT FRONT SEAT OUTER BELT ASSEMBLY RH

  1. B103254
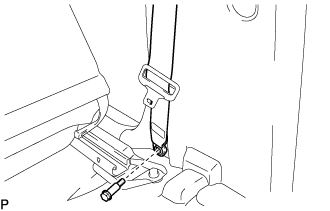
    Remove the bolt and disconnect front seat outer belt assembly RH.

  1. B101641E02
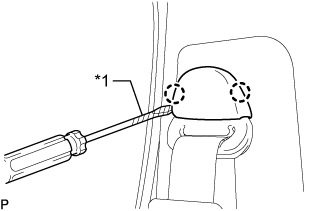
    Using a screwdriver, detach the 2 claws and open the cover.

    HINT:
    Tape the screwdriver tip before use.

    Text in Illustration 
    *1
    Protective Tape

  1. B101642
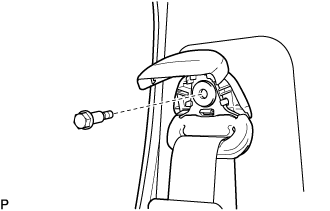
    Remove the bolt and disconnect front seat outer belt assembly RH.


16. REMOVE CENTER PILLAR GARNISH COVER LOWER LH

  1. B106189E01
    Remove the clip.

  1. Using a screwdriver, detach the 4 clips and remove the center pillar garnish lower RH.

    HINT:
    Tape the screwdriver tip before use.


17. REMOVE SEAT ASSEMBLY LH
  1. Disconnect connector.

  1. B106197
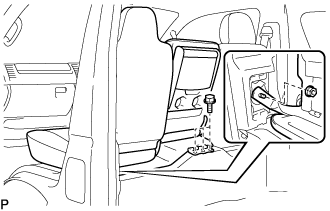
    Remove the nut and 3 bolts.

  1. Remove the seat assembly LH.


18. REMOVE SEAT BELT ANCHOR COVER

  1. B103255E01
    Remove the 2 clips.

  1. Detach the claw and then remove the seat belt anchor cover.


19. DISCONNECT FRONT SEAT OUTER BELT ASSEMBLY LH

  1. B103256
    Remove the bolt and disconnect the front seat outer belt assembly LH.

  1. B103245E02
    Using a screwdriver, detach the 2 claws and open the cover.

    HINT:
    Tape the screwdriver tip before use.

    Text in Illustration 
    *1
    Protective Tape

  1. B103246
    Remove the bolt and disconnect the front seat outer belt assembly LH.


20. REMOVE REAR DOOR SCUFF PLATE RH

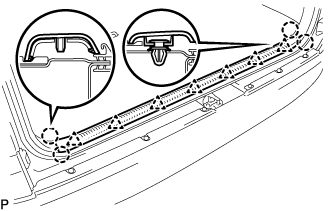
  1. B113347
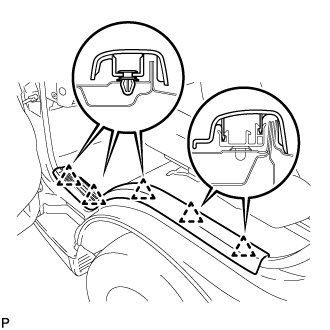
    Detach the 11 clips and remove the rear door scuff plate RH.


21. REMOVE SLIDE DOOR WEATHERSTRIP NO. 1 RH

22. REMOVE BACK DOOR SCUFF PLATE

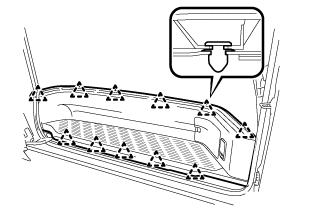
  1. B106176E01
    Detach the 7 clips and 4 claws and remove the back door scuff plate.


23. REMOVE BACK DOOR WEATHERSTRIP

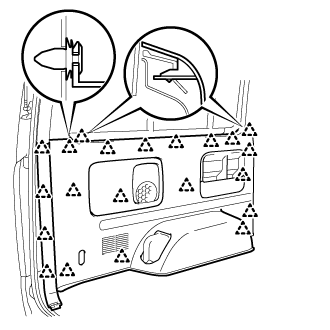
24. REMOVE QUARTER TRIM PANEL ASSEMBLY REAR LH (for Middle Roof)

  1. B113270
    Detach the 21 clips and remove the quarter trim panel assembly rear LH.


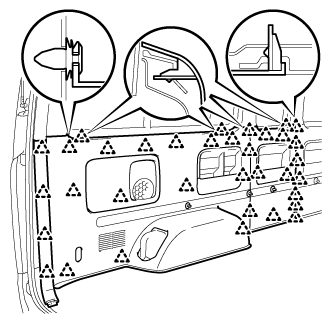
25. REMOVE QUARTER TRIM PANEL ASSEMBLY REAR LH (for High Roof)

  1. B113348
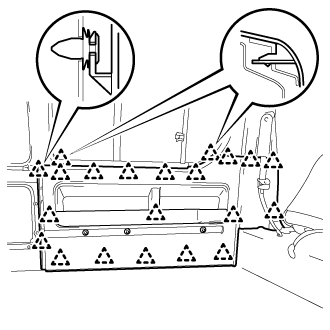
    Detach the 35 clips and remove the quarter trim panel assembly rear LH.


26. REMOVE QUARTER TRIM PANEL ASSEMBLY REAR RH

HINT:
Use the same procedures described for the LH side.
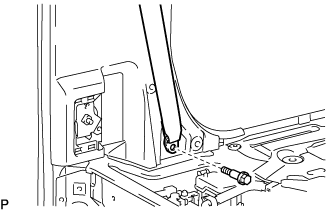

27. REMOVE SIDE NO. 1 TRIM ASSEMBLY LH
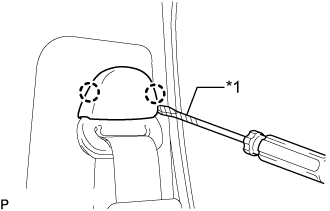
  1. B113349
    Detach the 21 clips and remove the side No. 1 trim assembly LH.


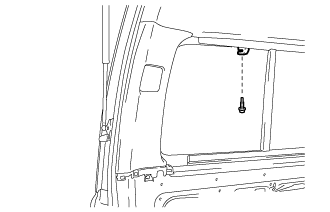
28. REMOVE ENGINE SERVICE HOLE COVER HOOK NO. 2 LH

  1. B112983
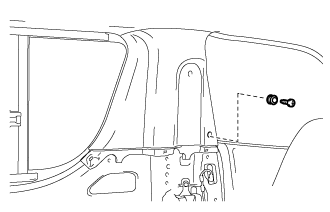
    Remove the screw and engine service hole cover hook No. 2 LH.


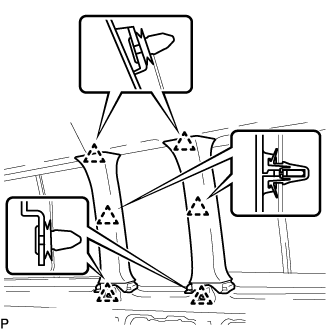
29. REMOVE CENTER PILLAR GARNISH LH

  1. B113350
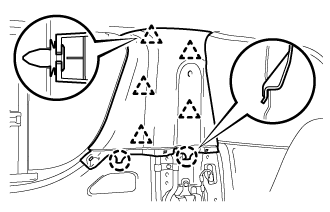
    Detach the 5 clips and 2 claws, and remove the center pillar garnish LH.


30. REMOVE ASSIST GRIP PLUG

  1. B113268
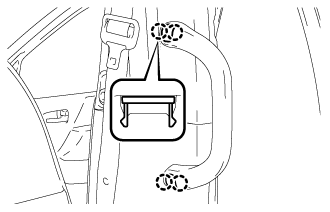
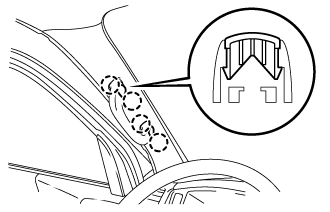
    Using a screwdriver, detach the 4 claws and remove the 2 assist grip plugs.

    HINT:
    Tape the screwdriver tip before use.


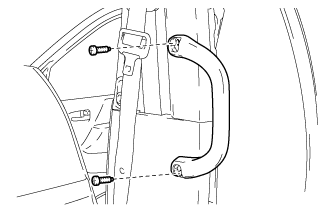
31. REMOVE ASSIST GRIP ASSEMBLY REAR

  1. B113269
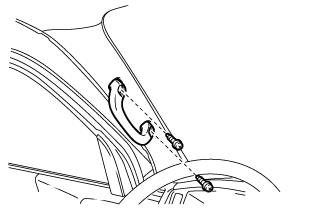
    Remove the 2 screws and assist grip assembly rear.


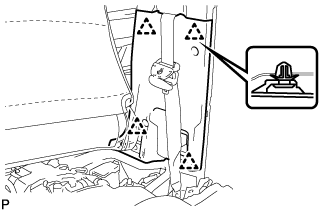
32. REMOVE CENTER PILLAR GARNISH LOWER RH

  1. B113012
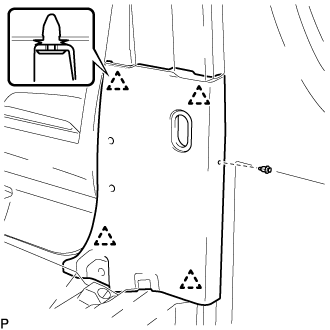
    Detach the 4 claws and remove the center pillar garnish lower RH.


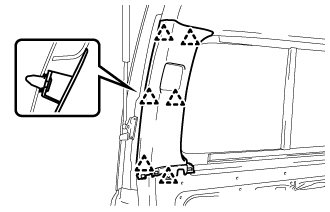
33. REMOVE CENTER PILLAR GARNISH RH

  1. B113351
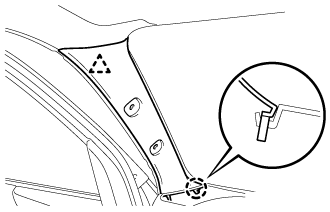
    Detach the 3 clips, claw and remove the center pillar garnish RH.


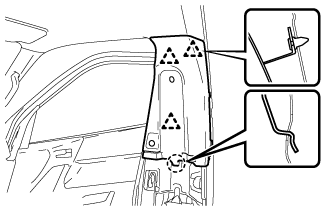
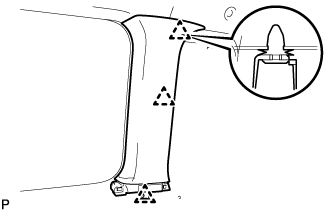
34. REMOVE QUARTER PILLAR GARNISH LH (for High Roof)

  1. B106184E02
    Detach the 6 clips and remove the quarter pillar garnish LH.


35. REMOVE QUARTER PILLAR GARNISH RH (for High Roof)

HINT:
Use the same procedures described for the LH side.


36. REMOVE QUARTER PILLAR GARNISH LH (for Middle Roof)

  1. B113273
    Detach the 3 clips and remove the quarter pillar garnish LH.


37. REMOVE QUARTER PILLAR GARNISH RH (for Middle Roof)

HINT:
Use the same procedures described for the LH side.


38. REMOVE ROOF SIDE GARNISH INNER UPPER LH

  1. B113352
    Using a screwdriver, detach the 6 clips and remove the roof side garnish inner upper LH.

    HINT:
    Tape the screwdriver tip before use.


39. REMOVE ROOF SIDE GARNISH INNER UPPER RH

HINT:
Use the same procedures described for the LH side.


40. REMOVE REAR SEAT HOOK (for Space Up Seat)

  1. B113353
    Remove the bolt and rear seat hook.


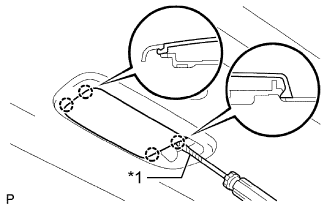
41. REMOVE ROOM LIGHT ASSEMBLY NO. 2 (Deluxe)

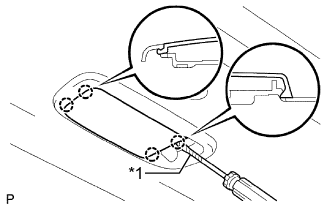
  1. B070797E03
    Using a screwdriver, detach the 4 claws and remove the room light lens cover.

    HINT:
    Tape the screwdriver tip before use.

    Text in Illustration 
    *1
    Protective Tape

  1. B103034
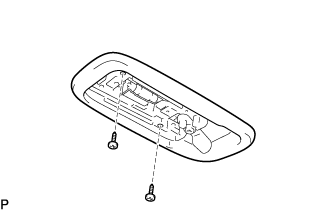
    Remove the 2 screws and room light assembly No. 2.

  1. Disconnect the connector.


42. REMOVE ROOM LIGHT ASSEMBLY NO. 2 (Super Wagon)

  1. B113362
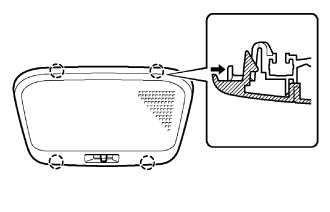
    Using a screwdriver, detach the 4 claws and remove the room light base.

    HINT:
    Tape the screwdriver tip before use.

  1. Remove the 2 screws.

  1. B113363E01
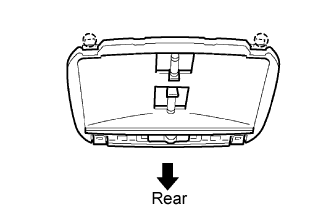
    Pull the room light assembly No. 2 rearward and detach the 2 claws and remove it.

  1. Disconnect the connector.


43. REMOVE ROOF HEADLINING NO. 2 (for Middle Roof)

  1. B103048E01
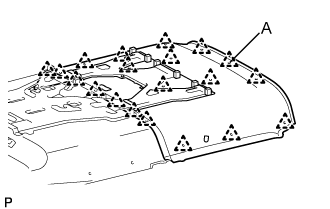
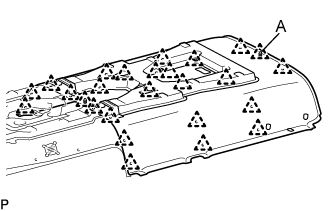
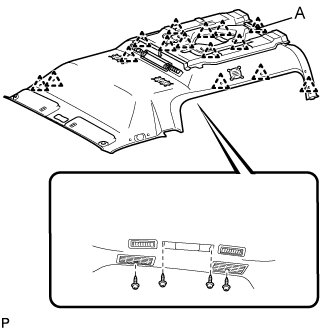
    Using a clip remover, remove the 19 clips.

  1. Using a clip remover, detach the clip A and remove the roof headlining No. 2.


44. REMOVE ROOF HEADLINING NO. 2 (for High Roof)

B110051E01
  1. Using a clip remover, remove the 25 clips.

  1. Using a clip remover, detach the clip A and remove the roof headlining No. 2.


45. REMOVE FRONT ASSIST GRIP PLUG NO. 1

  1. B113343
    Using a screwdriver, detach the 4 claws and remove the 2 front assist grip plugs No. 1.

    HINT:
    1. Tape the screwdriver tip before use.
    2. Use the same procedures described for the other side.


46. REMOVE ASSIST GRIP ASSEMBLY

  1. B113344
    Remove the 2 screws and assist grip assembly.

    HINT:
    Use the same procedures described for the other side.


47. REMOVE FRONT PILLAR GARNISH LH

  1. B113345
    Detach the clip and claw and remove the front pillar garnish LH.


48. REMOVE FRONT PILLAR GARNISH RH

HINT:
Use the same procedures described for the LH side.


49. REMOVE ASSIST GRIP

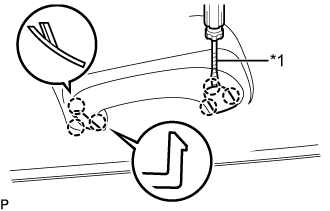
  1. B103023E02
    Using a screwdriver, detach the 6 claws and open the 2 assist grip covers.

    HINT:
    Tape the screwdriver tip before use.

    Text in Illustration 
    *1
    Protective Tape

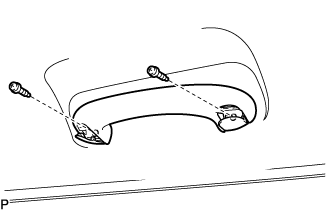
  1. B103024
    Remove the 2 screws and assist grip.


50. REMOVE VISOR ASSEMBLY LH

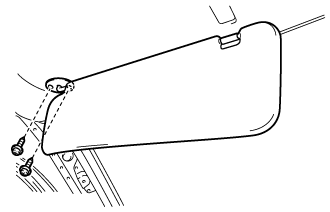
  1. B113346
    Remove the 2 screws and visor assembly LH.


51. REMOVE VISOR ASSEMBLY RH

HINT:
Use the same procedures described for the LH side.


52. REMOVE VISOR HOLDER

HINT:
Use the same procedures described for the other side.

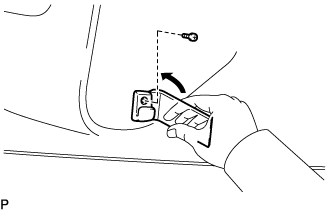
  1. B103025
    Remove the screw.

  1. Using a moulding remover, detach the claw and remove the visor holder.


53. REMOVE ROOM LIGHT ASSEMBLY NO. 1 (Deluxe)

  1. B070797E04
    Using a screwdriver, detach the 4 claws and remove the room light lens cover.

    HINT:
    Tape the screwdriver tip before use.

    Text in Illustration 
    *1
    Protective Tape

  1. B103034
    Remove the 2 screws and room light assembly No. 1.

  1. Disconnect the connector.


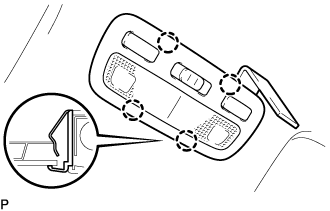
54. REMOVE MAP LIGHT ASSEMBLY (Super Wagon)

  1. B103027E01
    Using a moulding remover, detach the 4 claws and map light assembly.

  1. Disconnect the connector.


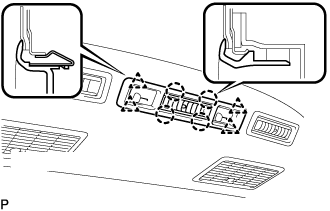
55. REMOVE REAR COOLER CONTROL PANEL

  1. E108775E01
    Release the 4 clips and 4 claws, and disconnect the rear cooler control panel.

  1. Disconnect the connector and remove the rear cooler control panel.


56. REMOVE ROOF HEADLINING NO. 1 (for Middle Roof)

  1. B112984E03
    Remove the 4 screws.

  1. Using a clip remover, remove the 8 clips.

  1. Using a clip remover, detach the clip A and remove the roof headlining No. 1.


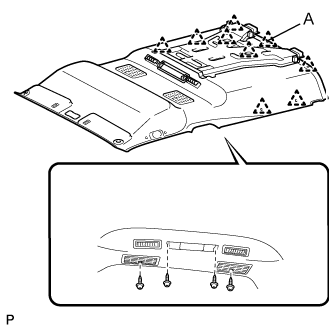
57. REMOVE ROOF HEADLINING NO. 1 (for High Roof)

B112985E03
  1. Remove the 4 screws.

  1. Using a clip remover, remove the 14 clips.

  1. Using a clip remover, detach the clip A and remove the roof headlining No. 1.

← REMOVAL (Oct 2014 – Dec 2014)REMOVAL (Apr 2016 – Dec 2016) →