DIAGNOSIS SYSTEM
Troubleshooting · Vehicles built Oct 2014 – Dec 2014
Versions by build date: Oct 2014 – Dec 2014 from Jan 2015
| M-OBD (EXCEPT EUROPEAN SPEC.) |
When troubleshooting Multiplex On-Board Diagnostic (M-OBD) vehicles, the vehicle must be connected to the Intelligent Tester. Various data output from the ECM can then be read.
OBD regulations require that the vehicle's on-board computer illuminates the MIL on the instrument panel when the computer detects a malfunction in:

The emission control system/components.
The powertrain control components (which affect vehicle emissions).
The computer.
In addition to, the applicable DTCs are recorded in the ECM memory. If the malfunction does not recur in 3 consecutive trips, the MIL goes off automatically but the DTCs remain recorded in the ECM memory.
To check DTCs, connect the intelligent tester to the Data link Connector 3 (DLC3) of the vehicle.
The scan tool displays DTCs, the freeze frame data and a variety of the engine data.
The DTCs and freeze frame data can be erased with the scan tool (Click here).
| FREEZE FRAME DATA |
The ECM records vehicle and driving condition information as freeze frame data the moment a DTC is stored. When troubleshooting, freeze frame data can be helpful in determining whether the vehicle was moving or stationary, whether the engine was warmed up or not, whether the air-fuel ratio was lean or rich, as well as other data recorded at the time of a malfunction.
| DLC3 (Data Link Connector 3) |
The vehicle's ECM uses the ISO 9141-2 (Euro-OBD)/ISO 14230 (M-OBD) communication protocol. The terminal arrangement of the DLC3 complies with ISO 15031-03 and matches the ISO 9141-2/ISO 14230 format.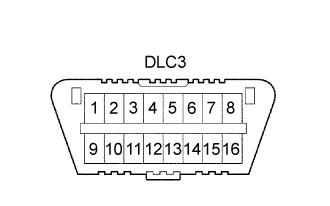
- HINT:
- Connect the cable of the Intelligent Tester to the DLC3, turn the ignition switch to ON and attempt to use the intelligent tester. If the screen displays a communication error message, a problem exists on the vehicle side or the tester side.
If communication is still impossible when the tool is connected to another vehicle, the problem is probably in the tool itself. Consult the Service Department listed in the tool's instruction manual.Symbol
Terminal No.
Name
Reference terminal
Result
Condition
SIL
7
Bus "+" line
5 - Signal ground
Pulse generation
During transmission
CG
4
Chassis ground
Body ground
1 Ω or less
Always
SG
5
Signal ground
Body ground
1 Ω or less
Always
BAT
16
Battery positive
Body ground
11 to 14 V
Always
CANH
6
HIGH-level CAN bus line
14 - LOW-level CAN bus line
54 to 69 Ω
Ignition switch off
CANH
6
HIGH-level CAN bus line
16 - Battery Positive
1 MΩ or higher
Ignition switch off
CANH
6
HIGH-level CAN bus line
4 - Chassis ground
1 kΩ or higher
Ignition switch off
CANL
14
LOW-level CAN bus line
16 - Battery positive
1 MΩ or higher
Ignition switch off
CANL
14
LOW-level CAN bus line
4 - Chassis ground
1 kΩ or higher
Ignition switch off
| INSPECT BATTERY VOLTAGE |
- Battery Voltage:
- 11 to 14 V
| CHECK MIL |
Check that the MIL illuminates when turning the ignition switch to ON.
If the MIL does not illuminate, there is a problem in the MIL circuit (Click here).When the engine is started, the MIL should go off.