Transmission Control Switch Circuit
Circuit diagnosis · Vehicles built Jan 2015 – Nov 2015
Versions by build date: Jan 2015 – Nov 2015 Dec 2015 – Mar 2016 Apr 2016 – Dec 2016 from Jan 2017
DESCRIPTION
After moving the shift lever to S, it is possible to switch the shift range between "1" (S1 range) and "6" (S6 range) using the transmission control switch.Moving the shift lever to "+" once raises the shift range by one, and moving the shift lever to "-" once lowers the shift range by one.
WIRING DIAGRAM
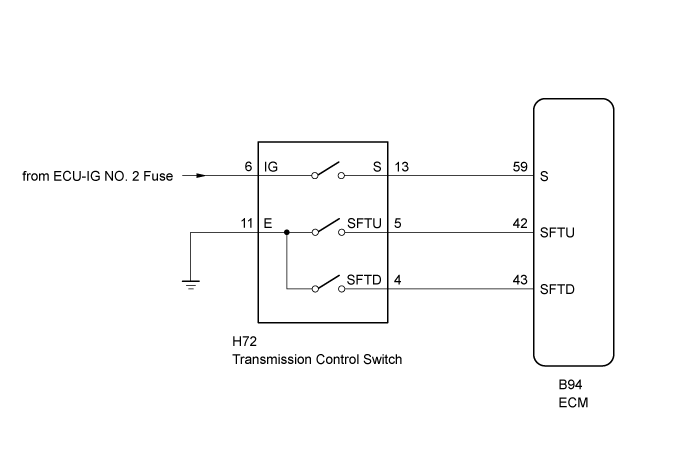

INSPECTION PROCEDURE
- NOTICE:
- Inspect the fuses for circuits related to this system before performing the following inspection procedure.
| 1. READ VALUE USING GTS (SPORTS MODE SELECTION SW) |

Connect the GTS to the DLC3.
Turn the ignition switch to ON.
Turn the GTS on.
Enter the following menus: Powertrain / Engine and ECT / Data List.
In accordance with the display on the GTS, read the Data List.
Engine and ECT Tester Display
Measurement Item/Range
Normal Condition
Diagnostic Note
Sports Mode Selection SW
Sport mode select switch status/
ON or OFF
- ON: Shift lever in S, "+" or "-"
- OFF: Shift lever not in S, "+" or "-"
-
- ON: Shift lever in S, "+" or "-"
| Result |
Proceed to |
| Data display is within Normal Condition range |
A |
| Data display is not within Normal Condition range |
B |
|
|
||||

| A | |
 |
| 2. READ VALUE USING GTS (SPORTS SHIFT UP SW AND SPORTS SHIFT DOWN SW) |
Connect the GTS to the DLC3.
Turn the ignition switch to ON.
Turn the GTS on.
Enter the following menus: Powertrain / Engine and ECT / Data List.
In accordance with the display on the GTS, read the Data List.
Engine and ECT Tester Display
Measurement Item/Range
Normal Condition
Diagnostic Note
Sports Shift Up SW
Sport shift up switch status/
ON or OFF
- ON: Shift lever held in "+" (up-shift)
- OFF: Shift lever not held in "+" (up-shift)
-
Sports Shift Down SW
Sport shift down switch status/
ON or OFF
- ON: Shift lever held in "-" (down-shift)
- OFF: Shift lever not held in "-" (down-shift)
-
- ON: Shift lever held in "+" (up-shift)
| Result |
Proceed to |
| Data display is within Normal Condition range |
A |
| Data display is not within Normal Condition range |
B |
|
|
||||
| A | ||
 |
||
| ||
| 3. INSPECT TRANSMISSION CONTROL SWITCH (SHIFT LOCK CONTROL UNIT ASSEMBLY) |
Disconnect the transmission control switch connector.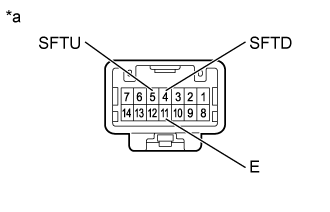
Measure the resistance according to the value(s) in the table below.
- Standard Resistance:
Tester Connection
Condition
Specified Condition
5 (SFTU) - 11 (E)
Shift lever held in "+"
(Up-shift)
Below 1 Ω
4 (SFTD) - 11 (E)
Shift lever held in "-"
(Down-shift)
Below 1 Ω
5 (SFTU) - 11 (E)
Shift lever not held in "+"
10 kΩ or higher
4 (SFTD) - 11 (E)
Shift lever not held in "-"
10 kΩ or higher
Text in Illustration *a
Component without harness connected
(Transmission Control Switch)
|
|
||||

| OK | |
|
| 4. CHECK HARNESS AND CONNECTOR (TRANSMISSION CONTROL SWITCH - BODY GROUND) |
Disconnect the transmission control switch connector.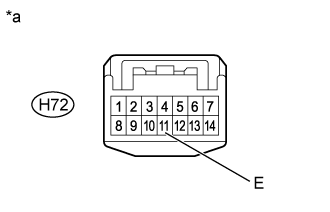
Measure the resistance according to the value(s) in the table below.
- Standard Resistance:
Tester Connection
Condition
Specified Condition
H72-11 (E) - Body ground
Always
Below 1 Ω
Text in Illustration *a
Front view of wire harness connector
(to Transmission Control Switch)
|
|
||||
| OK | |
|
| 5. CHECK HARNESS AND CONNECTOR (TRANSMISSION CONTROL SWITCH - ECM) |
Disconnect the ECM connector.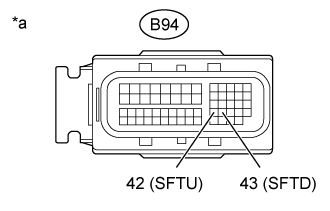
Measure the resistance according to the value(s) in the table below.
- Standard Resistance:
Tester Connection
Condition
Specified Condition
B94-42 (SFTU) - Body ground
Shift lever held in "+"
(Up-shift)
Below 1 Ω
B94-43 (SFTD) - Body ground
Shift lever held in "-"
(Down-shift)
Below 1 Ω
B94-42 (SFTU) - Body ground
Shift lever not held in "+"
10 kΩ or higher
B94-43 (SFTD) - Body ground
Shift lever not held in "-"
10 kΩ or higher
Text in Illustration *a
Front view of wire harness connector
(to ECM)
|
|
||||
| OK | ||
|
||
| ||
| 6. INSPECT TRANSMISSION CONTROL SWITCH (SHIFT LOCK CONTROL UNIT ASSEMBLY) |
Disconnect the transmission control switch connector.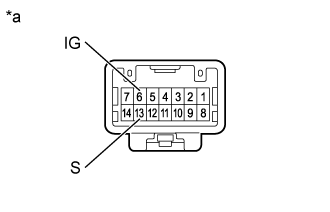
Measure the resistance according to the value(s) in the table below.
- Standard Resistance:
Tester Connection
Condition
Specified Condition
6 (IG) - 13 (S)
Shift lever in S, "+" or "- "
Below 1 Ω
6 (IG) - 13 (S)
Shift lever not in S, "+" or "-"
10 kΩ or higher
Text in Illustration *a
Component without harness connected
(Transmission Control Switch)
|
|
||||
| OK | |
|
| 7. CHECK HARNESS AND CONNECTOR (BATTERY - TRANSMISSION CONTROL SWITCH) |
Disconnect the transmission control switch connector.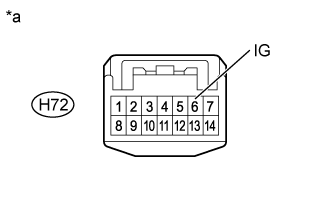
Measure the voltage according to the value(s) in the table below.
- Standard Voltage:
Tester Connection
Switch Condition
Specified Condition
H72-6 (IG) - Body ground
Ignition switch ON
11 to 14 V
H72-6 (IG) - Body ground
Ignition switch off
Below 1 V
Text in Illustration *a
Front view of wire harness connector
(to Transmission Control Switch)
|
|
||||
| OK | |
|
| 8. CHECK HARNESS AND CONNECTOR (TRANSMISSION CONTROL SWITCH - ECM) |
Disconnect the H72 transmission control switch connector.
Disconnect the B94 ECM connector.
Measure the resistance according to the value(s) in the table below.
- Standard Resistance:
Tester Connection
Condition
Specified Condition
H72-13 (S) - B94-59 (S)
Always
Below 1 Ω
H72-13 (S) - Body ground
Always
10 kΩ or higher
B94-59 (S) - Body ground
Always
10 kΩ or higher
|
|
||||
| OK | ||
|
||
| ||