TERMINALS OF ECU
System information · Vehicles built from Oct 2014
| CHECK CERTIFICATION ECU (SMART KEY ECU ASSEMBLY) |
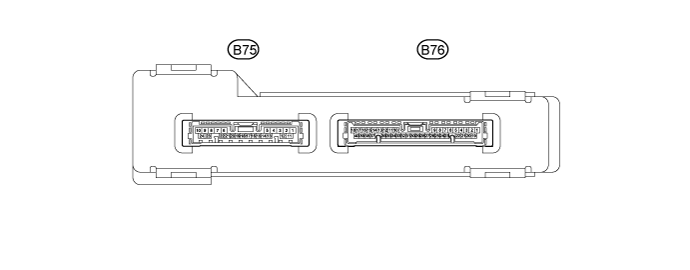

Disconnect the B75 and B76 certification ECU (smart key ECU assembly) connectors.
Measure the voltage and resistance according to the value(s) in the table below.
- HINT:
- Measure the values on the wire harness side with the connector disconnected.
Tester Connection
Input/Output
Wiring Color
Terminal Description
Condition
Specified Condition
Related Data List Item
B75-10 (E) - Body ground
-
W-B - Body ground
Ground
Always
Below 1 Ω
-
B75-1 (+B) - B75-10 (E)
Input
L - W-B
+B power supply
Always
11 to 14 V
-
Connect the B75 and B76 certification ECU (smart key ECU assembly) connectors.
Measure the voltage and check for pulses according to the value(s) in the table below.
Tester Connection
Input/Output
Wiring Color
Terminal Description
Condition
Specified Condition
Related Data List Item
B75-21 (ACCD) - B75-10 (E)
Output
R - W-B
ACC signal
Engine switch off → Engine switch on (ACC)
1 V or less → 8.5 V or higher
-
B75-20 (IG1D) - B75-10 (E)
Output
B - W-B
IG1 signal
Engine switch on (ACC) → Engine switch on (IG)
1 V or less → 9 V or higher
-
B76-31 (CLG1) - B75-10 (E)
Input/Output
G - W-B
Output to No. 1 indoor electrical key antenna assembly (front bumper RH) (request signal [challenge] is sent to No. 1 indoor electrical key antenna assembly [front bumper RH] from certification ECU [smart key ECU assembly] to form detection area)
Procedure: - Engine switch off
- All doors closed
Not pulse generation
Overhead + Driver Side (key diagnostic mode)
Procedure: - Engine switch off
- All doors closed
- While carrying the electrical key transmitter sub-assembly, press the trigger switch on the front door outside handle assembly RH.
Pulse generation (See waveform 1)
B76-30 (CG1B) - B75-10 (E)
Input/Output
R - W-B
Output to No. 1 indoor electrical key antenna assembly (front bumper RH) (terminal on opposite side of component from CLG1 output terminal)
Procedure: - Engine switch off
- All doors closed
Not pulse generation
Overhead + Driver Side (key diagnostic mode)
Procedure: - Engine switch off
- All doors closed
- While carrying the electrical key transmitter sub-assembly, press the trigger switch on the front door outside handle assembly RH.
Pulse generation (See waveform 1)
B76-6 (CLG2) - B75-10 (E)
Input/Output
G - W-B
Output to No. 1 indoor electrical key antenna assembly (front bumper LH) (request signal [challenge] is sent to No. 1 indoor electrical key antenna assembly [front bumper LH] from certification ECU [smart key ECU assembly] to form detection area)
Procedure: - Engine switch off
- All doors closed
Not pulse generation
Overhead + Passenger Side (key diagnostic mode)
Procedure: - Engine switch off
- All doors closed
- While carrying the electrical key transmitter sub-assembly, press the trigger switch on the front door outside handle assembly LH.
Pulse generation (See waveform 2)
B76-23 (CG2B) - B75-10 (E)
Input/Output
R - W-B
Output to No. 1 indoor electrical key antenna assembly (front bumper LH) (terminal on opposite side of component from CLG2 output terminal)
Procedure: - Engine switch off
- All doors closed
Not pulse generation
Overhead + Passenger Side (key diagnostic mode)
Procedure: - Engine switch off
- All doors closed
- While carrying the electrical key transmitter sub-assembly, press the trigger switch on the front door outside handle assembly LH.
Pulse generation (See waveform 2)
B75-4 (TSW1) - B75-10 (E)
Input
BR - W-B
Driver door trigger switch signal input sends signals from trigger switch on front door outside handle assembly RH to certification ECU (smart key ECU assembly).
Certification ECU (smart key ECU assembly) sends 12 V pulse waveform every 20 ms. from terminal TSW. When trigger switch is pressed, the pulse is grounded.
Procedure: - Engine switch off
- All doors closed
- Driver door trigger switch not pressed → pressed
9.5 to 16 V → Below 1.5 V
D-Door Trigger Switch
B75-12 (TSW2) - B75-10 (E)
Input
B - W-B
Passenger door trigger switch signal input sends signals from trigger switch on front door outside handle assembly LH to certification ECU (smart key ECU assembly).
Certification ECU (smart key ECU assembly) sends 12 V pulse waveform every 20 ms. from terminal TSW. When trigger switch is pressed, the pulse is grounded.
Procedure: - Engine switch off
- All doors closed
- Passenger door trigger switch not pressed → pressed
9.5 to 16 V → Below 1.5 V
P-Door Trigger Switch
B75-14 (TSW5) - B75-10 (E)
Input
V - W-B
Back door trigger switch signal input sends signals from trigger switch on license plate light assembly to certification ECU (smart key ECU assembly).
Certification ECU (smart key ECU assembly) sends 12 V pulse waveform every 20 ms. from terminal TSW. When trigger switch is pressed, the pulse is grounded.
Procedure: - Engine switch off
- All doors closed
- Back door trigger switch not pressed → pressed
4.5 V or higher → Below 1.5 V
Tr/B-Door Unlock SW
B76-28 (CGND) - B75-10 (E)
Output
GR - W-B
Output to No. 2 indoor electrical key antenna assembly (front floor)
Procedure: - All doors closed
- Engine switch off
- Electrical key transmitter sub-assembly not inside vehicle
- Door is open
- Door is closed
- Within 30 seconds
Pulse generation (See waveform 3)
Overhead + front room (key diagnostic mode)
B76-27 (CG6B) - B75-10 (E)
Input/Output
BR - W-B
Output to No. 2 indoor electrical key antenna assembly (front floor) (terminal on opposite side of component from CGND output terminal)
Procedure: - All doors closed
- Engine switch off
- Electrical key transmitter sub-assembly not inside vehicle
- Door is open
- Door is closed
- Within 30 seconds
Pulse generation (See waveform 3)
Overhead + front room (key diagnostic mode)
B76-26 (CLG6) - B75-10 (E)
Input/Output
G - W-B
Output to No. 3 indoor electrical key antenna assembly (rear floor)
Procedure: - All doors closed
- Engine switch off
- Electrical key transmitter sub-assembly not inside vehicle
- Door is open
- Door is closed
- Within 30 seconds
Pulse generation (See waveform 3)
Overhead + room (key diagnostic mode)
B76-9 (BGND) - B75-10 (E)
Output
R - W-B
Output to No. 3 indoor electrical key antenna assembly (rear floor) (terminal on opposite side of component from CLG6 output terminal)
Procedure: - All doors closed
- Engine switch off
- Electrical key transmitter sub-assembly not inside vehicle
- Door is open
- Door is closed
- Within 30 seconds
Pulse generation (See waveform 3)
Overhead + room (key diagnostic mode)
B76-8 (CLG8) - B75-10 (E)
Input/Output
BR - W-B
Output to electrical key antenna (back door)
Procedure: - Engine switch off
- All doors closed
Not pulse generation
Overhead + Luggage (key diagnostic mode)
Procedure: - Engine switch off
- All doors closed
- Back door trigger switch off → on
Pulse generation (See waveform 4)
B76-24 (CG8B) - B75-10 (E)
Input/Output
GR - W-B
Output to electrical key antenna (back door) (terminal on opposite side of component from CLG8 output terminal)
Procedure: - Engine switch off
- All doors closed
Not pulse generation
Overhead + Luggage (key diagnostic mode)
Procedure: - Engine switch off
- All doors closed
- Back door trigger switch off → on
Pulse generation (See waveform 4)
B75-9 (LSWP) - B75-10 (E)
Input
Y - W-B
Except front door RH unlock detection switch input
Procedure: - Engine switch off
- All doors locked
- Lock button of electrical key transmitter sub-assembly not pressed
Below 1 V
-
Procedure: - Engine switch off
- All doors locked
- Lock button of electrical key transmitter sub-assembly pressed
8.5 V or higher
B76-13 (RDA3) - B75-10 (E)
Output
W - W-B
Signal output to instrument panel junction block assembly (body computer)
Procedure: - Engine switch off
- All doors locked
- 10 seconds elapsed after all doors locked
- Electrical key transmitter sub-assembly unlock switch not pressed
11 to 14 V
-
Procedure: - Engine switch off
- All doors locked
- 10 seconds elapsed after all doors locked
- Electrical key transmitter sub-assembly unlock switch pressed
Pulse generation
B76-36 (PRG3) - B75-10 (E)
Input
B - W-B
Signal input from instrument panel junction block assembly (body computer)
Procedure: - Engine switch off
- All doors locked
- 10 seconds elapsed after all doors locked
- Electrical key transmitter sub-assembly unlock switch not pressed
11 to 14 V
-
Procedure: - Engine switch off
- All doors locked
- 10 seconds elapsed after all doors locked
- Electrical key transmitter sub-assembly unlock switch pressed
Pulse generation
- Engine switch off
Using an oscilloscope, check waveform 1.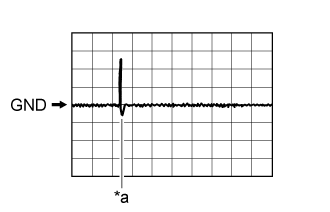
- HINT:
- The oscilloscope waveform shown in the illustration is an example for reference only. Noise, chattering, etc. are not shown.
Text in Illustration *a
Trigger switch ON
Waveform 1 (Reference) Item
Content
Tester Connection
- B76-31 (CLG1) - B75-10 (E)
- B76-30 (CG1B) - B75-10 (E)
Tool Setting
2 V/DIV., 500 ms./DIV.
Condition
Procedure: - Engine switch off
- All doors closed
- While carrying the electrical key transmitter sub-assembly, press the trigger switch on the front door outside handle assembly RH.
Using an oscilloscope, check waveform 2.
- HINT:
- The oscilloscope waveform shown in the illustration is an example for reference only. Noise, chattering, etc. are not shown.
Text in Illustration *a
Trigger switch ON
Waveform 2 (Reference) Item
Content
Tester Connection
- B76-6 (CLG2) - B75-10 (E)
- B76-23 (CG2B) - B75-10 (E)
Tool Setting
2 V/DIV., 500 ms./DIV.
Condition
Procedure: - Engine switch off
- All doors closed
- While carrying the electrical key transmitter sub-assembly, press the trigger switch on the front door outside handle assembly LH.
Using an oscilloscope, check waveform 3.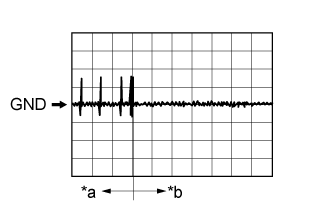
- HINT:
- The oscilloscope waveform shown in the illustration is an example for reference only. Noise, chattering, etc. are not shown.
Text in Illustration *a
Door open
*b
After approximately 30 seconds from when the door is closed
Waveform 3 (Reference) Item
Content
Tester Connection
- B76-26 (CLG6) - B75-10 (E)
- B76-27 (CG6B) - B75-10 (E)
- B76-28 (CGND) - B75-10 (E)
- B76-9 (BGND) - B75-10 (E)
Tool Setting
2 V/DIV., 500 ms/DIV.
Condition
Procedure: - All doors closed
- Engine switch off
- Electrical key transmitter sub-assembly not inside vehicle
- Door is open
- Door is closed
- Within 30 seconds
Using an oscilloscope, check waveform 4.
- HINT:
- The oscilloscope waveform shown in the illustration is an example for reference only. Noise, chattering, etc. are not shown.
Text in Illustration *a
Trigger switch ON
Waveform 4 (Reference) Item
Content
Tester Connection
- B76-8 (CLG8) - B75-10 (E)
- B76-24 (CG8B) - B75-10 (E)
Tool Setting
2 V/DIV., 500 ms/DIV.
Condition
Procedure: - Engine switch off
- All doors closed
- Back door trigger switch off → on
| CHECK INSTRUMENT PANEL JUNCTION BLOCK ASSEMBLY (BODY COMPUTER) |
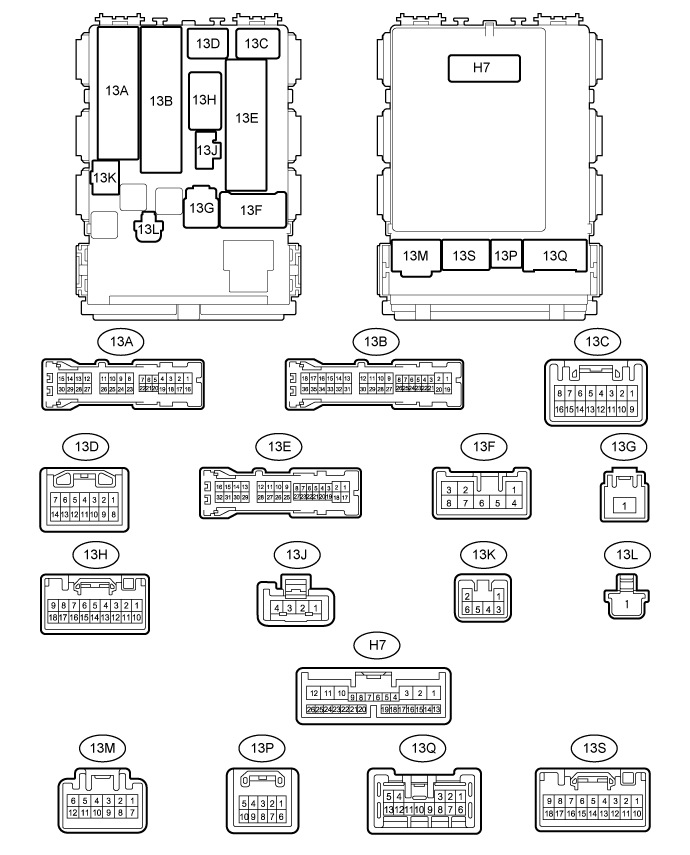
Disconnect the 13M, 13G, 13C and H7 instrument panel junction block assembly (body computer) connectors.
Measure the voltage and resistance according to the value(s) in the table below.
- HINT:
- Measure the values on the wire harness side with the connector disconnected.
Tester Connection
Input/Output
Wiring Color
Terminal Description
Condition
Specified Condition
13M-7 (GND) - Body ground
-
W-B - Body ground
Ground
Always
Below 1 Ω
13G-1 (BECU) - Body ground
Input
BG - Body ground
Battery power supply (for CPU)
Always
11 to 14 V
13C-4 (IG) - Body ground
Input
B - Body ground
Engine switch power supply
Engine switch on (IG)
11 to 14 V
H7-4 (LSWD) - Body ground
Input
W - Body ground
Driver door lock position switch input
Front door RH lock→ unlock
10 kΩ or higher → Below 1 Ω
Reconnect the instrument panel junction block assembly (body computer) connectors.
Measure the voltage and check for pulses according to the value(s) in the table below.
Tester Connection
Input/Output
Wiring Color
Terminal Description
Condition
Specified Condition
13E-11 (DCTY) - Body ground
Input
G - Body ground
Front door courtesy light switch RH input
Driver side door closed → Open
11 to 14 V* → Below 1 V
Pulse generation* → Below 1 V
13E-10 (PCTY) - Body ground
Input
R - Body ground
Front door courtesy light switch LH input
Front passenger side door closed → Open
11 to 14 V* → Below 1 V
Pulse generation* → Below 1 V
13A-30 (RRCY) - Body ground
Input
W - Body ground
Rear door courtesy light switch LH input
Rear door LH door closed → Open
11 to 14 V* → Below 1 V
Pulse generation* → Below 1 V
13A-18 (RRCY) - Body ground
Input
W - Body ground
Rear door courtesy light switch RH input
Rear door RH door closed → Open
11 to 14 V* → Below 1 V
Pulse generation* → Below 1 V
13A-24 (RRCY) - Body ground
Input
W - Body ground
Back door courtesy light switch input
Back door closed → Open
11 to 14 V* → Below 1 V
Pulse generation* → Below 1 V
13B-17 (ACT+) - Body ground
Output
L - Body ground
Door lock motor lock drive output
Door lock control switch off → On (lock)
Below 1 V → 11 to 14 V → Below 1 V
13B-35 (ACT-) - Body ground
Output
L - Body ground
Door lock motor unlock drive output
Door lock control switch off → On (unlock)
Below 1 V → 11 to 14 V → Below 1 V
H7-6 (HAZ) - Body ground
Input
W - Body ground
Hazard signal output
Door lock answer back operation
11 to 14 V → Below 1 V
H7-7 (RDA) - Body ground
Input
W - Body ground
Signal input from certification ECU (smart key ECU assembly)
Procedure: - Engine switch off
- All doors locked
- 10 seconds elapsed after all doors locked
- Electrical key transmitter sub-assembly unlock switch not pressed
11 to 14 V
Procedure: - Engine switch off
- All doors locked
- 10 seconds elapsed after all doors locked
- Electrical key transmitter sub-assembly unlock switch pressed
Pulse generation
H7-8 (PRG) - Body ground
Output
B - Body ground
Signal output to certification ECU (smart key ECU assembly)
Procedure: - Engine switch off
- All doors locked
- 10 seconds elapsed after all doors locked
- Electrical key transmitter sub-assembly unlock switch not pressed
11 to 14 V
Procedure: - Engine switch off
- All doors locked
- 10 seconds elapsed after all doors locked
- Electrical key transmitter sub-assembly unlock switch pressed
Pulse generation
- *: The specified value changes depending on vehicle conditions.
- Engine switch off