2014-2019 Hiace · Service Manual SUSPENSION & AXLE

REPLACEMENT

Removal / installation · Vehicles built Jan 2015 – Nov 2015

Versions by build date: Oct 2014 – Dec 2014 Jan 2015 – Nov 2015 Dec 2015 – Mar 2016 Apr 2016 – Dec 2016 Jan 2017 – Nov 2017 from Dec 2017


1. REMOVE FRONT WHEEL

2. REMOVE FRONT SPEED SENSOR (w/ ABS)

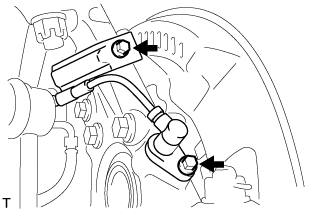
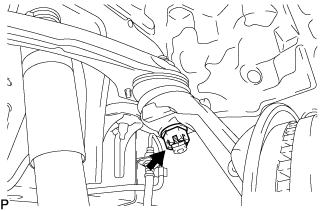
  1. C102281E01
    Remove the 2 bolts, and separate the speed sensor from the steering knuckle.

    NOTICE:
    1. Be careful not to damage the speed sensor.
    2. Prevent foreign matter from adhering to the speed sensor.


3. REMOVE FRONT DISC BRAKE CALIPER ASSEMBLY

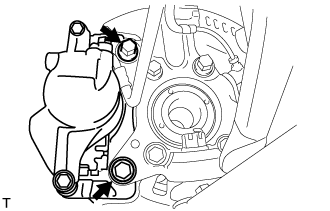
  1. C102283E01
    Remove the 2 bolts, and disconnect the brake caliper assembly.

    NOTICE:
    Use a wire or an equivalent to keep the brake caliper from hanging down by the flexible hose.


4. REMOVE TIE ROD END SUB-ASSEMBLY
  1. Remove the cotter pin and castle nut.

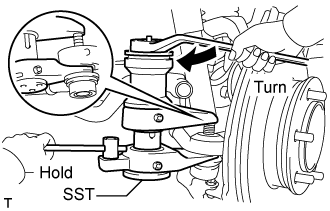
  1. C102285E01
    Using SST, separate the tie rod end from the steering knuckle.
    SST
    09628-00011  

    NOTICE:
    1. Do not damage the ball joint dust boot.
    2. Do not damage the brake dust cover.
    3. Make sure that the string of the SST is securely tied to the vehicle.


5. REMOVE FRONT AXLE ASSEMBLY

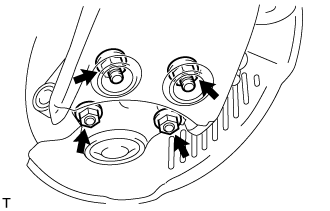
  1. C102287
    Remove the 4 bolts, 4 nuts and front axle assembly from the front suspension lower arm.

  1. Remove the cotter pin and castle nut.

  1. C102660E01
    Using SST, remove the front axle assembly from the front suspension upper arm.
    SST
    09628-62011  

    NOTICE:
    1. Do not damage the ball joint dust boot.
    2. Apply grease to the threads and tip of the SST center bolt before use.
    3. Make sure that the string of the SST is securely tied to the vehicle.


6. REMOVE FRONT LOWER BALL JOINT ASSEMBLY
  1. Fix the steering knuckle in the vise using aluminium plates.

    NOTICE:
    Do not damage the steering knuckle.

  1. Remove the cotter pin.

  1. Loosen the nut.

  1. C194033E01
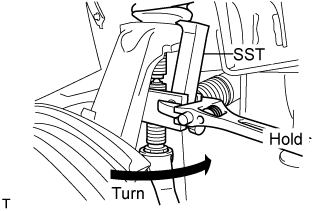
    Using SST, separate the front lower ball joint assembly from the steering knuckle.
    SST
    09628-00011  

    NOTICE:
    1. Do not damage the ball joint dust boot.
    2. Make sure that the string of the SST is securely tied to the steering knuckle.

  1. Remove the nut and front lower ball joint assembly.


7. REMOVE INNER KNUCKLE GREASE RETAINER CAP (w/ Cap)

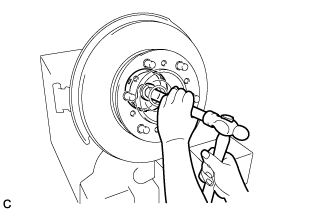
  1. C194034
    Using a chisel, make a hole in the center of the outer knuckle grease retainer cap to insert a brass bar.

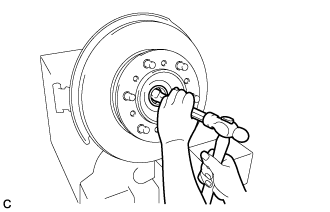
  1. C194035
    Using a brass bar, remove the inner knuckle grease retainer cap from the steering knuckle as shown in the illustration.


8. REMOVE OUTER KNUCKLE GREASE RETAINER CAP (w/ Cap)

  1. C194036E01
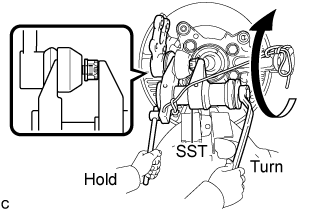
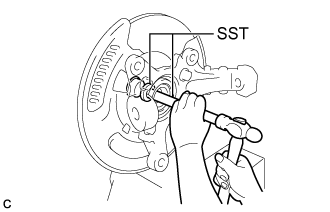
    Using SST, remove the outer knuckle grease retainer cap.
    SST
    09950-60010   (09951-00300)
    09950-70010   (09951-07200)


9. REMOVE STEERING KNUCKLE

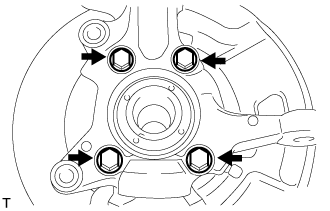
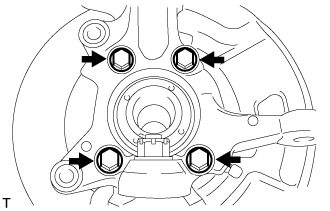
  1. C103883E01
    Remove the 4 bolts.

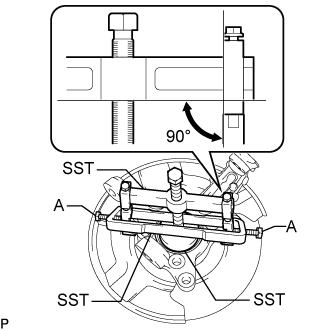
  1. C304721E01
    Using SST, remove the steering knuckle, brake dust cover from the front axle hub sub-assembly.
    SST
    09950-40011   (09951-04020, 09952-04010, 09953-04010, 09958-04011)
    09950-60010   (09951-00470)
    09955-04140  
    09958-04030  

    NOTICE:
    1. Apply grease to the threads and tip of the SST center bolt (09953-04010) before use.
    2. Make sure that the slide arm (09952-04010) is at a 90° angle to the hanger 200 (09951-04020) when using SST.
    3. Make sure that the claw No. 14 (09955-04140) is securely attached to the steering knuckle.

    HINT:
    For bolt A, use the bolt for the holder (09958-04011).


10. REMOVE FRONT DISC

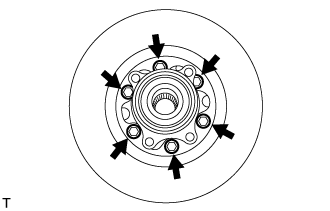
  1. C102293E01
    Remove the 6 bolts.

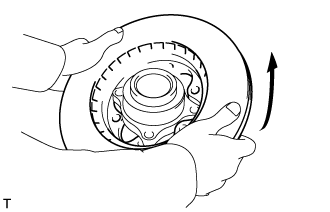
  1. C113549E01
    Remove the front disc as shown in the illustration.


11. REMOVE FRONT AXLE HUB BOLT
  1. Hold the front axle hub sub-assembly in a vise between aluminium plates.

    NOTICE:
    Do not overtighten the vise.

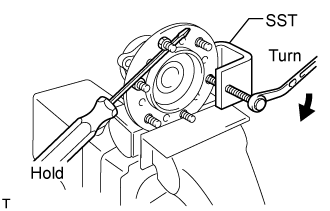
  1. C102370E01
    Temporarily install the 2 nuts and 2 washers to the front axle hub bolts as shown in the illustration.

  1. Using SST and a screwdriver or an equivalent to hold the front axle hub sub-assembly, remove the front axle hub bolt.

    SST
    09650-17011  


12. INSTALL FRONT AXLE HUB BOLT
  1. Hold the front axle hub sub-assembly in a vise between aluminium plates.

    NOTICE:
    Do not overtighten the vise.

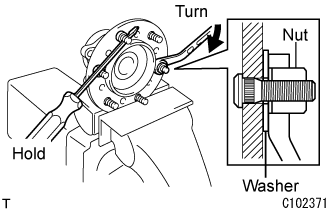
  1. C102371E01
    Install a washer and nut to a new front axle hub bolt as shown in the illustration.

  1. Using a screwdriver or an equivalent to hold the front axle hub sub-assembly, install a new front axle hub bolt by tightening the nut.


13. INSTALL FRONT DISC

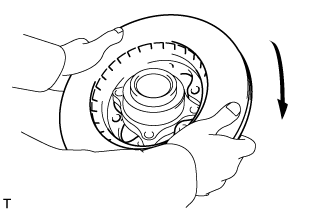
  1. C113549E02
    Install the front disc as shown in the illustration.

  1. C102293E01
    Install the front disc with the 6 bolts.

    Torque:
    62 N*m{ 632 kgf*cm , 46 ft.*lbf }


14. INSTALL INNER KNUCKLE GREASE RETAINER CAP (w/ Cap)

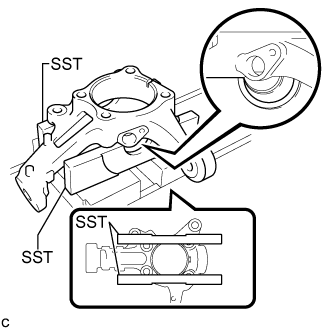
  1. C194037E01
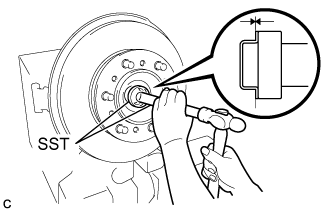
    Using SST, place the steering knuckle on a press as shown in the illustration.
    SST
    09527-30010  

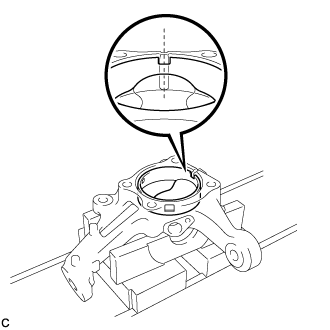
  1. C194038
    Temporarily install a new inner knuckle grease retainer cap to the steering knuckle as shown in the illustration.

    NOTICE:
    Align the center of the cutout in the inner knuckle grease retainer cap and the groove of the steering knuckle.

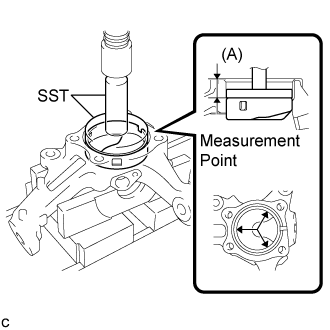
  1. C194039E01
    Using SST and the press, press the inner knuckle grease retainer cap into the steering knuckle until the distance (A) in the illustration meets the standard value.
    SST
    09950-70010   (09951-07100)
    09951-00900  

    Distance (A):
    26 +/- 0.5 mm (1.02 +/- 0.0196 in.)

    NOTICE:
    Using a vernier caliper, measure the distance (A) at the 3 points indicated by the arrows in the illustration while pressing.


15. INSTALL FRONT LOWER BALL JOINT ASSEMBLY
  1. Fix the steering knuckle in the vise using aluminium plates.

    NOTICE:
    Do not damage the steering knuckle.

  1. Install the front lower ball joint assembly to the steering knuckle with the nut.

    Torque:
    170 N*m{ 1,730 kgf*cm , 125 ft.*lbf }

    NOTICE:
    1. Ensure that the thread and taper are free of oil etc.
    2. Do not damage the lower ball joint dust boot.

  1. Install a new cotter pin to the front lower ball joint assembly.

    NOTICE:
    Further tighten the nut up to 60° if the holes for the cotter pin are not aligned.


16. INSTALL STEERING KNUCKLE

  1. C102290E01
    Install the steering knuckle and brake dust cover to the front axle hub sub-assembly with the 4 bolts.

    Torque:
    88 N*m{ 897 kgf*cm , 65 ft.*lbf }


17. INSTALL OUTER KNUCKLE GREASE RETAINER CAP (w/ Cap)

  1. C194041E01
    Using SST, install a new outer knuckle grease retainer cap.
    SST
    09950-60010   (09951-00420)
    09950-70010   (09951-07150)


18. INSTALL FRONT AXLE ASSEMBLY
  1. Temporarily install the front axle assembly to the front suspension upper arm and front suspension lower arm.

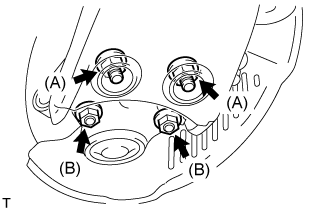
  1. C102287E02
    Fully tighten front suspension lower arm with the 4 bolts and 4 nuts.

    Torque:
    Nut (A):
    90 N*m{ 918 kgf*cm , 66 ft.*lbf }
    Nut (B):
    52 N*m{ 530 kgf*cm , 38 ft.*lbf }

  1. C102007E01
    Fully tighten the front suspension upper arm with the nut.

    Torque:
    113 N*m{ 1,147 kgf*cm , 83 ft.*lbf }

    NOTICE:
    Do not damage the lower ball joint dust boot.

  1. Install a new cotter pin to the front suspension upper arm.

    NOTICE:
    Further tighten the castle nut up to 60° if the holes for the cotter pin are not aligned.


19. INSTALL TIE ROD END SUB-ASSEMBLY
  1. Install the tie rod end sub-assembly to the steering knuckle with the castle nut.

    Torque:
    50 N*m{ 510 kgf*cm , 37 ft.*lbf }

    NOTICE:
    Do not damage the lower ball joint dust boot.

  1. Install a new cotter pin to the tie rod end sub-assembly.

    NOTICE:
    Further tighten the castle nut up to 60° if the holes for the cotter pin are not aligned.


20. INSTALL FRONT DISC BRAKE CALIPER ASSEMBLY

  1. C102283E01
    Install the brake caliper assembly to the steering knuckle with the 2 bolts.

    Torque:
    123 N*m{ 1,250 kgf*cm , 91 ft.*lbf }


21. INSTALL FRONT SPEED SENSOR (w/ ABS)

  1. C102281E01
    Install the speed sensor to the steering knuckle with the 2 bolts.

    Torque:
    8.5 N*m{ 87 kgf*cm , 75 in.*lbf }

    NOTICE:
    1. Prevent foreign matter from adhering to the speed sensor.
    2. Be careful not to damage the speed sensor.
    3. Do not twist the sensor wire when installing the speed sensor.


22. INSTALL FRONT WHEEL

Torque:
100 N*m{ 1,020 kgf*cm , 74 ft.*lbf }


23. INSPECT WHEEL ALIGNMENT
(Click here)

24. CHECK ABS SPEED SENSOR SIGNAL (w/ ABS)
(Click here)
← REPLACEMENT (Oct 2014 – Dec 2014)REPLACEMENT (Dec 2015 – Mar 2016) →