REPLACEMENT
Removal / installation · Vehicles built from Dec 2017
Versions by build date: Oct 2014 – Dec 2014 Jan 2015 – Nov 2015 Dec 2015 – Mar 2016 Apr 2016 – Dec 2016 Jan 2017 – Nov 2017 from Dec 2017
| 2.
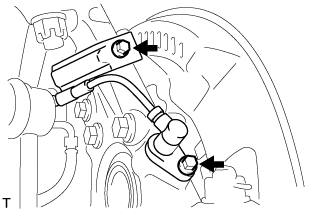
REMOVE FRONT SPEED SENSOR (w/ ABS) |
 |
- Remove the 2 bolts, and separate the speed sensor from the steering knuckle.
- NOTICE:
- Be careful not to damage the speed sensor.
- Prevent foreign matter from adhering to the speed sensor.
| 3.
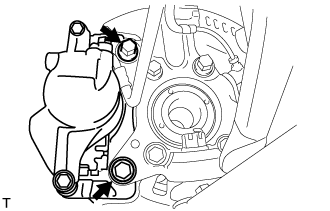
REMOVE FRONT DISC BRAKE CALIPER ASSEMBLY |
|
- Remove the 2 bolts, and disconnect the brake caliper assembly.
- NOTICE:
- Use a wire or an equivalent to keep the brake caliper from hanging down by the flexible hose.
| 4.
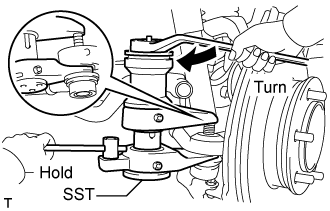
REMOVE TIE ROD END SUB-ASSEMBLY |
|
Remove the cotter pin and castle nut.
- Using SST, separate the tie rod end from the steering knuckle.
- SST
- 09628-00011
- NOTICE:
- Do not damage the ball joint dust boot.
- Do not damage the brake dust cover.
- Make sure that the string of the SST is securely tied to the vehicle.
| 5.
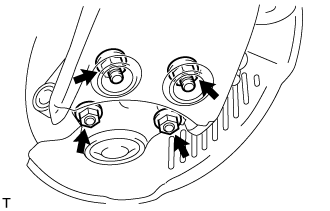
REMOVE FRONT AXLE ASSEMBLY |
|
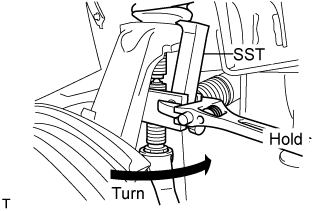
- Remove the 4 bolts, 4 nuts and front axle assembly from the front suspension lower arm.
Remove the cotter pin and castle nut.
- Using SST, remove the front axle assembly from the front suspension upper arm.
- SST
- 09628-62011
- NOTICE:
- Do not damage the ball joint dust boot.
- Apply grease to the threads and tip of the SST center bolt before use.
- Make sure that the string of the SST is securely tied to the vehicle.
| 6.
REMOVE FRONT LOWER BALL JOINT ASSEMBLY |
|
Fix the steering knuckle in the vise using aluminium plates.
- NOTICE:
- Do not damage the steering knuckle.
Remove the cotter pin.
Loosen the nut.
- Using SST, separate the front lower ball joint assembly from the steering knuckle.
- SST
- 09628-00011
- NOTICE:
- Do not damage the ball joint dust boot.
- Make sure that the string of the SST is securely tied to the steering knuckle.
Remove the nut and front lower ball joint assembly.
| 7.
REMOVE INNER KNUCKLE GREASE RETAINER CAP (w/ Cap) |
|
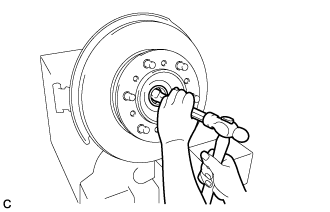
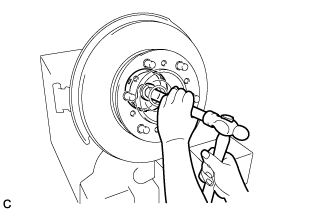
- Using a chisel, make a hole in the center of the outer knuckle grease retainer cap to insert a brass bar.
- Using a brass bar, remove the inner knuckle grease retainer cap from the steering knuckle as shown in the illustration.
| 8.
REMOVE OUTER KNUCKLE GREASE RETAINER CAP (w/ Cap) |
|
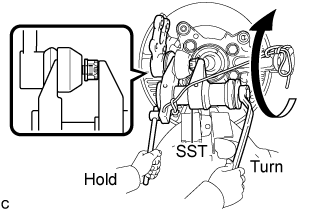
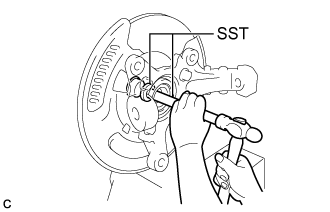
- Using SST, remove the outer knuckle grease retainer cap.
- SST
- 09950-60010
(09951-00300)
09950-70010
(09951-07200)
| 9.
REMOVE STEERING KNUCKLE |
|
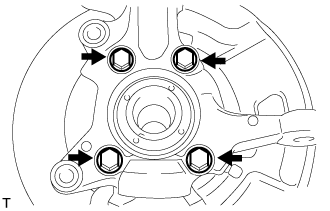
- Remove the 4 bolts.
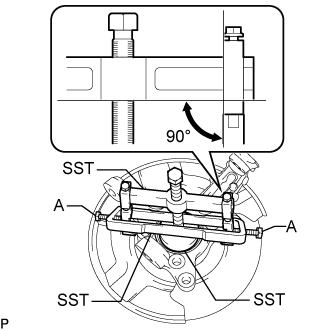
- Using SST, remove the steering knuckle, brake dust cover from the front axle hub sub-assembly.
- SST
- 09950-40011
(09951-04020, 09952-04010, 09953-04010, 09958-04011)
09950-60010
(09951-00470)
09955-04140
09958-04030
- NOTICE:
- Apply grease to the threads and tip of the SST center bolt (09953-04010) before use.
- Make sure that the slide arm (09952-04010) is at a 90° angle to the hanger 200 (09951-04020) when using SST.
- Make sure that the claw No. 14 (09955-04140) is securely attached to the steering knuckle.
- HINT:
- For bolt A, use the bolt for the holder (09958-04011).
| 10.
REMOVE FRONT DISC |
|
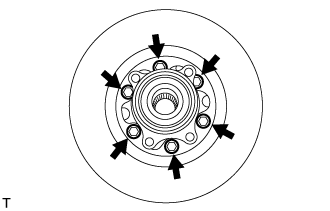
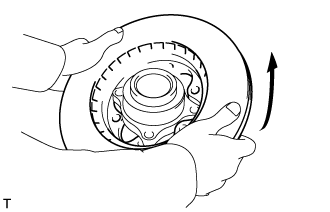
- Remove the 6 bolts.
- Remove the front disc as shown in the illustration.
| 11.
REMOVE FRONT AXLE HUB BOLT |
|
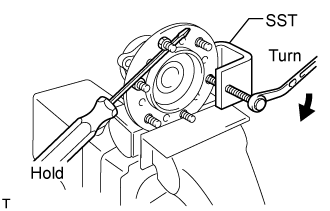
Hold the front axle hub sub-assembly in a vise between aluminium plates.
- NOTICE:
- Do not overtighten the vise.
- Temporarily install the 2 nuts and 2 washers to the front axle hub bolts as shown in the illustration.
Using SST and a screwdriver or an equivalent to hold the front axle hub sub-assembly, remove the front axle hub bolt.
- SST
- 09650-17011
| 12.
INSTALL FRONT AXLE HUB BOLT |
|
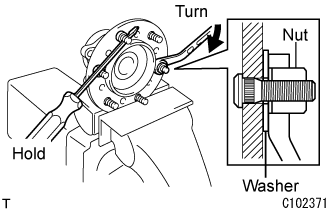
Hold the front axle hub sub-assembly in a vise between aluminium plates.
- NOTICE:
- Do not overtighten the vise.
- Install a washer and nut to a new front axle hub bolt as shown in the illustration.
Using a screwdriver or an equivalent to hold the front axle hub sub-assembly, install a new front axle hub bolt by tightening the nut.
| 13.
INSTALL FRONT DISC |
|
| 14.
INSTALL INNER KNUCKLE GREASE RETAINER CAP (w/ Cap) |
|
| 15.
INSTALL FRONT LOWER BALL JOINT ASSEMBLY |
|
| 16.
INSTALL STEERING KNUCKLE |
|
| 17.
INSTALL OUTER KNUCKLE GREASE RETAINER CAP (w/ Cap) |
|
| 18.
INSTALL FRONT AXLE ASSEMBLY |
|
| 19.
INSTALL TIE ROD END SUB-ASSEMBLY |
|
| 20.
INSTALL FRONT DISC BRAKE CALIPER ASSEMBLY |
|
| 21.
INSTALL FRONT SPEED SENSOR (w/ ABS) |
|
| 22.
INSTALL FRONT WHEEL |
|
-
Torque:
- 100 N*m{
1,020 kgf*cm
, 74 ft.*lbf
}
| 23.
INSPECT WHEEL ALIGNMENT |
|
(Click here)
| 24.
CHECK ABS SPEED SENSOR SIGNAL (w/ ABS) |
|
- w/ VSC: (Click here)
- w/o VSC: (Click here)