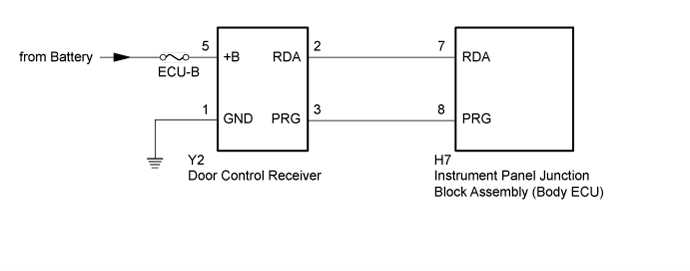
The door control receiver receives signals from the door control transmitter assembly and sends this signal to the instrument panel junction block assembly (body ECU). Then, instrument panel junction block assembly (body ECU) drives a door lock motor on each door and operate lock/unlock control.
WIRING DIAGRAM
INSPECTION PROCEDURE
NOTICE:
Inspect the fuses for circuits related to this system before performing the following procedure.
1. CHECK POWER DOOR LOCK OPERATION
When the door control switch is operated, check that the locked doors unlock.
Move the door control transmitter assembly in the vicinity of the door control receiver.
HINT:
Refer to Parts Location for the location of the door control receiver (Click here).
Press and hold either the lock or unlock switch on door control transmitter assembly for 1 second and check that the doors lock or unlock accordingly.
OK:
Wireless door lock control functions operate normally.
HINT:
Check if electrical noise is the cause by moving the door control transmitter assembly closer to the door control receiver. Moving it closer will decrease the effects of electrical noise.
If the operation check can be performed normally, there is a high probability that electrical noise or a decrease in output from the door control transmitter assembly is the cause of the malfunction. There is a high probability that electrical noise is the cause if the problem occurs only in a certain location or only during a certain time of day. Also, custom components may be causing electrical noise. If custom components are installed in the vehicle, remove them and perform the operation check again.
NG
FIND CAUSE OF ELECTRICAL NOISE AND REMOVE IT
OK
6. SWITCH TO SELF DIAGNOSTIC MODE
NOTICE:
If the change to the self-diagnostic mode fails, the system will return to the normal mode.
Close the driver side door and ensure that the door lock knob is in the unlock position.
Insert the door control transmitter assembly into the ignition key cylinder and remove it.
Within 5 seconds after the door control transmitter is removed, insert it into the ignition key cylinder again.
Turn the ignition switch to the ON position and then off.
Within 30 seconds of turning the ignition switch off, turn the ignition switch to the ON position then off 9 times.
HINT:
Turning the ignition switch to the ON position after the procedure above has been completed will end the self-diagnostic mode.
Do not lock or unlock doors while performing the self-diagnostic mode.
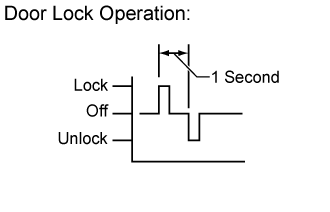
Check that the system has changed to self-diagnostic mode by checking the door lock operation (lock → unlock) as shown in the illustration.
NEXT
7. CHECK BY SELF DIAGNOSTIC MODE
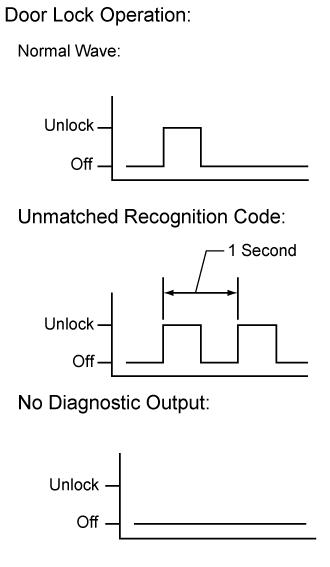
Check the diagnostic outputs when the door control transmitter assembly switch is held down. The diagnostic outputs can be checked by the door lock operating patterns shown in the illustration.
Check that the mismatch recognition code is output when a new or normally functioning another vehicle door control transmitter is pressed and held down.
OK:
Unmatching recognition code is output.
NG
REPLACE DOOR CONTROL TRANSMITTER ASSEMBLY
OK
10. CHECK HARNESS AND CONNECTOR (DOOR CONTROL RECEIVER - BATTERY AND BODY GROUND)
Disconnect the door control receiver connector.
Measure the resistance according to the value(s) in the table below.
Standard Resistance:
Tester Connection
Condition
Specified Condition
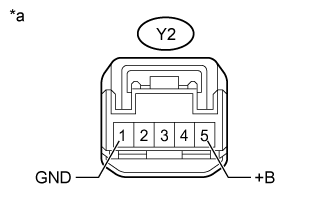
Y2-1 (E) - Body ground
Always
Below 1 Ω
Measure the voltage according to the value(s) in the table below.
Standard Voltage:
Tester Connection
Condition
Specified Condition
Y2-5 (+B) - Body ground
Always
11 to 14 V
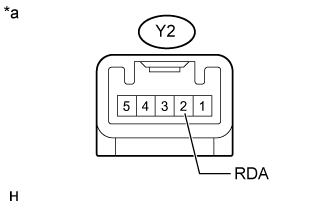
Text in Illustration
*a
Front view of wire harness connector (to Door Control Receiver)
NG
REPAIR OR REPLACE HARNESS OR CONNECTOR
OK
11. CHECK DOOR CONTROL RECEIVER (OUTPUT SIGNAL)
Reconnect the door control receiver connector.
Measure the voltage according to the value(s) in the table below.
Standard Voltage:
Tester Connection
Condition
Specified Condition
Y2-2 (RDA) - Body ground
No key in ignition key cylinder, all doors closed and transmitter switch off → on
Pulse generation
Text in Illustration
*a
Component with harness connected (Door Control Receiver)