Slide Door Closer Relay Power Source Circuit
Circuit diagnosis · Vehicles built from Dec 2015
Versions by build date: Oct 2014 – Nov 2015 from Dec 2015
DESCRIPTION
w/o Power Slide Door
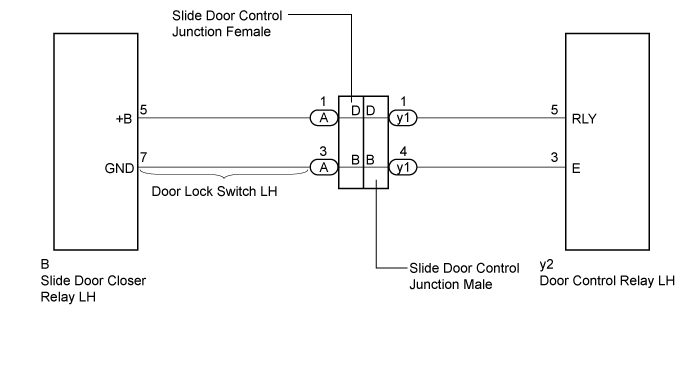
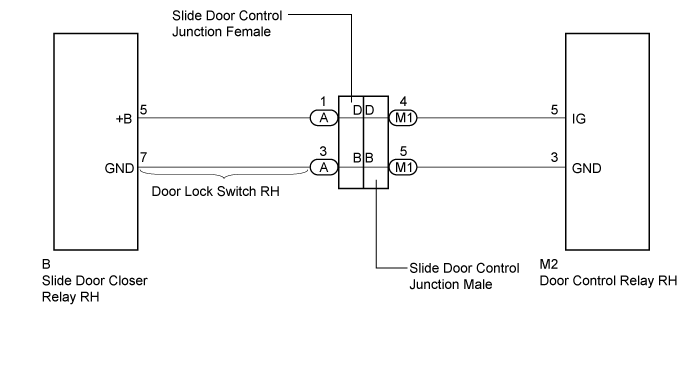
- This circuit provides power to the slide door closer relay LH*1 or slide door closer relay RH*2.
- *1: for LH Side
- *2: for RH Side
w/ Power Slide Door
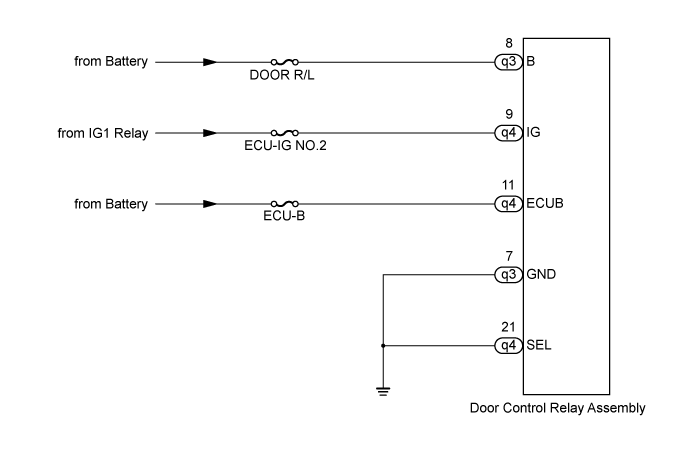
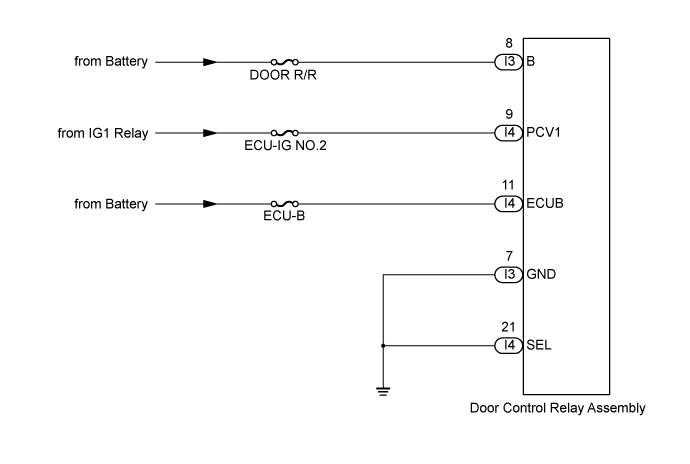
- This circuit provides power to the door control relay assembly.
WIRING DIAGRAM
| for LH Side (w/o Power Slide Door) |

| for RH Side (w/o Power Slide Door) |
| for LH Side (w/ Power Slide Door) |
| for RH Side (w/ Power Slide Door) |
INSPECTION PROCEDURE
- NOTICE:
- Inspect the fuses for circuits related to this system before performing the following inspection procedure.
| 1. CHECK VEHICLE TYPE |
 |
Check vehicle type.
Result
Result
|
Proceed to
|
w/ Power Slide Door
|
A
|
for LH Side (w/o Power Slide Door)
|
B
|
for RH Side (w/o Power Slide Door)
|
C
|
|
B |
 |
|
|
|
|
C |
|
|
|
|
| A |
|
 |
|
| 2. CHECK HARNESS AND CONNECTOR (DOOR CONTROL RELAY ASSEMBLY - BATTERY AND BODY GROUND) |
|
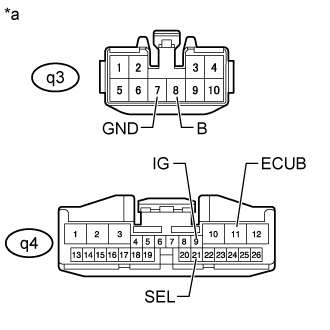
for LH Side
- Disconnect the door control relay assembly connectors.
Measure the resistance according to the value(s) in the table below.
- Standard Resistance:
Tester Connection
|
Condition
|
Specified Condition
|
q3-7(GND) - Body ground
|
Always
|
Below 1 Ω
|
q4-21(SEL) - Body ground
|
Always
|
Below 1 Ω
|
Measure the voltage according to the value(s) in the table below.
- Standard Voltage:
Tester Connection
|
Condition
|
Specified Condition
|
q3-8 (B) - Body ground
|
Always
|
11 to 14 V
|
q4-9 (IG) - Body ground
|
Ignition switch ON
|
11 to 14 V
|
q4-9 (IG) - Body ground
|
Ignition switch off
|
Below 1 V
|
q4-11 (ECUB) - Body ground
|
Always
|
11 to 14 V
|
Text in Illustration
*a
|
Front view of wire harness connector
(to Door Control Relay Assembly)
|
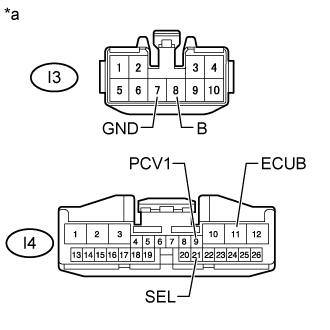
for RH Side
- Disconnect the door control relay assembly connectors.
Measure the resistance according to the value(s) in the table below.
- Standard Resistance:
Tester Connection
|
Condition
|
Specified Condition
|
I3-7(GND) - Body ground
|
Always
|
Below 1 Ω
|
I4-21(SEL) - Body ground
|
Always
|
Below 1 Ω
|
Measure the voltage according to the value(s) in the table below.
- Standard Voltage:
Tester Connection
|
Condition
|
Specified Condition
|
I3-8 (B) - Body ground
|
Always
|
11 to 14 V
|
I4-9 (PCV1) - Body ground
|
Ignition switch ON
|
11 to 14 V
|
I4-9 (PCV1) - Body ground
|
Ignition switch off
|
Below 1 V
|
I4-11 (ECUB) - Body ground
|
Always
|
11 to 14 V
|
Text in Illustration
*a
|
Front view of wire harness connector
(to Door Control Relay Assembly)
|
|
NG |
 |
|
| REPAIR OR REPLACE HARNESS OR CONNECTOR |
|
|
| OK |
|
 |
|
| PROCEED TO NEXT SUSPECTED AREA SHOWN IN PROBLEM SYMPTOMS TABLE (Click here)
|
|
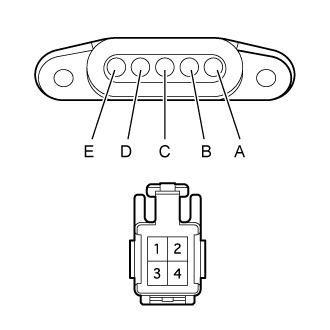
| 3. INSPECT SLIDE DOOR CONTROL JUNCTION FEMALE |
|
- Remove the slide door control slide door control junction female (Click here).
Measure the resistance according to the value(s) in the table below.
- Standard Resistance:
Tester Connection
|
Condition
|
Specified Condition
|
B - 3
|
Always
|
Below 1 Ω
|
D - 1
|
Always
|
Below 1 Ω
|
|
NG |
|
|
| REPLACE SLIDE DOOR CONTROL JUNCTION FEMALE (Click here)
|
|
|
| OK |
|
|
|
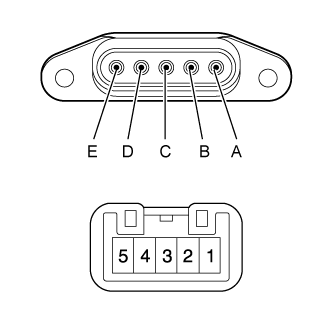
| 4. INSPECT SLIDE DOOR CONTROL JUNCTION MALE |
|
- Remove the slide door control junction male.
Measure the resistance according to the value(s) in the table below.
- Standard Resistance:
Tester Connection
|
Condition
|
Specified Condition
|
B - 4
|
Always
|
Below 1 Ω
|
D - 1
|
Always
|
Below 1 Ω
|
|
NG |
|
|
| REPLACE SLIDE DOOR CONTROL JUNCTION MALE |
|
|
| OK |
|
|
|
| 5. INSPECT DOOR LOCK SWITCH LH |
|
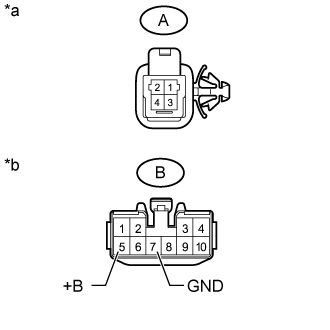
- Disconnect the A and B door lock switch LH connectors.
Measure the resistance according to the value(s) in the table below.
- Standard Resistance:
Tester Connection
|
Condition
|
Specified Condition
|
A-1 - B-5 (+B)
|
Always
|
Below 1 Ω
|
A-3 - B-7 (GND)
|
Always
|
Below 1 Ω
|
Text in Illustration
*a
|
Slide Door Control Junction Female Side
|
*b
|
Slide Door Closer Relay LH Side
|
|
NG |
|
|
| REPLACE DOOR LOCK SWITCH LH |
|
|
| OK |
|
|
|
| 6. CHECK HARNESS AND CONNECTOR (DOOR CONTROL RELAY LH - SLIDE DOOR CONTROL JUNCTION MALE) |
|
Disconnect the y2 slide door closer relay LH connectors.
Disconnect the y1 slide door control junction male connector.
Measure the resistance according to the value(s) in the table below.
- Standard Resistance:
Tester Connection
|
Condition
|
Specified Condition
|
y2-5 (RLY) - y1-1
|
Always
|
Below 1 Ω
|
y2-3 (E) - y1-4
|
Always
|
Below 1 Ω
|
y2-5 (RLY) or y1-1 - Body ground
|
Always
|
10 kΩ or higher
|
y2-3 (E) or y1-4 - Body ground
|
Always
|
10 kΩ or higher
|
|
NG |
|
|
| REPAIR OR REPLACE HARNESS OR CONNECTOR |
|
|
| OK |
|
|
|
| 7. CHECK SLIDE DOOR CLOSER RELAY LH |
|
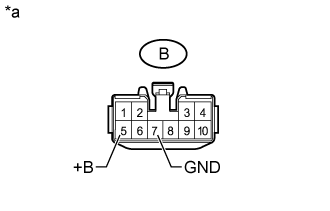
- Disconnect the slide door closer relay LH connector.
Measure the resistance according to the value(s) in the table below.
- Standard Resistance:
Tester Connection
|
Condition
|
Specified Condition
|
B-7 (GND) - Body ground
|
Always
|
Below 1 Ω
|
Measure the voltage according to the value(s) in the table below.
- Standard Voltage:
Tester Connection
|
Condition
|
Specified Condition
|
B-5 (+B) - Body ground
|
Slide door OPEN → Halfway position
|
Below 1 V → 11 to 14 V
|
Text in Illustration
*a
|
Front view of wire harness connector
(to Slide Door Closer Relay LH)
|
|
NG |
|
|
| PROCEED TO NEXT SUSPECTED AREA SHOWN IN PROBLEM SYMPTOMS TABLE (Click here)
|
|
|
| OK |
|
|
|
|
| 8. INSPECT SLIDE DOOR CONTROL JUNCTION FEMALE |
|
- Remove the slide door control slide door control junction female (Click here).
Measure the resistance according to the value(s) in the table below.
- Standard Resistance:
Tester Connection
|
Condition
|
Specified Condition
|
B - 3
|
Always
|
Below 1 Ω
|
D - 1
|
Always
|
Below 1 Ω
|
|
NG |
|
|
| REPLACE SLIDE DOOR CONTROL JUNCTION FEMALE (Click here)
|
|
|
| OK |
|
|
|
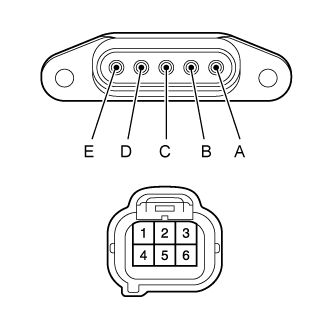
| 9. INSPECT SLIDE DOOR CONTROL JUNCTION MALE |
|
- Remove the slide door control junction male.
Measure the resistance according to the value(s) in the table below.
- Standard Resistance:
Tester Connection
|
Condition
|
Specified Condition
|
B - 5
|
Always
|
Below 1 Ω
|
D - 4
|
Always
|
Below 1 Ω
|
|
NG |
|
|
| REPLACE SLIDE DOOR CONTROL JUNCTION MALE |
|
|
| OK |
|
|
|
| 10. INSPECT DOOR LOCK SWITCH RH |
|
- Disconnect the A and B door lock switch RH connectors.
Measure the resistance according to the value(s) in the table below.
- Standard Resistance:
Tester Connection
|
Condition
|
Specified Condition
|
A-3 - B-5 (+B)
|
Always
|
Below 1 Ω
|
A-1 - B-7 (GND)
|
Always
|
Below 1 Ω
|
Text in Illustration
*a
|
Slide Door Control Junction Female Side
|
*b
|
Slide Door Closer Relay RH Side
|
|
NG |
|
|
| REPLACE DOOR LOCK SWITCH RH |
|
|
| OK |
|
|
|
| 11. CHECK HARNESS AND CONNECTOR (DOOR CONTROL RELAY RH - SLIDE DOOR CONTROL JUNCTION MALE) |
|
Disconnect the M2 slide door closer relay RH connectors.
Disconnect the M1 slide door control junction male connector.
Measure the resistance according to the value(s) in the table below.
- Standard Resistance:
Tester Connection
|
Condition
|
Specified Condition
|
M2-5 (IG) - M1-4
|
Always
|
Below 1 Ω
|
M2-3 (GND) - M1-5
|
Always
|
Below 1 Ω
|
M2-5 (IG) or M1-4 - Body ground
|
Always
|
10 kΩ or higher
|
M2-3 (GND) - M1-5 - Body ground
|
Always
|
10 kΩ or higher
|
|
NG |
|
|
| REPAIR OR REPLACE HARNESS OR CONNECTOR |
|
|
| OK |
|
|
|
| 12. CHECK SLIDE DOOR CLOSER RELAY RH |
|
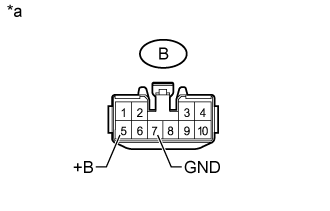
- Disconnect the slide door closer relay RH connector.
Measure the resistance according to the value(s) in the table below.
- Standard Resistance:
Tester Connection
|
Condition
|
Specified Condition
|
B-7 (GND) - Body ground
|
Always
|
Below 1 Ω
|
Measure the voltage according to the value(s) in the table below.
- Standard Voltage:
Tester Connection
|
Condition
|
Specified Condition
|
B-5 (+B) - Body ground
|
Slide door OPEN → Halfway position
|
Below 1 V → 11 to 14 V
|
Text in Illustration
*a
|
Front view of wire harness connector
(to Slide Door Closer Relay RH)
|
|
NG |
|
|
| PROCEED TO NEXT SUSPECTED AREA SHOWN IN PROBLEM SYMPTOMS TABLE (Click here)
|
|
|
| OK |
|
|
|
|