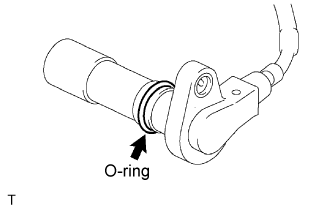
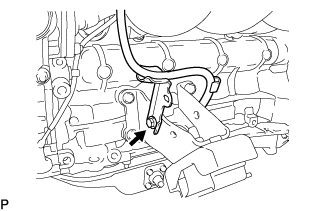
Apply a light coat of engine oil to the O-ring of the crankshaft position sensor.
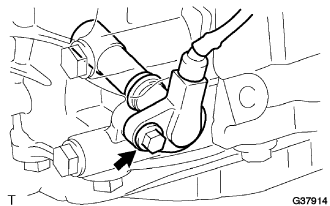
Install the crankshaft position sensor with the bolt.
Torque:
8.5 N*m{
87 kgf*cm
, 75 in.*lbf
}
NOTICE:
Make sure that the O-ring is not cracked or jammed when installing.
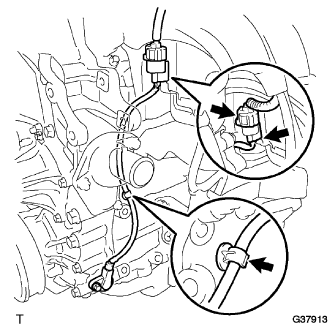
Connect the crankshaft position sensor connector and the 2 wire harness clamps.
2.
INSTALL COMPRESSOR MOUNTING BRACKET NO.1 (w/ Air Conditioning)
NOTICE:
Install the compressor mounting bracket No. 1 exactly as described in the procedures below to properly secure and prevent damage to the fan and generator V belt.
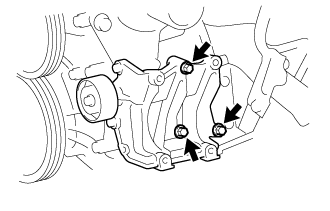
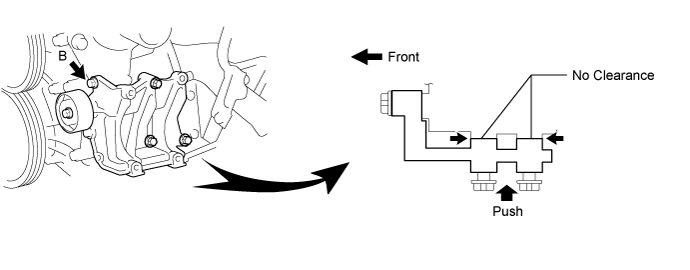
Temporarily install the compressor mounting bracket No. 1 with the 3 bolts.
HINT:
Temporarily install the compressor mounting bracket No. 1 with the 3 bolts so that the bracket can be moved by hand.
Push the compressor mounting bracket No. 1 toward the cylinder block as shown in the illustration and tighten bolt B.
Torque:
Bolt B:
45 N*m{
459 kgf*cm
, 33 ft.*lbf
}
HINT:
Make sure there is no clearance between the cylinder block and compressor mounting bracket No. 1 as shown in the illustration.
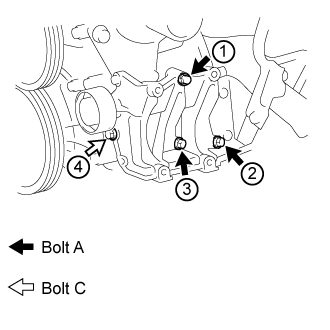
Uniformly tighten the 4 bolts in the order shown in the illustration.
Torque:
Bolt A:
45 N*m{
459 kgf*cm
, 33 ft.*lbf
}
Bolt C:
25 N*m{
255 kgf*cm
, 18 ft.*lbf
}
3.
INSTALL COMPRESSOR AND MAGNETIC CLUTCH (w/ Air Conditioning)
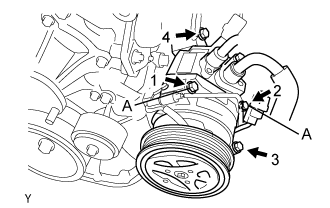
Temporarily install the bolt A to install the compressor.
Install the compressor completely by tightening the 4 bolts in the order shown in the illustration.
Torque:
25 N*m{
255 kgf*cm
, 18 ft.*lbf
}
NOTICE:
In order to prevent misalignment, which causes belt rattle, tightening of the bolts must be performed in the order shown.
Connect the suction tube clamp with the bolt.
Torque:
5.4 N*m{
55 kgf*cm
, 48 in.*lbf
}
Connect the compressor connector.
4.
INSTALL FAN & GENERATOR V BELT (w/ Air Conditioning)
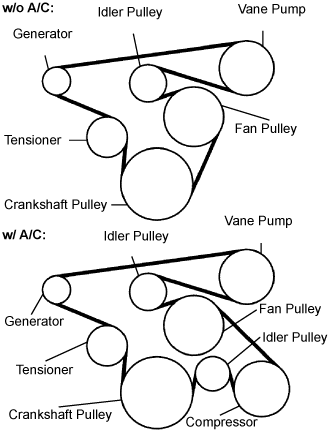
Install the drive belt to the pulleys except the drive belt tensioner pulley.
Use the hexagon-shaped part indicated by the arrow in the illustration to move the tensioner pulley downward and then install the drive belt to the tensioner pulley.
NOTICE:
The backside of the drive belt should face the tensioner pulley.
Check that the drive belt is properly set to each pulley.
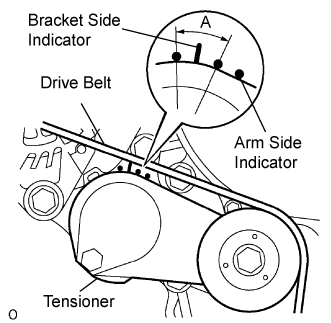
After a new belt has been installed, check that the tensioner indicator mark is within range A shown in the illustration.
5.
INSTALL OIL LEVEL GAUGE GUIDE (w/ Air Conditioning)
Install the gauge guide with the bolt.
Torque:
20 N*m{
204 kgf*cm
, 15 ft.*lbf
}
6.
INSTALL ENGINE SERVICE HOLE SUB COVER SUB-ASSEMBLY (w/ Air Conditioning)
Install the engine service hole sub cover with the 5 bolts.
Torque:
13 N*m{
133 kgf*cm
, 10 ft.*lbf
}
7.
INSTALL FRONT DOOR SCUFF PLATE RH (w/ Air Conditioning)
8.
INSTALL FRONT SEAT ASSEMBLY RH (for Hi-back Seat Type, w/ Air Conditioning)
Perform the same procedure as above on the opposite side. (Click here)
9.
INSTALL FRONT SEAT ASSEMBLY RH (for Low-back Seat Type, w/ Air Conditioning)
Perform the same procedure as above on the opposite side. (Click here)
10.
CONNECT CABLE TO NEGATIVE BATTERY TERMINAL
11.
INSTALL ENGINE UNDER COVER NO.1 (w/ Engine Under Cover No.1 and Air Conditioning)