Stop Light Switch Circuit
Circuit diagnosis · Vehicles built from Oct 2014
DESCRIPTION
The purpose of this circuit is to prevent the engine from stalling while driving in lock-up condition when brakes are suddenly applied.When the brake pedal is depressed, this switch sends a signal to the ECM. Then the ECM cancels the operation of the lock-up clutch while braking is in progress.
WIRING DIAGRAM
Click here.INSPECTION PROCEDURE
| 1. READ VALUE USING DATA LIST (STP SIGNAL) |

DATA LIST
- HINT:
- Using the intelligent tester to read the Data List allows the values or states of switches, sensors, actuators and other items to be read without removing any parts. This non-intrusive inspection can be very useful because intermittent conditions or signals may be discovered before parts or wiring is disturbed. Reading the Data List information early in troubleshooting is one way to save diagnostic time.
Turn the ignition switch off.
Connect the Intelligent Tester to the DLC3.
Turn the ignition switch to the ON position.
Turn on the tester.
Select the item "Enter / Powertrain / Engine and ECT / Data List".
Follow the instructions on the tester and read the Data List.
- Standard:
Item
Measurement Item/
Range (display)
Normal Condition
Stop Light Switch
Stop light SW Status/
ON or OFF
- Brake Pedal is depressed: ON
- Brake Pedal is released: OFF
- Brake Pedal is depressed: ON
- NOTICE:
- In the table above, the conditions listed under "Normal Condition" are reference conditions. Do not depend solely on these reference conditions when deciding whether a part is faulty or not.
|
|
||||

| NG | |
 |
| 2. INSPECT STOP LIGHT SWITCH ASSEMBLY |
Remove the stop light switch assembly.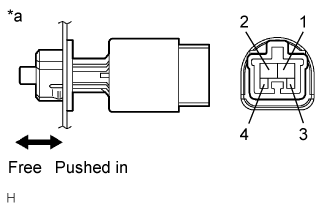

Measure the resistance according to the value(s) in the table below.
- Resistance:
Switch position
Tester Connection
Specified Condition
Switch pin free
1 - 2
Below 1 Ω
Switch pin pushed in
↑
10 kΩ or higher
Switch pin free
3 - 4
10 kΩ or higher
Switch pin pushed in
↑
Below 1 Ω
Text in Illustration *a
Component without harness connected
(Stop Light Switch Assembly)
|
|
||||

| OK | |
|
| 3. CHECK HARNESS AND CONNECTOR (STOP LIGHT SWITCH ASSEMBLY - ECM) |
Install the stop light switch assembly.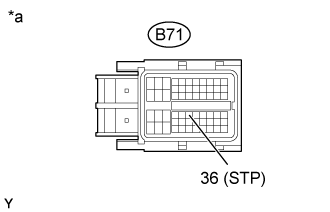
Disconnect the ECM connector.
Measure the voltage according to the value(s) in the table below when the brake pedal is depressed and released.
- Voltage:
Condition
Tester Connection
Specified Condition
Brake pedal is depressed
B71-36 (STP) - Body ground
10 to 14 V
Brake pedal is released
↑
Below 1 V
Text in Illustration *a
Front view of wire harness connector
(to ECM)
|
|
||||
| OK | ||
 |
||
| ||