INSTALLATION
Removal / installation · Vehicles built from Oct 2014
| 1. INSTALL VACUUM PUMP ASSEMBLY |

Align the matchmarks and install the vacuum pump assembly with the 4 bolts.
- Torque:
- 7.8 N*m{ 80 kgf*cm , 69 in.*lbf }
| 2. INSTALL GENERATOR W/ VACUUM PUMP ASSEMBLY |
Temporarily install the generator with the bolt (lower side).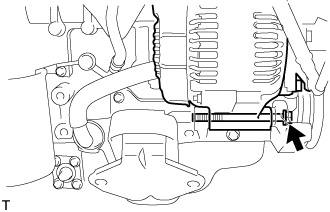

- Torque:
- 65 N*m{ 663 kgf*cm , 48 ft.*lbf }
Connect the vacuum pump oil inlet hose with a new gasket and the union bolt.
- Torque:
- 14 N*m{ 140 kgf*cm , 10 ft.*lbf }
Connect the oil outlet hose.
Connect the vacuum hose.
Connect the connector.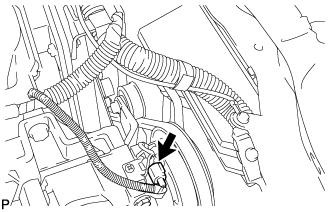
Connect the +B terminal wire with the nut.
- Torque:
- 9.8 N*m{ 100 kgf*cm , 87 in.*lbf }
Install the terminal cover.
| 3. INSTALL COMPRESSOR MOUNTING BRACKET (w/ Air Conditioning System) |
Temporarily install the compressor mounting bracket with the 3 bolts.
Using several steps, uniformly install and tighten the 3 bolts in the sequence order is as shown in the illustration.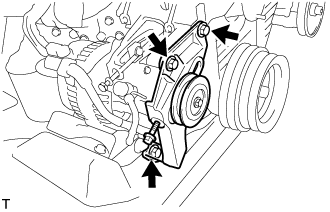
- Torque:
- 47 N*m{ 475 kgf*cm , 36 ft.*lbf }
| 4. INSTALL COMPRESSOR AND MAGNETIC CLUTCH (w/ Air Conditioning System) |
| 5. INSTALL FAN & GENERATOR V BELT (w/ Air Conditioning System) |
| 6. INSTALL FAN & GENERATOR V BELT (w/o Air Conditioning) |
| 7. INSTALL V (COOLER COMPRESSOR TO CRANKSHAFT PULLEY) BELT NO.1 (w/ Air Conditioning System) |
| 8. INSTALL VANE PUMP V BELT |
| 9. INSTALL ENGINE SERVICE HOLE SUB COVER SUB-ASSEMBLY |
| 10. INSTALL WIRE HARNESS SUPPORT |
| 11. INSTALL FRONT DOOR SCUFF PLATE RH |
| 12. INSTALL FRONT SEAT ASSEMBLY RH |