P0201 Injector Circuit / Open - (Cylinder 1)
Diagnostic trouble codes · Vehicles built Jan 2015 – Nov 2015
Also covers:
- P0202 Injector Circuit / Open - (Cylinder 2)
- P0203 Injector Circuit / Open - (Cylinder 3)
- P0204 Injector Circuit / Open - (Cylinder 4)
- P062D No. 1 Fuel Injector Driver Circuit Performance
Versions by build date: Oct 2014 – Dec 2014 Jan 2015 – Nov 2015 Dec 2015 – Mar 2016 Apr 2016 – Dec 2016 from Jan 2017
DESCRIPTION
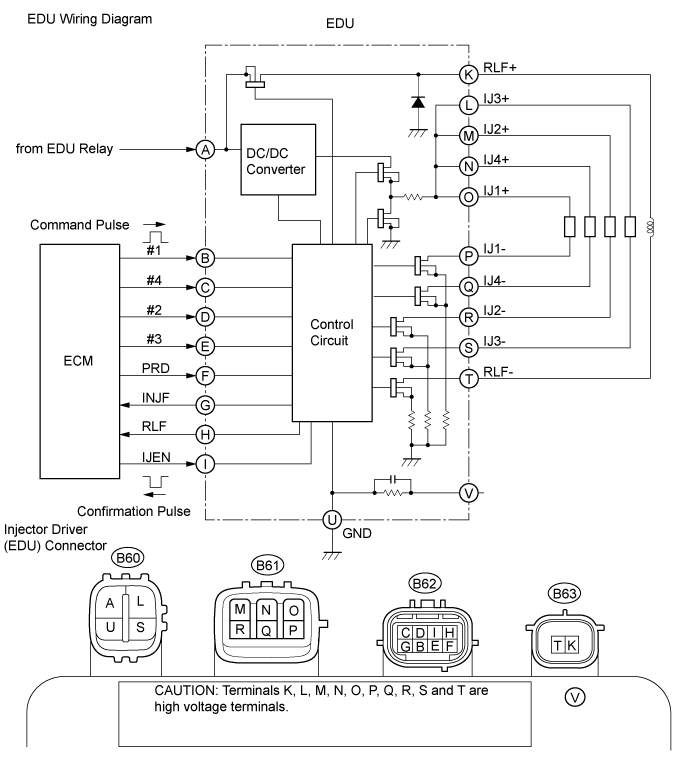
The injector driver (EDU) delivers drive signals to injector assembly using the DC/DC converter, which provides a high-voltage and quick-charging system.Soon after the injector driver (EDU) receives an injection command (#1 to #4) signal from the ECM, the injector driver (EDU) responds to the command with an injector injection confirmation (INJF) signal when the current is applied to the injector assembly.

| DTC Detection Drive Pattern |
DTC Detection Condition |
Trouble Area |
| Idling for 5 seconds |
Open or short in injector circuit occurs a certain number of times (a maximum of approx. 0.5 seconds). (1 trip detection logic) |
|
| DTC Detection Drive Pattern |
DTC Detection Condition |
Trouble Area |
| Idling for 5 seconds |
Inconsistency in the injection waveforms between the injector driver and ECM while the engine is running a certain number of times (a maximum of approx. 0.5 seconds). (1 trip detection logic) |
|
MONITOR DESCRIPTION
- P0201, P0202, P0203, P0204:
The ECM compares injection command (# 1 to #4) signals and injection confirmation (INJF) signals for each cylinder. If the ECM determines that a cylinder has a malfunction, DTC P0201, P0202, P0203 or P0204 will be stored.
- P062D:
The ECM continuously monitors both injection command (#1 to #4) signals and injection confirmation (INJF) signals. This DTC will be stored if the ECM determines that the number of #1 to #4 signals and INJF signals are inconsistent.
The fuel injectors are grounded over a Field Effect Transistor (FET) and a serial resistor. This resistor creates a voltage drop, which is monitored by the injector driver (EDU) (injector drive circuit) in relation to the current drawn by the injector assembly. When the injector current becomes too high, the voltage drop over the resistor exceeds a specified level and no INJF signal for that cylinder is sent to the ECM.
After the engine is started, when there is no injection confirmation (INJF) signal from the injector driver (EDU) to the ECM even though the ECM sends injection command (#1 to #4) signals to the injector driver (EDU), DTC P062D is stored.
If this DTC is stored, the ECM enters fail-safe mode and limits engine power or stops the engine. The fail-safe mode continues until the ignition switch is turned off.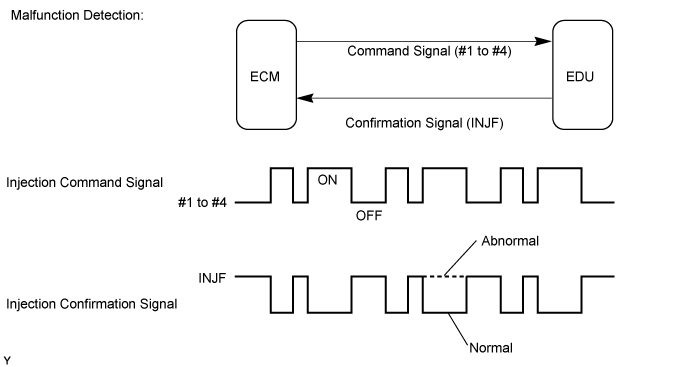
WIRING DIAGRAM
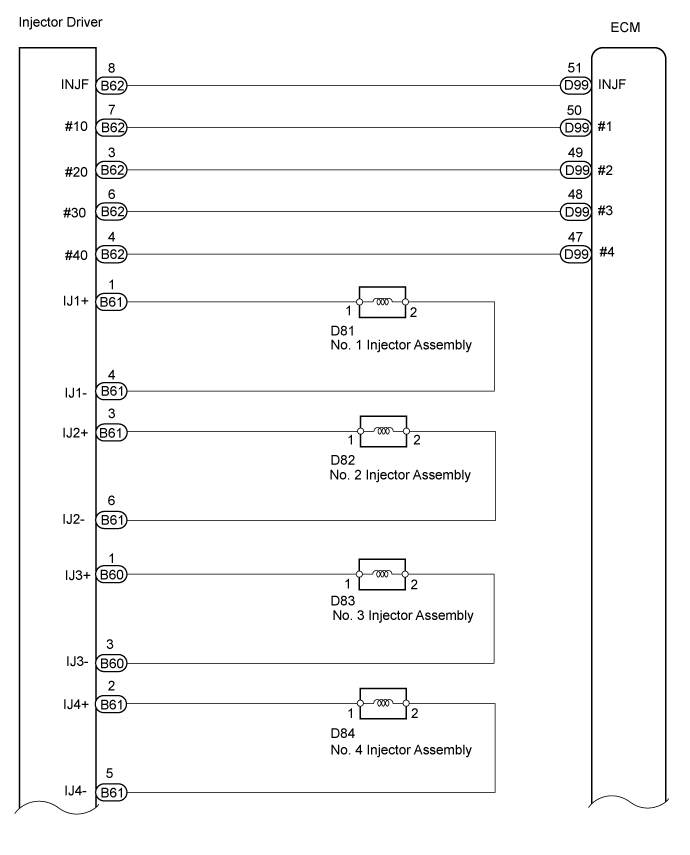
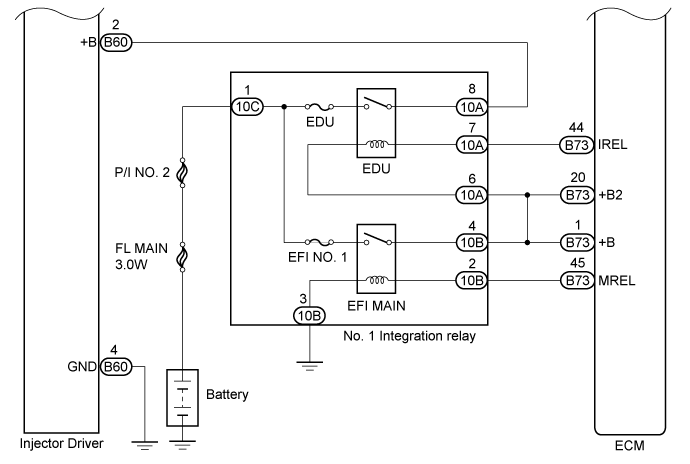
INSPECTION PROCEDURE
- CAUTION:
- Make sure to perform work on high voltage circuits with the ignition switch off.
- NOTICE:
- Inspect the fuses of circuits related to this system before performing the following inspection procedure.
- After replacing the ECM, the new ECM needs registration (Click here) and initialization (Click here).
- After replacing the fuel supply pump assembly, the ECM needs initialization (Click here).
- After replacing an injector assembly, the ECM needs registration (Click here).
- Inspect the fuses of circuits related to this system before performing the following inspection procedure.
- HINT:
- Read freeze frame data using the GTS. Freeze frame data records the engine condition when malfunctions are detected. When troubleshooting, freeze frame data can help determine if the vehicle was moving or stationary, if the engine was warmed up or not, and other data from the time the malfunction occurred.
| 1. CHECK ENGINE CRANKING CONDITION |

Check the engine cranking condition.
Result Result
Proceed to
Engine does not start*1
A
Engine starts, but idling is rough*2
B
Except above
C
- HINT:
- *1: Once DTC P062D is cleared, it is not stored again even when the engine does not start due to a malfunction in the injector driver (EDU).
When the engine cannot be started due to a malfunction in the injector driver (EDU), the value for "Common Rail Pressure" is higher than the value for "Target Common Rail Pressure"
- *2: DTC P0201, P0202, P0203, P0204 and P062D are stored at this time.
- *1: Once DTC P062D is cleared, it is not stored again even when the engine does not start due to a malfunction in the injector driver (EDU).
|
|
||||
|
|
||||


| A | |
 |
| 2. INSPECT ECM |
Check the waveform of the ECM connectors using an oscilloscope.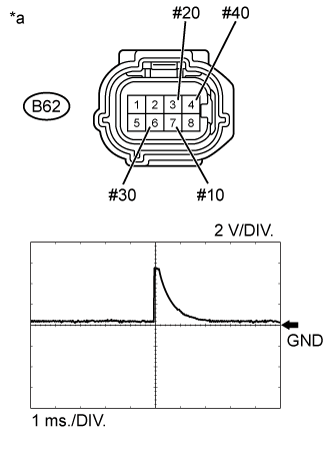
- OK:
Tester Connection
Condition
Specified Condition
D62-7 (#10) - Body ground
Cranking
Correct waveform is as shown
D62-3 (#20) - Body ground
Cranking
Correct waveform is as shown
D62-6 (#30) - Body ground
Cranking
Correct waveform is as shown
D62-4 (#40) - Body ground
Cranking
Correct waveform is as shown
Text in Illustration *a
Front view of wire harness connector
(to Injector Driver (EDU))
|
|
||||
| OK | |
|
| 3. CHECK TERMINAL VOLTAGE INJECTOR DRIVER POWER SOURCE |
Disconnect the injector driver connectors.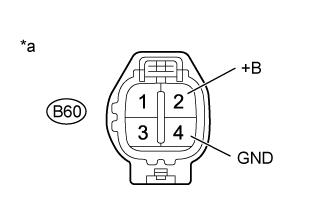
Measure the voltage according to the value(s) in the table below.
- Standard Voltage:
Tester Connection
Switch Condition
Specified Condition
B60-2 (+B) - B60-4 (GND)
Ignition switch ON
11 to 14 V
Text in Illustration *a
Front view of wire harness connector
(to Injector Driver)
Reconnect the injector driver connectors.
|
|
||||
| OK | |
|
| 4. CHECK HARNESS AND CONNECTOR (INJECTOR DRIVER - ECM) |
Disconnect the injector driver connector.
Disconnect the ECM connector.
Measure the resistance according to the value(s) in the table below.
- Standard Resistance:
Tester Connection
Condition
Specified Condition
B62-7 (#10) - D99-50 (#1)
Always
Below 1 Ω
B62-3 (#20) - D99-49 (#2)
Always
Below 1 Ω
B62-6 (#30) - D99-48 (#3)
Always
Below 1 Ω
B62-4 (#40) - D99-47 (#4)
Always
Below 1 Ω
B62-8 (INJF) - D99-51 (INJF)
Always
Below 1 Ω
B62-7 (#10) or D99-50 (#1) - Body ground
Always
10 kΩ or higher
B62-3 (#20) or D99-49 (#2) - Body ground
Always
10 kΩ or higher
B62-6 (#30) or D99-48 (#3) - Body ground
Always
10 kΩ or higher
B62-4 (#40) or D99-47 (#4) - Body ground
Always
10 kΩ or higher
B62-8 (INJF) or D99-51 (INJF) - Body ground
Always
10 kΩ or higher
Reconnect the injector driver connector.
Reconnect the ECM connector.
|
|
||||
| OK | |
|
| 5. REPLACE INJECTOR DRIVER |
Replace the injector driver (Click here).
|
|
||||
| 6. CHECK WHETHER DTC OUTPUT RECURS |
Connect the GTS to the DLC3.
Turn the ignition switch to ON and turn the GTS on.
Clear the DTCs (Click here).
Turn the ignition switch off for 30 seconds.
Start the engine and idle it for 30 seconds.
Enter the following menus: Powertrain / Engine and ECT / Trouble Codes.
Check the DTCs output on the GTS.
- HINT:
- The cylinder with the malfunctioning injector assembly can be determined based on the output DTCs.
- If the DTC P0201 is output, check the No. 1 injector assembly circuit.
- If the DTC P0202 is output, check the No. 2 injector assembly circuit.
- If the DTC P0203 is output, check the No. 3 injector assembly circuit.
- If the DTC P0204 is output, check the No. 4 injector assembly circuit.
- The cylinder with the malfunctioning injector assembly can be determined based on the output DTCs.
| NEXT | |
|
| 7. INSPECT INJECTOR DRIVER |
Disconnect the injector assembly connectors for all cylinders.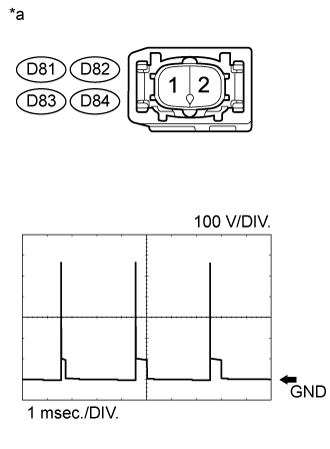
Start the engine.
Check the waveform of the injector assembly connectors using an oscilloscope.
- OK:
Tester Connection
Condition
Specified Condition
D81-1 - D81-2
Cranking
Voltage increases by 50 V or more
D82-1 - D82-2
Cranking
Voltage increases by 50 V or more
D83-1 - D83-2
Cranking
Voltage increases by 50 V or more
D84-1 - D84-2
Cranking
Voltage increases by 50 V or more
Text in Illustration *a
Front view of wire harness connector
(to Fuel Injector assembly)
|
|
||||
| OK | |
|
| 8. REPLACE INJECTOR ASSEMBLY (RELEVANT CYLINDER) |
Replace the injector assembly of the cylinder relevant to the DTC (Click here).
- NOTICE:
- When replacing the injector assembly for a cylinder, always be sure to use a new injection pipe.
- Follow the procedure in the repair manual and temporarily install the injection pipes and nozzle leakage pipe, and then correctly position the injector assemblies. After that, tighten parts according to the torque specifications.
- If the installation procedure is not performed correctly, injector assemblies may become out of position, which may cause the injector assemblies to deteriorate, resulting in malfunctions.
- If an injector assembly deteriorates and malfunctions, other problems such as knocking, rough idle, etc. may occur.
- If an injector assembly becomes out of position, it is possible that the seal between the injector assembly and injection pipe may become incomplete, resulting in a fuel leak.
- When replacing the injector assembly for a cylinder, always be sure to use a new injection pipe.
| NEXT | |
|
| 9. BLEED AIR FROM FUEL SYSTEM |
Bleed the air from the fuel system (Click here).
| NEXT | |
|
| 10. REGISTER INJECTOR COMPENSATION CODE AND PERFORM PILOT QUANTITY LEARNING |
Register the injector compensation code (Click here).
Perform the fuel injector pilot quantity learning (Click here).
|
|
||||
| 11. CHECK HARNESS AND CONNECTOR (INJECTOR DRIVER - ECM) |
Disconnect the injector driver connector.
Disconnect the ECM connector.
Measure the resistance according to the value(s) in the table below.
- Standard Resistance:
Tester Connection
Condition
Specified Condition
B62-7 (#10) - D99-50 (#1)
Always
Below 1 Ω
B62-3 (#20) - D99-49 (#2)
Always
Below 1 Ω
B62-6 (#30) - D99-48 (#3)
Always
Below 1 Ω
B62-4 (#40) - D99-47 (#4)
Always
Below 1 Ω
B62-8 (INJF) - D99-51 (INJF)
Always
Below 1 Ω
B62-7 (#10) or D99-50 (#1) - Body ground
Always
10 kΩ or higher
B62-3 (#20) or D99-49 (#2) - Body ground
Always
10 kΩ or higher
B62-6 (#30) or D99-48 (#3) - Body ground
Always
10 kΩ or higher
B62-4 (#40) or D99-47 (#4) - Body ground
Always
10 kΩ or higher
B62-8 (INJF) or D99-51 (INJF) - Body ground
Always
10 kΩ or higher
Reconnect the injector driver connector.
Reconnect the ECM connector.
|
|
||||
| OK | |
|
| 12. REPLACE ECM |
Replace the ECM (Click here).
|
|
||||
| 13. CHECK HARNESS AND CONNECTOR (INJECTOR ASSEMBLY - INJECTOR DRIVER) |
Disconnect the injector assembly connectors.
Disconnect the injector driver connectors.
Measure the resistance according to the value(s) in the table below.
- Standard Resistance:
Tester Connection
Condition
Specified Condition
D81-1 - B61-1 (IJ1+)
Always
Below 1 Ω
D81-2 - B61-4 (IJ1-)
Always
Below 1 Ω
D82-1 - B61-3 (IJ2+)
Always
Below 1 Ω
D82-2 - B61-6 (IJ2-)
Always
Below 1 Ω
D83-1 - B60-1 (IJ3+)
Always
Below 1 Ω
D83-2 - B60-3 (IJ3-)
Always
Below 1 Ω
D84-1 - B61-2 (IJ4+)
Always
Below 1 Ω
D84-2 - B61-5 (IJ4-)
Always
Below 1 Ω
D81-1 or B61-1 (IJ1+) - Body ground
Always
10 kΩ or higher
D81-2 or B61-4 (IJ1-) - Body ground
Always
10 kΩ or higher
D82-1 or B61-3 (IJ2+) - Body ground
Always
10 kΩ or higher
D82-2 or B61-6 (IJ2-) - Body ground
Always
10 kΩ or higher
D83-1 or B60-1 (IJ3+) - Body ground
Always
10 kΩ or higher
D83-2 or B60-3 (IJ3-) - Body ground
Always
10 kΩ or higher
D84-1 or B61-2 (IJ4+) - Body ground
Always
10 kΩ or higher
D84-2 or B61-5 (IJ4-) - Body ground
Always
10 kΩ or higher
Reconnect the injector assembly connectors.
Reconnect the injector driver connectors.
|
|
||||
| OK | |
|
| 14. REPLACE INJECTOR DRIVER |
Replace the injector driver (Click here).
|
|
||||
| 15. REPAIR OR REPLACE HARNESS OR CONNECTOR |
Repair or replace the harness or connector.
| NEXT | |
|
| 16. CONFIRM WHETHER MALFUNCTION HAS BEEN SUCCESSFULLY REPAIRED |
Connect the GTS to the DLC3.
Clear the DTCs (Click here).
Turn the ignition switch off for 30 seconds or more.
Start the engine and idle it for 10 seconds.
Enter the following menus: Powertrain / Engine and ECT / Trouble Codes.
Confirm that the DTC is not output again.
| NEXT | ||
 |
||
| ||