Speaker Circuit
Circuit diagnosis · Vehicles built Oct 2014 – Mar 2016
Versions by build date: Oct 2014 – Mar 2016 Apr 2016 – Dec 2016 from Jan 2017
DESCRIPTION
The radio receiver assembly sends sound signals to speakers.WIRING DIAGRAM
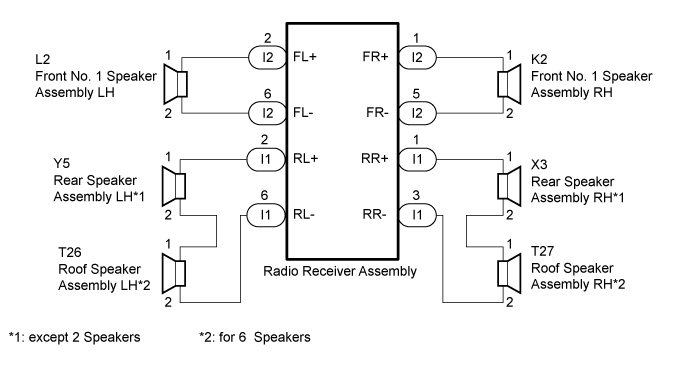

INSPECTION PROCEDURE
| 1. CHECK HARNESS AND CONNECTOR (SPEAKER CIRCUIT) |
 |
- *1: for RH Side
- *2: for LH Side
- *3: except 2 Speakers
- *4: for 6 Speakers
Disconnect the I2 and I1 radio receiver assembly connector.
Disconnect the K2*1 and/or L2*2 front No. 1 speaker assembly connector.
Disconnect the X3*1 and/or Y5*2 rear speaker assembly connector*3.
Disconnect the T27*1 and/or T26*2 roof speaker assembly connector*4.
Measure the resistance according to the value(s) in the table below.
- Standard Resistance:
for RH Side (for 2 Speakers)
Tester Connection
|
Condition
|
Specified Condition
|
I2-1 (FR+) - K2-1
|
Always
|
Below 1 Ω
|
I2-5 (FR-) - K2-2
|
Always
|
Below 1 Ω
|
I2-1 (FR+) - Body ground
|
Always
|
10 kΩ or higher
|
I2-5 (FR-) - Body ground
|
Always
|
10 kΩ or higher
|
for RH Side (for 4 Speakers)
Tester Connection
|
Condition
|
Specified Condition
|
I2-1 (FR+) - K2-1
|
Always
|
Below 1 Ω
|
I2-5 (FR-) - K2-2
|
Always
|
Below 1 Ω
|
I1-1 (RR+) - X3-1
|
Always
|
Below 1 Ω
|
I1-3 (RR-) - X3-2
|
Always
|
Below 1 Ω
|
I2-1 (FR+) - Body ground
|
Always
|
10 kΩ or higher
|
I2-5 (FR-) - Body ground
|
Always
|
10 kΩ or higher
|
I1-1 (RR+) - Body ground
|
Always
|
10 kΩ or higher
|
I1-3 (RR-) - Body ground
|
Always
|
10 kΩ or higher
|
for RH Side (for 6 Speakers)
Tester Connection
|
Condition
|
Specified Condition
|
I2-1 (FR+) - K2-1
|
Always
|
Below 1 Ω
|
I2-5 (FR-) - K2-2
|
Always
|
Below 1 Ω
|
I1-1 (RR+) - X3-1
|
Always
|
Below 1 Ω
|
X3-2 - T27-1
|
Always
|
Below 1 Ω
|
I1-3 (RR-) - T27-2
|
Always
|
Below 1 Ω
|
I2-1 (FR+) - Body ground
|
Always
|
10 kΩ or higher
|
I2-5 (FR-) - Body ground
|
Always
|
10 kΩ or higher
|
I1-1 (RR+) - Body ground
|
Always
|
10 kΩ or higher
|
I1-3 (RR-) - Body ground
|
Always
|
10 kΩ or higher
|
X3-2 - Body ground
|
Always
|
10 kΩ or higher
|
for LH Side (for 2 Speakers)
Tester Connection
|
Condition
|
Specified Condition
|
I2-2 (FL+) - L2-1
|
Always
|
Below 1 Ω
|
I2-6 (FL-) - L2-2
|
Always
|
Below 1 Ω
|
I2-2 (FL+) - Body ground
|
Always
|
10 kΩ or higher
|
I2-6 (FL-) - Body ground
|
Always
|
10 kΩ or higher
|
for LH Side (for 4 Speakers)
Tester Connection
|
Condition
|
Specified Condition
|
I2-2 (FL+) - L2-1
|
Always
|
Below 1 Ω
|
I2-6 (FL-) - L2-2
|
Always
|
Below 1 Ω
|
I1-2 (RL+) - Y5-1
|
Always
|
Below 1 Ω
|
I1-6 (RL-) - Y5-2
|
Always
|
Below 1 Ω
|
I2-2 (FL+) - Body ground
|
Always
|
10 kΩ or higher
|
I2-6 (FL-) - Body ground
|
Always
|
10 kΩ or higher
|
I1-2 (RL+) - Body ground
|
Always
|
10 kΩ or higher
|
I1-6 (RL-) - Body ground
|
Always
|
10 kΩ or higher
|
for LH Side (for 6 Speakers)
Tester Connection
|
Condition
|
Specified Condition
|
I2-2 (FL+) - L2-1
|
Always
|
Below 1 Ω
|
I2-6 (FL-) - L2-2
|
Always
|
Below 1 Ω
|
I1-2 (RL+) - Y5-1
|
Always
|
Below 1 Ω
|
Y5-2 - T26-1
|
Always
|
Below 1 Ω
|
I1-6 (RL-) - T26-2
|
Always
|
Below 1 Ω
|
I2-2 (FL+) - Body ground
|
Always
|
10 kΩ or higher
|
I2-6 (FL-) - Body ground
|
Always
|
10 kΩ or higher
|
I1-2 (RL+) - Body ground
|
Always
|
10 kΩ or higher
|
I1-6 (RL-) - Body ground
|
Always
|
10 kΩ or higher
|
Y5-2 - Body ground
|
Always
|
10 kΩ or higher
|
|
NG |
 |
|
| REPAIR OR REPLACE HARNESS OR CONNECTOR |
|
|
| OK |
|
 |
|
| 2. INSPECT FRONT NO. 1 SPEAKER ASSEMBLY |
|
Remove the front No. 1 speaker assembly (Click here).
Inspect the front No. 1 speaker assembly (Click here).
Result
Result
|
Proceed to
|
OK (except 2 Speakers)
|
A
|
OK (for 2 Speakers)
|
B
|
NG
|
C
|
|
B |
|
|
|
|
|
C |
|
|
|
|
| A |
|
|
|
| 3. INSPECT REAR SPEAKER ASSEMBLY |
|
Remove the rear speaker assembly (Click here).
Inspect the rear speaker assembly (Click here).
Result
Result
|
Proceed to
|
OK (for 6 Speakers)
|
A
|
OK (for 4 Speakers)
|
B
|
NG
|
C
|
|
B |
|
|
|
|
|
C |
|
|
|
|
| A |
|
|
|
| 4. INSPECT ROOF SPEAKER ASSEMBLY |
|
Remove the roof speaker assembly (Click here).
Inspect the roof speaker assembly (Click here).
|
NG |
|
|
|
|
| OK |
|
 |
|
|