INSTALLATION
Removal / installation · Vehicles built Jan 2015 – Dec 2016
Versions by build date: Jan 2015 – Dec 2016 from Jan 2017
| 1. INSTALL TRANSMISSION CONTROL CABLE ASSEMBLY |

Roll up the floor carpet of the front seat LH and connect the transmission control cable assembly with the 2 bolts.
- Torque:
- 8.0 N*m{ 82 kgf*cm , 71 in.*lbf }
Install the No. 3 transmission control cable bracket to the body with the 2 nuts.
- Torque:
- 5.5 N*m{ 56 kgf*cm , 49 in.*lbf }
Install the transmission control cable assembly to the No. 3 transmission control cable bracket.
Install the No. 2 transmission control cable bracket to the under body with the 2 nuts.
- Torque:
- 5.5 N*m{ 56 kgf*cm , 49 in.*lbf }
Connect the transmission control cable assembly to the No. 2 transmission control cable bracket.
Connect the transmission control cable assembly to the body with the 2 bolts.
- Torque:
- 14 N*m{ 143 kgf*cm , 10 ft.*lbf }
Turn the control shaft lever clockwise until it stops, and then return the control shaft lever counterclockwise 2 notches to N.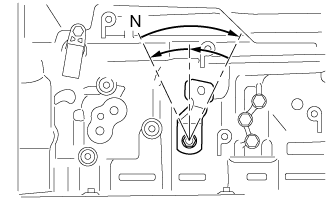

Cable end lightly pushed toward the front of the vehicle, install the transmission control cable assembly to the transmission control shaft lever LH with the nut.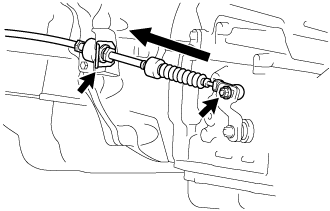
- Torque:
- 15 N*m{ 148 kgf*cm , 11 ft.*lbf }
- HINT:
- Tighten the nut with no slack in the control cable.
Connect the transmission control shift cable assembly to the No. 1 transmission control cable bracket with a new clip.
| 2. CONNECT TRANSMISSION CONTROL CABLE ASSEMBLY |
| 3. INSTALL NO. 1 ENGINE UNDER COVER |
Install the No. 1 engine under cover with the 4 bolts.
- Torque:
- 13 N*m{ 133 kgf*cm , 10 ft.*lbf }