Fuel Injector Circuit
Circuit diagnosis · Vehicles built Oct 2014 – Dec 2014
DESCRIPTION
The fuel injectors are located on the cylinder head. They inject fuel into the cylinders based on the signals from the ECM.WIRING DIAGRAM
Refer to DTC P0300 (Click here).INSPECTION PROCEDURE
- NOTICE:
- Inspect the fuses for circuits related to this system before performing the following inspection procedure.
| 1. INSPECT FUEL INJECTOR ASSEMBLY (POWER SOURCE) |

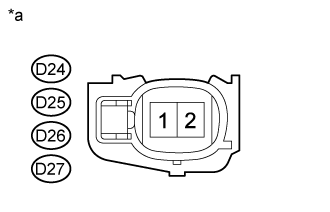  |
Disconnect the fuel injector connector.
Turn the ignition switch to ON.
Measure the voltage according to the value(s) in the table below.
- Standard Voltage:
Cylinder
Tester Connection
Switch Condition
Specified Condition
No. 1
D24-1 - Body ground
Ignition switch ON
11 to 14 V
No. 2
D25-1 - Body ground
Ignition switch ON
11 to 14 V
No. 3
D26-1 - Body ground
Ignition switch ON
11 to 14 V
No. 4
D27-1 - Body ground
Ignition switch ON
11 to 14 V
Text in Illustration *a
Front view of wire harness connector
(to Fuel Injector Assembly)
|
|
||||

| OK | |
 |
| 2. INSPECT FUEL INJECTOR ASSEMBLY |
Inspect the fuel injector assembly (Click here).
|
|
||||

| OK | |
|
| 3. CHECK HARNESS AND CONNECTOR (FUEL INJECTOR - ECM) |
Disconnect the fuel injector connector.
Disconnect the ECM connector.
Measure the resistance according to the value(s) in the table below.
- Standard Resistance:
Cylinder
Tester Connection
Condition
Specified Condition
No. 1
D24-2 - Body ground
Always
10 kΩ or higher
D24-2 - D97-86 (#1)
Always
Below 1 Ω
No. 2
D25-2 - Body ground
Always
10 kΩ or higher
D25-2 - D97-85 (#2)
Always
Below 1 Ω
No. 3
D26-2 - Body ground
Always
10 kΩ or higher
D26-2 - D97-84 (#3)
Always
Below 1 Ω
No. 4
D27-2 - Body ground
Always
10 kΩ or higher
D27-2 - D97-83 (#4)
Always
Below 1 Ω
|
|
||||
| OK | ||
 |
||
| ||
| 4. CHECK HARNESS AND CONNECTOR (FUEL INJECTOR - NO. 1 INTEGRATION RELAY) |
Disconnect the fuel injector connector.
Remove the No. 1 integration relay from the No. 1 engine room relay block.
Measure the resistance according to the value(s) in the table below.
- Standard Resistance:
Cylinder
Tester Connection
Condition
Specified Condition
No. 1
D24-1 or 10B-4 - Body ground
Always
10 kΩ or higher
D24-1 - 10B-4
Always
Below 1 Ω
No. 2
D25-1 or 10B-4 - Body ground
Always
10 kΩ or higher
D25-1 - 10B-4
Always
Below 1 Ω
No. 3
D26-1 or 10B-4- Body ground
Always
10 kΩ or higher
D26-1 - 10B-4
Always
Below 1 Ω
No. 4
D27-1 or 10B-4- Body ground
Always
10 kΩ or higher
D27-1 - 10B-4
Always
Below 1 Ω
|
|
||||
| OK | |
|
| 5. INSPECT NO. 1 INTEGRATION RELAY (INJ) |
Inspect the No. 1 integration relay (INJ) (Click here).
|
|
||||
| OK | |
|
| 6. CHECK NO. 1 INTEGRATION RELAY (POWER SOURCE) |
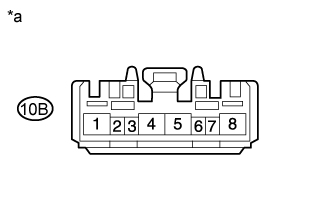 |
Remove the No. 1 integration relay from the No. 1 engine room relay block.
Measure the voltage according to the value(s) in the table below.
- Standard Voltage:
Tester Connection
Condition
Specified Condition
10B-1 - Body ground
Always
11 to 14 V
Text in Illustration *a
Front view of wire harness connector
(to No. 1 Integration Relay)
|
|
||||
| OK | |
|
| 7. CHECK HARNESS AND CONNECTOR (NO. 1 INTEGRATION RELAY - BODY GROUND) |
Remove the No. 1 integration relay from the No. 1 engine room relay block.
Measure the resistance according to the value(s) in the table below.
- Standard Resistance:
Tester Connection
Condition
Specified Condition
10B-3 - Body ground
Always
Below 1 Ω
|
|
||||
| OK | |
|
| 8. CHECK HARNESS AND CONNECTOR (NO. 1 INTEGRATION RELAY - NO. 2 INTEGRATION RELAY) |
Remove the No. 1 integration relay from the No. 1 engine room relay block.
Remove the No. 2 integration relay from the instrument panel relay block.
Measure the resistance according to the value(s) in the table below.
- Standard Resistance:
Tester Connection
Condition
Specified Condition
12B-7 - 10B-2
Always
Below 1 Ω
12B-7 or 10B-2 - Body ground
Always
10 kΩ or higher
|
|
||||
| OK | ||
|
||
| ||