INSTALLATION
Removal / installation · Vehicles built from Jan 2017
| 1. INSTALL FRONT EXHAUST PIPE ASSEMBLY |

Using a vernier caliper, measure the free length of the compression spring.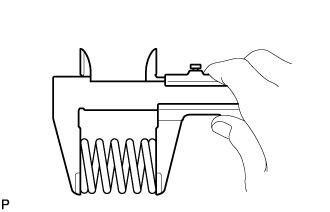

- Minimum free length:
- 38.5 mm (1.52 in.)
- If the free length is less than the minimum, replace the compression spring.
Using a plastic-faced hammer and wooden block, tap in a new gasket until its surface is flush with the front exhaust pipe assembly.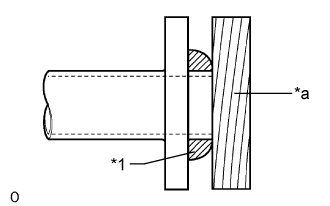
Text in Illustration *1
Gasket
*a
Wooden Block
- NOTICE:
- Be sure to install the gasket so that it faces the correct direction.
- Do not reuse the gasket.
- Do not damage the gasket.
- When connecting the front exhaust pipe assembly, do not push in the gasket with the front exhaust pipe assembly.
- Be sure to install the gasket so that it faces the correct direction.
Connect the front exhaust pipe assembly to the 2 exhaust pipe supports.
Install a new gasket and the front exhaust pipe assembly and 2 compression springs with the 2 bolts.
- Torque:
- 43 N*m{ 438 kgf*cm , 32 ft.*lbf }
| 2. INSTALL UREA INJECTOR SET |
| 3. INSTALL CENTER EXHAUST PIPE ASSEMBLY |
Install a new gasket to the center exhaust pipe assembly.
Connect the center exhaust pipe assembly to the 2 exhaust pipe supports.
Install the center exhaust pipe assembly with the 2 bolts and 2 new nuts.
- Torque:
- 48 N*m{ 489 kgf*cm , 35 ft.*lbf }
| 4. INSTALL NITROGEN OXIDES SENSOR |
Temporarily install the nitrogen oxides sensor.
Install the controller portion with the 2 nuts, and then attach the connector and clamp.
- Torque:
- 8.0 N*m{ 82 kgf*cm , 71 in.*lbf }
Using SST, install the nitrogen oxides sensor.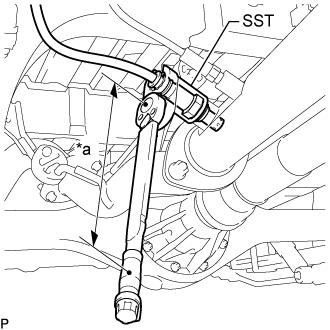
- SST
- 09224-00012
- Torque:
- Specified tightening torque:
- 55 N*m{ 561 kgf*cm , 41 ft.*lbf }
Text in Illustration *a
Torque Wrench Fulcrum Length
- NOTICE:
- Replace with a new part if it is dropped or if it receives a strong impact.
- Complete the installation so that there is no tension or slack in the harness of the nitrogen oxides sensor, and there is no interference.
- Replace with a new part if it is dropped or if it receives a strong impact.
- HINT:
- Calculate the torque wrench reading when changing the fulcrum length of the torque wrench (Click here).
- When using SST (fulcrum length of 30 mm (1.181 in.)) + torque wrench (fulcrum length of 255 mm (10.039 in.)): 49 N*m (502 kgf*cm, 36 ft.*lbf)
- Calculate the torque wrench reading when changing the fulcrum length of the torque wrench (Click here).
| 5. INSTALL NO. 4 EXHAUST GAS TEMPERATURE SENSOR |
Using a 14 mm union nut wrench, install the No. 4 exhaust gas temperature sensor to the front exhaust pipe assembly.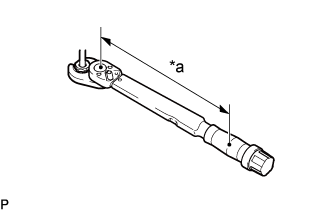
- Torque:
- Specified tightening torque
- 30 N*m {306 kgf*cm, 22 ft.*lbf}
Text in Illustration *a
Torque Wrench Fulcrum Length
- NOTICE:
- If the No. 4 exhaust gas temperature sensor is dropped, replace it with a new.
- HINT:
- Calculate the torque wrench reading when changing the fulcrum length of the torque wrench (Click here).
- When using a union nut wrench (fulcrum length of 25 mm (0.984 in.)) + torque wrench (fulcrum length of 180 mm (7.09 in.)): 26 N*m (268 kgf*cm, 19 ft.*lbf)
- Calculate the torque wrench reading when changing the fulcrum length of the torque wrench (Click here).
Connect the connector to the No. 4 exhaust gas temperature sensor.
| 6. INSTALL NO. 1 FRONT FLOOR HEAT INSULATOR |
Install the No. 1 front floor heat insulator with the 3 bolts.
- Torque:
- 17 N*m{ 168 kgf*cm , 12 ft.*lbf }
| 7. INSTALL EXHAUST PIPE DAMPER |
Install the exhaust pipe damper with the 2 bolts.
- Torque:
- 19 N*m{ 194 kgf*cm , 14 ft.*lbf }
| 8. INSTALL TAILPIPE ASSEMBLY |
Install a new gasket to the tailpipe assembly.
Connect the tailpipe assembly to the exhaust pipe support.
Connect the tailpipe assembly to the center exhaust pipe assembly.
Install the 2 bolts.
- Torque:
- 48 N*m{ 489 kgf*cm , 35 ft.*lbf }
| 9. INSPECT FOR EXHAUST GAS LEAK |
- If gas is leaking, tighten the areas necessary to stop the leak. Replace damaged parts as necessary.