INSTALLATION
Removal / installation · Vehicles built from Oct 2014
- HINT:
- A bolt without a torque specification is shown in the standard bolt chart (Click here).
| 1. INSTALL FRONT BUMPER SIDE SUPPORT LH |

Attach the 2 claws to install the front bumper side support LH.
Install the 2 screws.
| 2. INSTALL FRONT BUMPER SIDE SUPPORT RH |
- HINT:
- Use the same procedure described for the LH side.
| 3. INSTALL FRONT BUMPER REINFORCEMENT |
Install the front bumper reinforcement with the 6 bolts.
- Torque:
- 61 N*m{ 622 kgf*cm , 45 ft.*lbf }
| 4. INSTALL FRONT FLOOR CROSSMEMBER REINFORCEMENT SUB-ASSEMBLY RH |
Install the front floor crossmember reinforcement sub-assembly RH with the 5 bolts.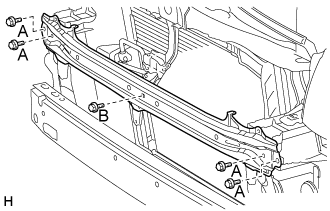

- Torque:
- for bolt A:
- 61 N*m{ 622 kgf*cm , 45 ft.*lbf }
- for bolt B:
- 12 N*m{ 122 kgf*cm , 9 ft.*lbf }
| 5. INSTALL FRONT BUMPER COVER |
Attach the 14 claws and 2 guides to install the front bumper cover.
Install the 3 bolts and 6 clips.
w/ Fog Light:
Connect the No. 4 engine room wire connector.
| 6. INSTALL STEP PLATE COVER LH |
Attach the claw to install the step plate cover LH.
Install the 4 clips.
| 7. INSTALL STEP PLATE COVER RH |
- HINT:
- Use the same procedure described for the LH side.
| 8. INSTALL LOWER RADIATOR GRILLE |
Attach the 18 claws to install the lower radiator grille.
| 9. INSTALL UPPER RADIATOR GRILLE |
Attach the 18 claws and 8 guides to install the upper radiator grille.
| 10. INSTALL RADIATOR GRILLE |
Attach the 10 claws to install the radiator grille.
Install the 4 clips and 2 screws.
| 11. ADJUST FOG LIGHT AIMING (w/ Fog Light) |