INSTALLATION
Removal / installation · Vehicles built from Jan 2017
| 1. INSTALL ENGINE OIL PRESSURE SWITCH ASSEMBLY |

Apply adhesive to 2 or 3 threads of the engine oil pressure switch assembly.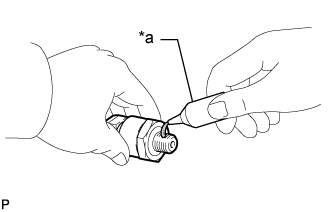

- Adhesive:
- Toyota Genuine Adhesive 1344, Three Bond 1344 or equivalent
- NOTICE:
- Do not apply adhesive to the oil inlet port of the engine oil pressure switch assembly.
Text in Illustration *a
Adhesive
Using SST and a 24 mm deep socket wrench, install the engine oil pressure switch assembly to the oil filter bracket.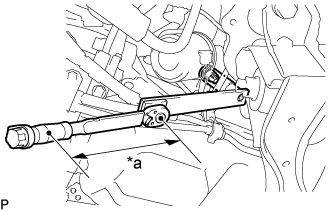
- SST
- 09961-01270
Text in Illustration *a
Torque Wrench Fulcrum Length
- Torque:
- Specified tightening torque:
- 15 N*m{ 153 kgf*cm , 11 ft.*lbf }
- HINT:
- Calculate the torque wrench reading when changing the fulcrum length of the torque wrench.
- When using SST (fulcrum length of 200 mm (7.87 in.)) + torque wrench (fulcrum length of 162 mm (6.38 in.)): 7.0 N*m (68 kgf*cm, 59 in.*lbf)
- Calculate the torque wrench reading when changing the fulcrum length of the torque wrench.
- NOTICE:
- Do not start the engine for at least 1 hour after the installation.
| 2. ADD ENGINE OIL |
Add new engine oil and install the oil filler cap sub-assembly.
- Oil Grade:
Oil Grade
Oil Viscosity (SAE)
ACEA C2
(Using engine oil other than ACEA C2 may damage the catalytic converter)
- 0W-30
- Standard Capacity:
Item
Specified Condition
Drain and refill without oil filter sub-assembly change
5.5 liters (5.8 US qts, 4.8 Imp. qts)
Drain and refill with oil filter sub-assembly change
6.1 liters (6.4 US qts, 5.4 Imp. qts)
Dry fill
7.0 liters (7.4 US qts, 6.2 Imp. qts)
| 3. INSPECT FOR OIL LEAK |
Start the engine. Make sure that there are no oil leaks from the areas that were worked on.
| 4. INSTALL NO. 2 ENGINE UNDER COVER |
Install the No. 2 engine under cover with the 6 bolts.
- Torque:
- 13 N*m{ 133 kgf*cm , 10 ft.*lbf }