HEATING / AIR CONDITIONING CONDENSER INSTALLATION
PROCEDURE

 1.INSTALL NO. 1 COOLER CONDENSER CUSHION (for 7GR-FKS)
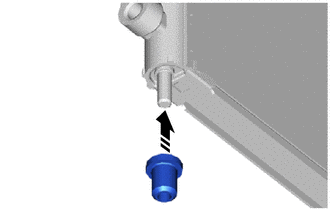

|
Install in this Direction |
Install each No. 1 cooler condenser cushion.
2.INSTALL COOLER CONDENSER ASSEMBLY (for 7GR-FKS)
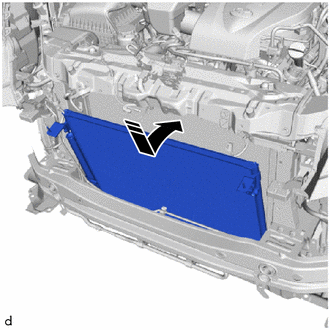
|
|
Install in this Direction |
Insert the cooler condenser assembly from the top as shown in the illustration.
- NOTICE:
-
Do not damage the cooler condenser assembly or radiator assembly when installing the cooler condenser assembly.
- HINT:
-
If the cooler condenser assembly is replaced with a new one, add compressor oil to the new cooler condenser assembly.
- Capacity:
40 cc (1.35 fl.oz)
- Compressor oil:
ND-OIL 8 or equivalent
3.INSTALL COOLER BRACKET (for 7GR-FKS)
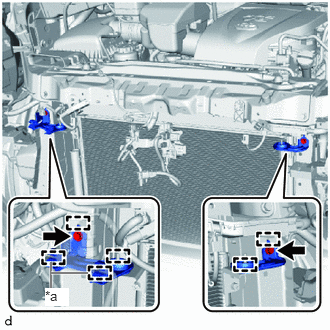
| *a | Clamp |
Attach the guide to install each cooler bracket with the 2 bolts.
- Torque:
- 9.8 N*m (100 kgf*cm, 87 in.*lbf)
Attach the clamp.
52139E
4.INSTALL FRONT BUMPER CENTER BRACE (for 7GR-FKS)
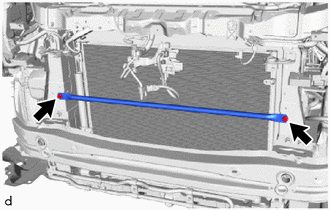
Install the front bumper center brace with the 2 bolts.
- Torque:
- 15 N*m (153 kgf*cm, 11 ft.*lbf)
5.INSTALL NO. 1 COOLER CONDENSER CUSHION (for 1GD-FTV)
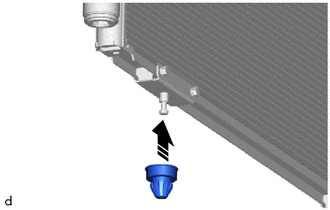
|
|
Install in this Direction |
Install each No. 1 cooler condenser cushion.
88716B
6.INSTALL COOLER REFRIGERANT LIQUID PIPE B (for 1GD-FTV)
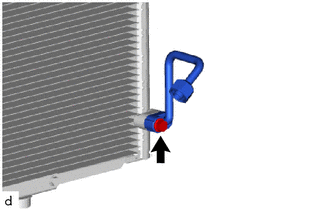
Install the cooler refrigerant liquid pipe B with the bolt.
- Torque:
- 5.4 N*m (55 kgf*cm, 48 in.*lbf)
7.INSTALL COOLER CONDENSER ASSEMBLY (for 1GD-FTV)
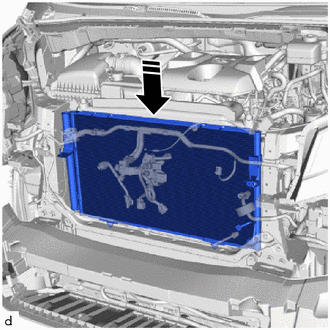
|
|
Install in this Direction |
Insert the cooler condenser assembly from the top as shown in the illustration.
- NOTICE:
-
Do not damage the cooler condenser assembly or radiator assembly when installing the cooler condenser assembly.
- HINT:
-
If the cooler condenser assembly is replaced with a new one, add compressor oil to the new cooler condenser assembly.
- Capacity:
40 cc (1.35 fl.oz)
- Compressor oil:
ND-OIL 8 or equivalent
8.INSTALL COOLER BRACKET (for 1GD-FTV)
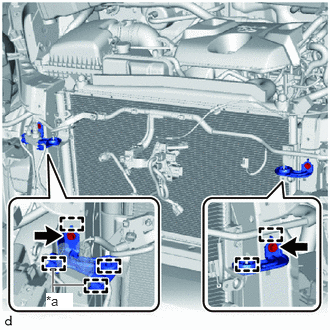
| *a | Clamp |
Attach the guide to install each cooler bracket with the 2 bolts.
- Torque:
- 9.8 N*m (100 kgf*cm, 87 in.*lbf)
Attach the clamp.
53205
9.INSTALL UPPER RADIATOR SUPPORT SUB-ASSEMBLY (for 1GD-FTV)
44360
10.CONNECT VANE PUMP OIL RESERVOIR ASSEMBLY (for 1GD-FTV)
17751
11.INSTALL NO. 1 AIR CLEANER INLET (for 1GD-FTV)
53209B
12.INSTALL HOOD LOCK SUPPORT BRACE SUB-ASSEMBLY
for 7GR-FKS:
Click hereEngine / Hybrid System>7GR-FKS (COOLING)>RADIATOR>INSTALLATION
for 1GD-FTV:
Click hereEngine / Hybrid System>1GD-FTV (COOLING)>RADIATOR>INSTALLATION
53510
13.INSTALL HOOD LOCK ASSEMBLY (for RHD)
53510
14.INSTALL HOOD LOCK ASSEMBLY (for LHD)
88710
15.CONNECT AIR CONDITIONING TUBE ASSEMBLY (for 7GR-FKS)
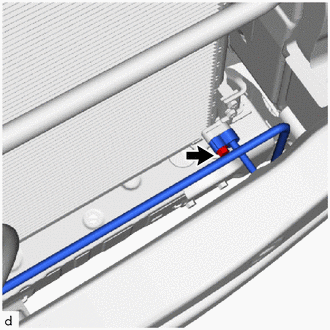
Remove the vinyl tape from the air conditioning tube assembly and the connecting part of the cooler condenser assembly.
Sufficiently apply compressor oil to a new O-ring and the fitting surface of the air conditioning tube assembly.
- Compressor oil:
ND-OIL 8 or equivalent
Install the O-ring to the air conditioning tube assembly.
- NOTICE:
-
Keep the O-rings and O-ring fitting surfaces free of foreign matter.
Connect the air conditioning tube assembly to the cooler condenser assembly with the bolt.
- Torque:
- 5.4 N*m (55 kgf*cm, 48 in.*lbf)
88703
16.CONNECT DISCHARGE HOSE SUB-ASSEMBLY (for 7GR-FKS)
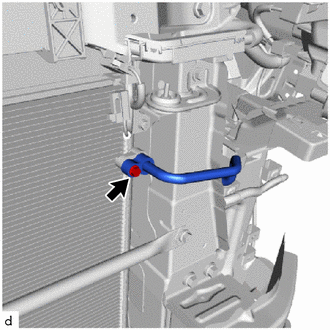
Remove the vinyl tape from the discharge hose sub-assembly and the connecting part of the cooler condenser assembly.
Sufficiently apply compressor oil to a new O-ring and the fitting surface of the discharge hose sub-assembly.
- Compressor oil:
ND-OIL 8 or equivalent
Install the O-ring to the discharge hose sub-assembly.
- NOTICE:
-
Keep the O-rings and O-ring fitting surfaces free of foreign matter.
Connect the discharge hose sub-assembly to the condenser assembly with the bolt.
- Torque:
- 5.4 N*m (55 kgf*cm, 48 in.*lbf)
88710
17.CONNECT AIR CONDITIONING TUBE ASSEMBLY (for 1GD-FTV)
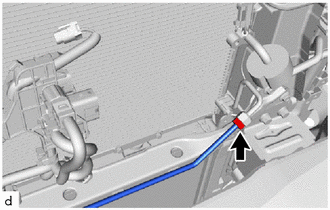
Remove the vinyl tape from the air conditioning tube assembly and the connecting part of the cooler condenser assembly.
Sufficiently apply compressor oil to a new O-ring and the fitting surface of the air conditioning tube assembly.
- Compressor oil:
ND-OIL 8 or equivalent
Install the O-ring to the air conditioning tube assembly.
- NOTICE:
-
Keep the O-rings and O-ring fitting surfaces free of foreign matter.
Connect the air conditioning tube assembly to the cooler condenser assembly with the union nut using a double wrench.
- Torque:
- 13.7 N*m (140 kgf*cm, 10 ft.*lbf)
88703
18.CONNECT DISCHARGE HOSE SUB-ASSEMBLY (for 1GD-FTV)
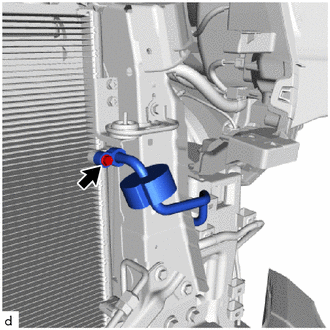
Remove the vinyl tape from the discharge hose sub-assembly and the connecting part of the cooler condenser assembly.
Sufficiently apply compressor oil to a new O-ring and the fitting surface of the discharge hose sub-assembly.
- Compressor oil:
ND-OIL 8 or equivalent
Install the O-ring to the discharge hose sub-assembly.
- NOTICE:
-
Keep the O-rings and O-ring fitting surfaces free of foreign matter.
Connect the discharge hose sub-assembly to the cooler condenser assembly with the bolt.
- Torque:
- 5.4 N*m (55 kgf*cm, 48 in.*lbf)
53286F
19.INSTALL RADIATOR SIDE AIR SEAL LH (w/o Condenser fan)
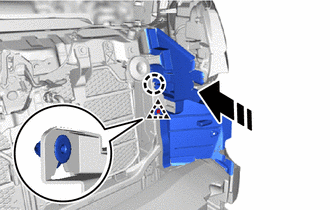
|
|
Install in this Direction |
Attach the clip and claw to install the radiator side air seal LH as shown in the illustration.
53285N
20.INSTALL RADIATOR SIDE AIR SEAL RH (w/o Condenser fan)
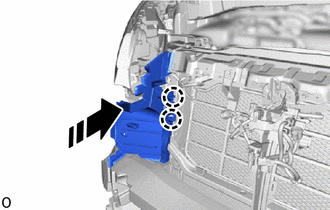
|
|
Install in this Direction |
Attach the claw to install the radiator side air seal LH as shown in the illustration.
17311B
21.INSTALL NO. 1 AIR INLET DUCT (for 1GD-FTV, w/o Condenser Fan)
22.INSTALL CONDENSER FAN (for 1GD-FTV, w/ Condenser Fan)
86520
23.INSTALL LOW PITCHED HORN ASSEMBLY
Click hereVehicle Exterior>HORN>HORN>INSTALLATION
86510
24.INSTALL HIGH PITCHED HORN ASSEMBLY (for 2-piece Type)
Click hereVehicle Exterior>HORN>HORN>INSTALLATION
25.INSTALL FRONT BUMPER ASSEMBLY
26. CHARGE AIR CONDITIONING SYSTEM WITH REFRIGERANT
53301
27.INSPECT HOOD SUB-ASSEMBLY
53301
28.ADJUST HOOD SUB-ASSEMBLY