1GD-FTV COOLING RADIATOR INSTALLATION
CAUTION / NOTICE / HINT
- HINT:
- ·
Use the same procedure for RHD and LHD vehicles.
·The procedure listed below is for LHD vehicles.
PROCEDURE

 16535
1.INSTALL LOWER RADIATOR SUPPORT
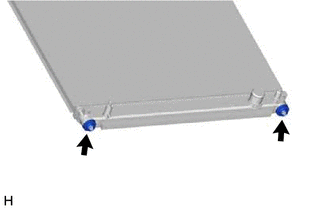
Install the 2 lower radiator supports to the radiator assembly.
16523A
2.INSTALL RADIATOR SUPPORT CUSHION
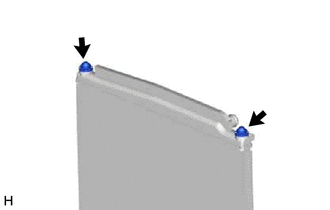
Install the 2 radiator support cushions to the radiator assembly.
16400
3.INSTALL RADIATOR ASSEMBLY
w/ Air Conditioning System:
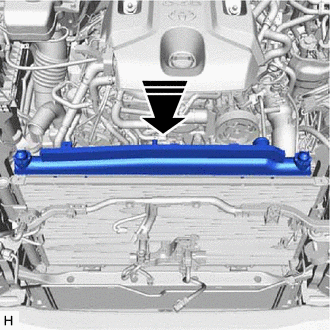

|
Install in this Direction |
Install the radiator assembly to the vehicle as shown in the illustration.
- NOTICE:
- ·
Perform the following procedure with 2 or more people to prevent damage to the radiator assembly.
·When installing the radiator assembly, do not damage the cooler condenser assembly.
w/o Air Conditioning System:
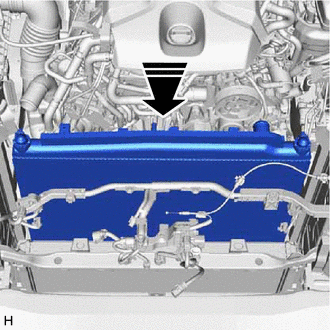
|
|
Install in this Direction |
Install the radiator assembly to the vehicle as shown in the illustration.
- NOTICE:
-
Perform the following procedure with 2 or more people to prevent damage to the radiator assembly.
32922A
4.CONNECT OIL COOLER OUTLET HOSE (for Automatic Transmission)
Connect the oil cooler outlet hose to the radiator assembly, and slide the clip to secure the hose.
- NOTICE:
-
Make sure the oil cooler outlet hose is securely inserted to the stopper.
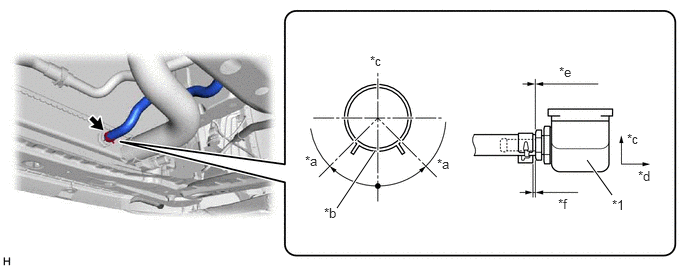
| *1 | Radiator Assembly | - | - |
| *a | 45° | *b | Paint Mark |
| *c | Upper Side | *d | Front Side |
| *e | 0 to 3 mm (0 to 0.118 in.) | *f | 2 to 5 mm (0.0787 to 0.197 in.) |
32921D
5.CONNECT OIL COOLER INLET HOSE (for Automatic Transmission)
Connect the oil cooler inlet hose to the radiator assembly, and slide the clip to secure the hose.
- NOTICE:
-
Make sure the oil cooler inlet hose is securely inserted to the stopper.
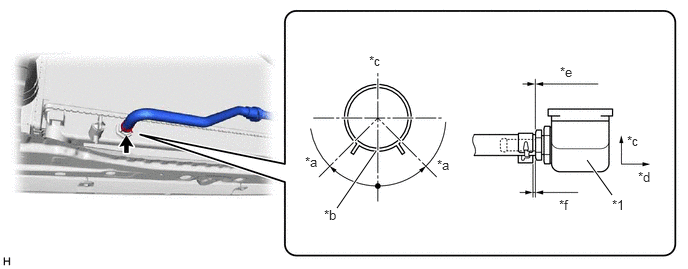
| *1 | Radiator Assembly | - | - |
| *a | 45° | *b | Paint Mark |
| *c | Upper Side | *d | Front Side |
| *e | 0 to 3 mm (0 to 0.118 in.) | *f | 2 to 5 mm (0.0787 to 0.197 in.) |
53205
6.INSTALL UPPER RADIATOR SUPPORT SUB-ASSEMBLY
for LHD:
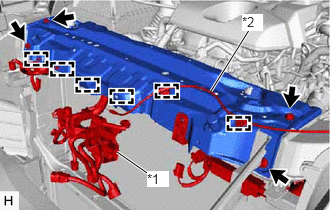
| *1 | Engine Room Main Wire |
| *2 | Hood Lock Control Cable Assembly |
Attach the clamps to connect the engine room main wire and hood lock control cable assembly.
Install the upper radiator support sub-assembly with the 4 bolts.
- Torque:
- 24 N*m (245 kgf*cm, 18 ft.*lbf)
for RHD:
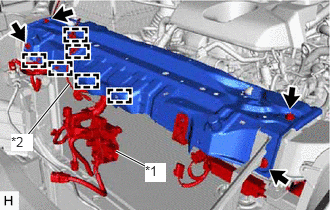
| *1 | Engine Room Main Wire |
| *2 | Hood Lock Control Cable Assembly |
Attach the clamps to connect the engine room main wire and hood lock control cable assembly.
Install the upper radiator support sub-assembly with the 4 bolts.
- Torque:
- 24 N*m (245 kgf*cm, 18 ft.*lbf)
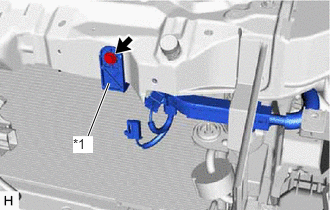
| *1 | Engine Room Main Wire |
Install the bolt to connect the engine room main wire.
- Torque:
- 11.5 N*m (117 kgf*cm, 8 ft.*lbf)
16546
7.INSTALL RADIATOR PROTECTOR (w/o Air Conditioning System)
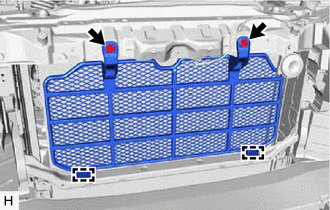
Attach the guides to install the radiator protector.
Install the 2 bolts.
- Torque:
- 7.5 N*m (76 kgf*cm, 66 in.*lbf)
53209B
8.INSTALL HOOD LOCK SUPPORT BRACE SUB-ASSEMBLY
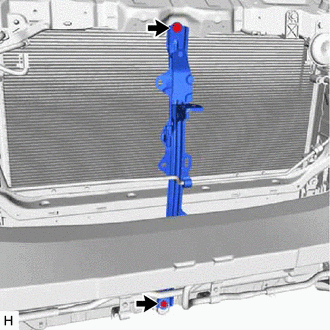
Install the hood lock support brace sub-assembly with the 2 bolts.
- Torque:
- 8.5 N*m (87 kgf*cm, 75 in.*lbf)
w/ Air Conditioning System:
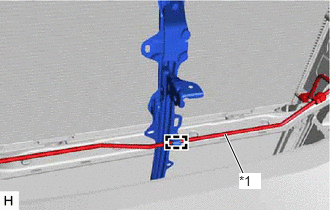
| *1 | Air Conditioner Tube and Accessory Assembly |
Attach the clamp to connect the air conditioner tube and accessory assembly.
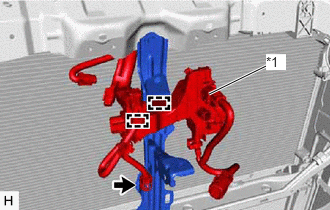
| *1 | Engine Room Main Wire |
Attach the clamps to connect the engine room main wire.
Connect the connector.
88590E
9.INSTALL BLOWER ASSEMBLY WITH SHROUD (w/ Condenser Fan)
for LH Side:
Click hereVehicle Interior>HEATING / AIR CONDITIONING>CONDENSER FAN>INSTALLATION
for RH Side:
Click hereVehicle Interior>HEATING / AIR CONDITIONING>CONDENSER FAN>INSTALLATION
86510
10.INSTALL HIGH PITCHED HORN ASSEMBLY (for 2-piece Type)
Click hereVehicle Exterior>HORN>HORN>INSTALLATION
86520
11.INSTALL LOW PITCHED HORN ASSEMBLY
Click hereVehicle Exterior>HORN>HORN>INSTALLATION
17311B
12.INSTALL NO. 1 AIR INLET DUCT
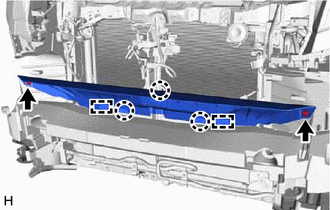
Attach the guides and claws to install the No. 1 air inlet duct.
Install the clips.
53510
13.INSTALL HOOD LOCK ASSEMBLY
14.INSTALL FRONT BUMPER
16572D
15.INSTALL NO. 2 RADIATOR HOSE
w/ Viscous Heater:
Connect the No. 2 radiator hose to the water inlet, and slide the clip to secure the hose.
- NOTICE:
- ·
Make sure the No. 2 radiator hose is securely inserted to the stopper.
·Position the clip so that it is 2 to 5 mm (0.0787 to 0.197 in.) away from the end of the water hose.
·Install so that the No. 2 radiator hose paint mark is aligned with the protrusion of the water inlet.
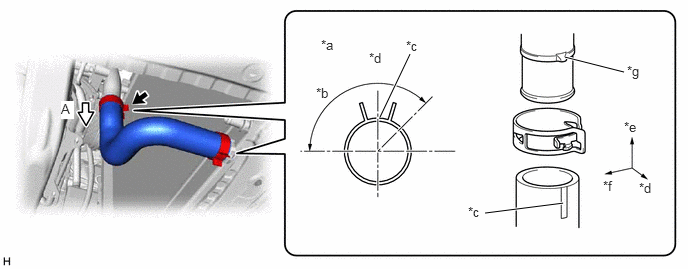
| *a | View A | *b | 135° |
| *c | Paint Mark | *d | Front Side |
| *e | Upper Side | *f | RH Side |
| *g | Protrusion of the Water Inlet | - | - |
w/o Viscous Heater:
Connect the No. 2 radiator hose to the water inlet, and slide the clip to secure the hose.
- NOTICE:
- ·
Make sure the No. 2 radiator hose is securely inserted to the stopper.
·Position the clip so that it is 2 to 5 mm (0.0787 to 0.197 in.) away from the end of the water hose.
·Install so that the No. 2 radiator hose paint mark is aligned with the protrusion of the water inlet.
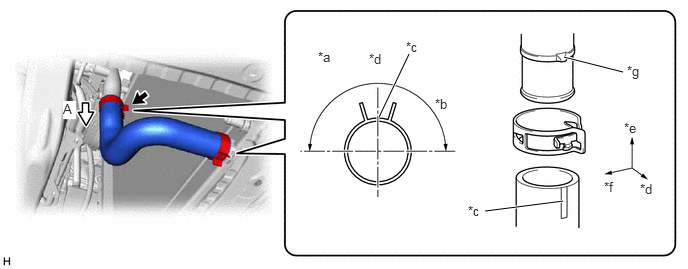
| *a | View A | *b | 180° |
| *c | Paint Mark | *d | Front Side |
| *e | Upper Side | *f | RH Side |
| *g | Protrusion of the Water Inlet | - | - |
Install the No. 2 radiator hose to the radiator assembly, and slide the clip to secure the hose.
- NOTICE:
- ·
Make sure the No. 2 radiator hose is securely inserted to the stopper.
·Position the clip so that it is 2 to 5 mm (0.0787 to 0.197 in.) away from the end of the water hose.
·Install so that the No. 2 radiator hose paint mark is aligned with the protrusion of the radiator assembly.
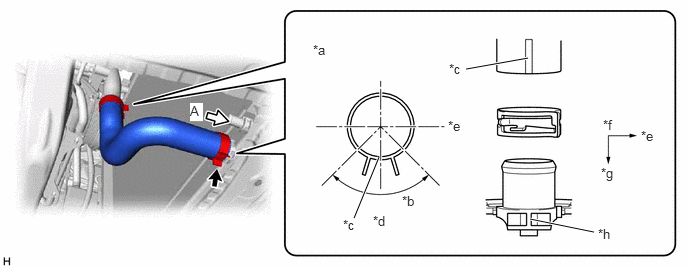
| *a | View A | *b | 90° |
| *c | Paint Mark | *d | Lower Side |
| *e | RH Side | *f | Upper Side |
| *g | Front Side | *h | Protrusion of the Radiator Assembly |
16711
16.INSTALL FAN SHROUD
Install the fan pulley to the water pump assembly.
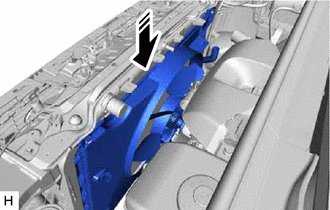
|
|
Install in this Direction |
Place the fan shroud together with the fan with fluid coupling assembly between the engine and radiator assembly.
- NOTICE:
-
Do not allow the radiator assembly to interfere with other parts.
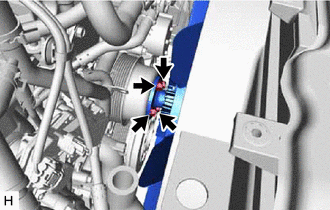
Temporarily install the fan with fluid coupling assembly to the water pump assembly with the 4 nuts.
- NOTICE:
- ·
Make sure to match the paint mark colors on the fan with fluid coupling assembly with the stud bolts of the same color on the water pump assembly.
·When installing the fan and fan and generator V belt, make sure to securely tighten the nuts of the fan with fluid coupling assembly so that the fan pulley is properly aligned.
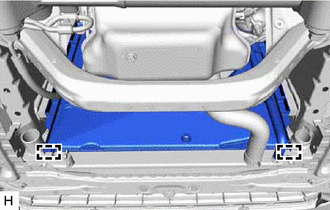
Attach the guides to install the fan shroud.
for Automatic Transmission:
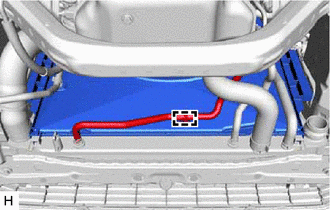
Attach the clamp to connect the oil cooler inlet hose.
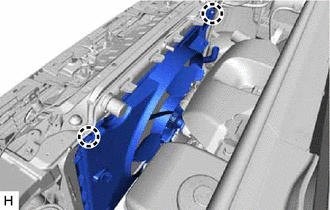
Attach the claws.
Install the fan and generator V belt.
Click hereGeneral>MAINTENANCE>1GD-FTV DRIVE BELT>INSTALLATION
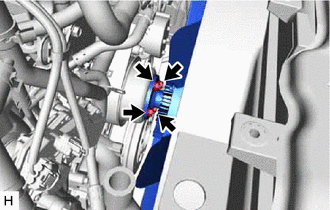
Tighten the 4 nuts holding the fan with fluid coupling assembly.
- Torque:
- 23 N*m (235 kgf*cm, 17 ft.*lbf)
Connect the No. 2 water by-pass hose to the radiator assembly, and slide the clip to secure the hose.
- NOTICE:
- ·
Make sure the No. 2 water by-pass hose is securely inserted to the stopper.
·Position the clip so that it is 2 to 5 mm (0.0787 to 0.197 in.) away from the end of the water hose.
·Install so that the No. 2 water by-pass hose paint mark is aligned with the protrusion of the radiator assembly.
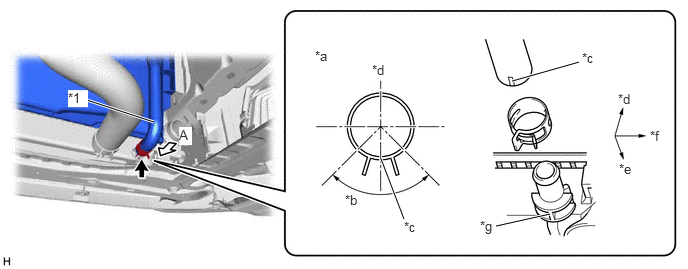
| *1 | No. 2 Water By-pass Hose | - | - |
| *a | View A | *b | 90° |
| *c | Paint Mark | *d | Upper Side |
| *e | Front Side | *f | RH Side |
| *g | Protrusion of the Radiator Assembly | - | - |
88359
17.INSTALL VISCOUS HEATER V BELT (w/ Viscous Heater)
16571C
18.INSTALL NO. 1 RADIATOR HOSE
Install the No. 1 radiator hose to the water outlet sub-assembly, and slide the clip to secure the hose.
- NOTICE:
- ·
Make sure the No. 1 radiator hose is securely inserted to the stopper.
·Position the clip so that it is 2 to 5 mm (0.0787 to 0.197 in.) away from the end of the water hose.
·Install so that the No. 1 radiator hose paint mark is aligned with the protrusion of the water outlet sub-assembly.
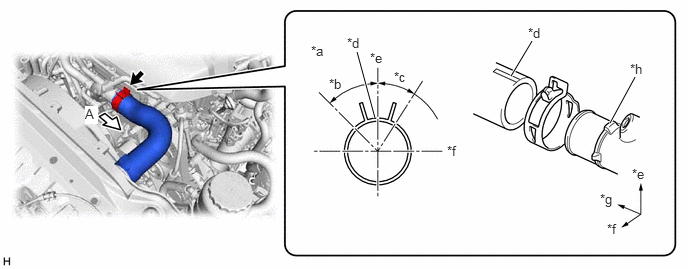
| *a | View A | *b | 45° |
| *c | 30° | *d | Paint Mark |
| *e | Upper Side | *f | Front Side |
| *g | RH Side | *h | Protrusion of the Water Outlet Sub-assembly |
Connect the No. 1 radiator hose to the radiator assembly, and slide the clip to secure the hose.
- NOTICE:
- ·
Make sure the No. 1 radiator hose is securely inserted to the stopper.
·Position the clip so that it is 2 to 5 mm (0.0787 to 0.197 in.) away from the end of the water hose.
·Install so that the No. 1 radiator hose paint mark is aligned with the protrusion of the radiator assembly.
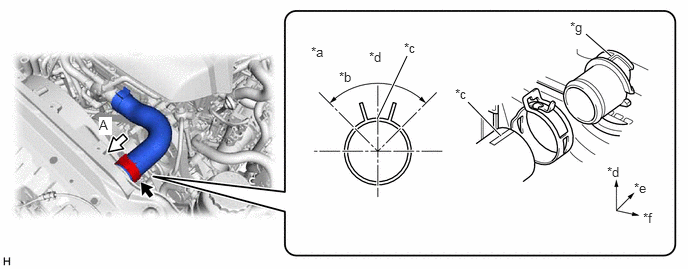
| *a | View A | *b | 90° |
| *c | Paint Mark | *d | Upper Side |
| *e | Front Side | *f | RH Side |
| *g | Protrusion of the Radiator Assembly | - | - |
16470
19.INSTALL RADIATOR RESERVE TANK ASSEMBLY
Install the radiator reserve tank assembly with the 2 bolts.
- Torque:
- 5.0 N*m (51 kgf*cm, 44 in.*lbf)
Connect the No. 1 water by-pass hose to the radiator assembly, and slide the clip to secure the hose.
- NOTICE:
- ·
Make sure the No. 1 water by-pass hose is securely inserted to the stopper.
·Position the clip so that it is 2 to 5 mm (0.0787 to 0.197 in.) away from the end of the water hose.
·Install so that the No. 1 water by-pass hose paint mark is aligned with the protrusion of the radiator assembly.
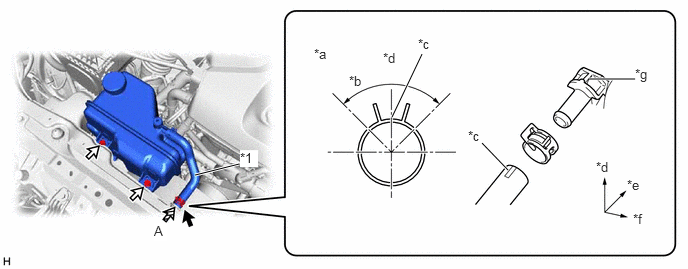
| *1 | No. 1 Water By-pass Hose | - | - |
| *a | View A | *b | 90° |
| *c | Paint Mark | *d | Upper Side |
| *e | Front Side | *f | RH Side |
| *g | Protrusion of the Radiator Assembly | - | - |

|
Clip | 
|
Bolt |
Connect the No. 2 water by-pass hose to the radiator reserve tank assembly, and slide the clip to secure the hose.
- NOTICE:
- ·
Make sure the No. 2 water by-pass hose is securely inserted to the stopper.
·Position the clip so that it is 2 to 5 mm (0.0787 to 0.197 in.) away from the end of the water hose.
·Install so that the No. 2 water by-pass hose paint mark is aligned with the protrusion of the radiator reserve tank assembly.
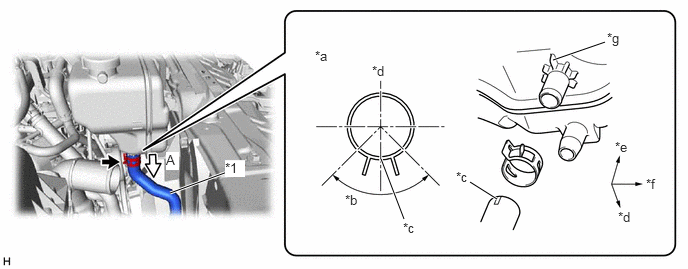
| *1 | No. 2 Water By-pass Hose | - | - |
| *a | View A | *b | 90° |
| *c | Paint Mark | *d | Front Side |
| *e | Upper Side | *f | RH Side |
| *g | Protrusion of the Radiator Reserve Tank Assembly | - | - |
17030
20.INSTALL AIR HOSE ASSEMBLY
44360
21.CONNECT VANE PUMP OIL RESERVOIR ASSEMBLY
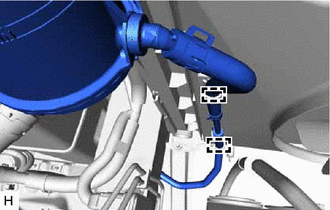
Attach the clamps to connect the vane pump oil reservoir assembly.
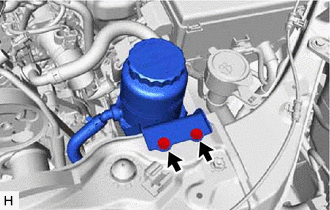
Install the 2 bolts to connect the vane pump oil reservoir assembly.
- Torque:
- 4.5 N*m (46 kgf*cm, 40 in.*lbf)
17751
22.INSTALL NO. 1 AIR CLEANER INLET
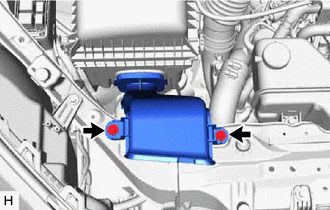
Install the No. 1 air cleaner inlet with the 2 bolts.
- Torque:
- 5.0 N*m (51 kgf*cm, 44 in.*lbf)
53106B
23.INSTALL RADIATOR COVER SUB-ASSEMBLY
24.ADD ENGINE COOLANT
25.INSPECT FOR COOLANT LEAK
51405A
26.INSTALL NO. 1 ENGINE UNDER COVER SUB-ASSEMBLY
52618
27.INSTALL LOWER FRONT BUMPER ABSORBER
51406A
28.INSTALL NO. 2 ENGINE UNDER COVER SUB-ASSEMBLY (w/ No. 2 Engine Under Cover Sub-assembly)