MAINTENANCE 1GD-FTV COOLANT REPLACEMENT
CAUTION / NOTICE / HINT
- HINT:
- ·
Use the same procedure for RHD and LHD vehicles.
·The procedure listed below is for LHD vehicles.
- CAUTION:
-
-
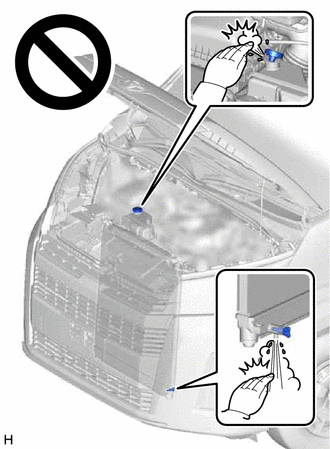
Do not remove the reserve tank cap sub-assembly or radiator drain cock plug while the engine and radiator assembly are still hot. Pressurized, hot engine coolant and steam may be released and cause serious burns.
PROCEDURE

 51447D
1.REMOVE CENTER NO. 4 ENGINE UNDER COVER
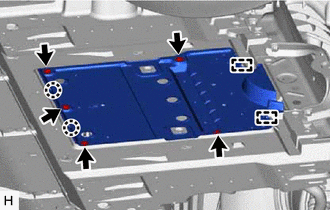
Remove the 5 screws.
Detach the claws.
Detach the guides and remove the center No. 4 engine under cover.
2.DRAIN ENGINE COOLANT
- CAUTION:
-
Do not remove the reserve tank cap sub-assembly, vent plug, radiator drain cock plug while the engine and radiator assembly are still hot. Pressurized, hot engine coolant and steam may be released and cause serious burns.
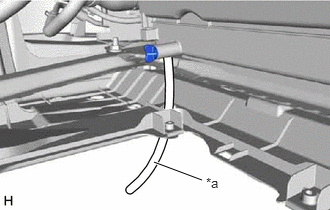
| *a | Hose |
Connect a hose with an inside diameter of 9 mm (0.354 in.) to the radiator drain cock as shown in the illustration.
Loosen the radiator drain cock plug.
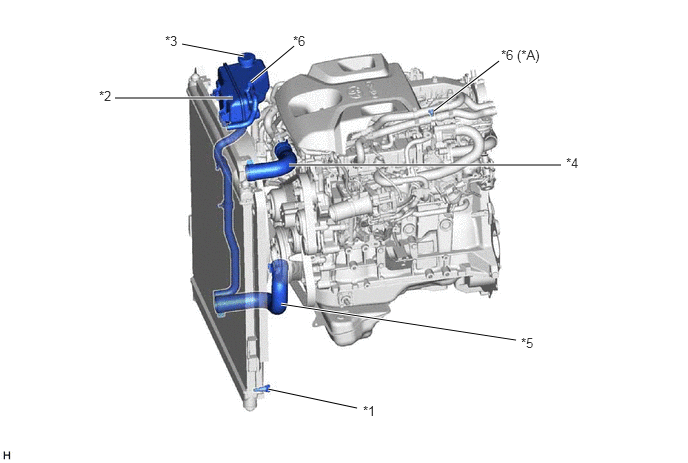
| *A | w/ Heater | - | - |
| *1 | Radiator Drain Cock Plug | *2 | Radiator Reserve Tank Assembly |
| *3 | Reserve Tank Cap Sub-assembly | *4 | No. 1 Radiator Hose |
| *5 | No. 2 Radiator Hose | *6 | Vent Plug |
- HINT:
-
Collect the engine coolant in a container and dispose of it according to the regulations in your area.
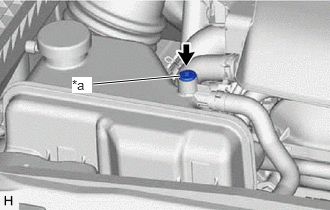
| *a | Vent Plug |
Using a 6 mm hexagon socket wrench, remove the vent plug and reserve tank cap sub-assembly, and then drain the engine coolant.
w/ Heater:
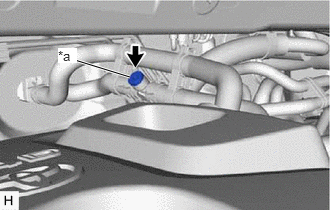
| *a | Vent Plug |
Remove the vent plug, and then drain the engine coolant from the water hose sub-assembly.
Tighten the radiator drain cock plug by hand and remove the hose from the radiator drain cock.
3.ADD ENGINE COOLANT
- CAUTION:
-
To prevent injury due to contact with an operating fan and generator V belt or cooling fan, keep your hands and clothing away from the fan and generator V belt and the fan when working in the engine compartment with the engine running or the ignition switch to ON.
- HINT:
-
Before adding coolant, turn the A/C switch off. (w/ Air Conditioning System)
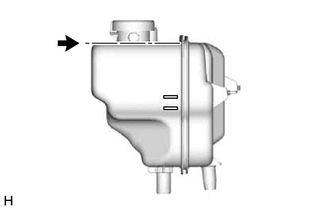

|
B Line |
Add engine coolant to the radiator reservoir filler opening until it is filled to the B line at the base of the radiator reservoir filler neck.
- Standard Capacity (except Australia and New Zealand):
Item Specified Condition w/o DPF w/o Heater 9.3 liters (9.8 US qts, 8.2 Imp. qts) w/ Heater, w/o Rear Heater 9.9 liters (10.5 US qts, 8.7 Imp. qts) w/ Heater, w/ Rear Heater 12.8 liters (13.5 US qts, 11.3 Imp. qts) w/ DPF w/o Heater 9.7 liters (10.3 US qts, 8.5 Imp. qts) w/ Heater, w/o Rear Heater 10.3 liters (10.9 US qts, 9.1 Imp. qts) w/ Heater, w/ Rear Heater 13.2 liters (13.9 US qts, 11.6 Imp. qts)
- Standard Capacity (for Australia and New Zealand):
Item Specified Condition w/o Rear Heater 10.1 liters (10.7 US qts, 8.9 Imp. qts) w/ Rear Heater 12.7 liters (13.4 US qts, 11.2 Imp. qts)
- NOTICE:
-
Do not substitute plain water for engine coolant.
- HINT:
- ·
TOYOTA vehicles are filled with TOYOTA SLLC at the factory. In order to avoid damage to the engine cooling system and other technical problems, only use TOYOTA SLLC or similar high quality ethylene glycol based non-silicate, non-amine, non-nitrite, non-borate coolant with long-life hybrid organic acid technology (coolant with long-life hybrid organic acid technology is a combination of low phosphates and organic acids).
·The B line is the lower edge of the inner wall of the filler neck.
Press the No. 1 radiator hose and No. 2 radiator hose several times by hand, and then check the level of the engine coolant.
If the coolant level drops below the B line, add engine coolant to the B line.
Install the reserve tank cap sub-assembly.
w/ Heater:
| *a | Vent Plug |
Install the vent plug to the water hose sub-assembly.
| *a | Vent Plug |
Using a 6 mm hexagon socket wrench, install the vent plug.
- Torque:
- 2.0 N*m (20 kgf*cm, 17 in.*lbf)
Bleed air from the cooling system.
Warm up the engine until the thermostat opens. While the thermostat is open, circulate the engine coolant for several minutes.
Maintain the engine speed at 2500 to 3000 rpm.
Press the No. 1 radiator hose and No. 2 radiator hose several times by hand to bleed air.
- CAUTION:
- ·
Wear protective gloves.
·Be careful as the radiator hoses are hot.
·Keep your hands away from the radiator fan.
Stop the engine and wait until the engine coolant cools down to ambient temperature.
After the engine coolant cools down, check that the coolant level is at the F line.
If the coolant level is below the F line, add engine coolant to the F line.
4.INSPECT FOR COOLANT LEAK
51447D
5.INSTALL CENTER NO. 4 ENGINE UNDER COVER
Attach the guides.
Attach the claws to install the center No. 4 engine under cover.
Install the 5 screws.