SEAT BELT FRONT SEAT OUTER BELT ASSEMBLY(for Wagon) INSTALLATION
CAUTION / NOTICE / HINT
- CAUTION:
- ·
Wear protective gloves. Sharp areas on the parts may injure your hands.
·There is risk of injury.
- HINT:
- ·
Use the same procedure for RHD and LHD vehicles.
·The procedure listed below is for LHD vehicles.
·Use the same procedure for the RH and LH sides.
·The following procedure is for the LH side.
PROCEDURE

 73200A
1.INSTALL FRONT SHOULDER BELT ANCHOR ADJUSTER ASSEMBLY
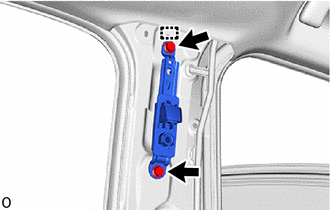
Attach the guide.
Install the front shoulder belt anchor adjuster assembly with the 2 bolts.
- Torque:
- 42 N*m (428 kgf*cm, 31 ft.*lbf)
73024
2.INSTALL FRONT SHOULDER BELT ANCHOR PLATE SUB-ASSEMBLY LH
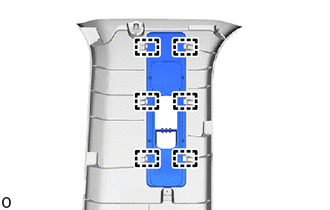
Attach the guide and install the front shoulder belt anchor plate sub-assembly LH.
62412
3.INSTALL CENTER PILLAR GARNISH LH
- HINT:
-
Use the same procedure described for the RH side.
-
Click hereVehicle Interior>INTERIOR PANELS / TRIM>ROOF HEADLINING (for Full-trim)>INSTALLATION
4.INSPECT FRONT SEAT OUTER BELT ASSEMBLY
73220
5.INSTALL FRONT SEAT OUTER BELT ASSEMBLY LH
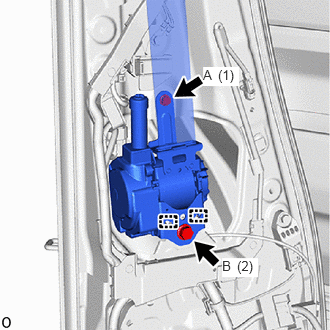
Attach the guide.
Temporarily install the front seat outer belt assembly LH with the 2 bolts.
Tighten the 2 bolts in the order shown in the illustration.
- Torque:
- Bolt A : 12.5 N*m (127 kgf*cm, 9 ft.*lbf)
- Bolt B : 42 N*m (428 kgf*cm, 31 ft.*lbf)
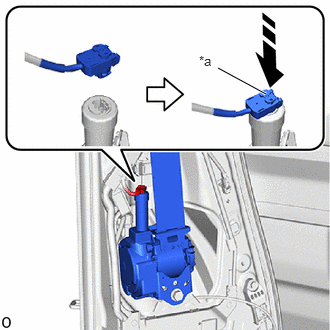
| *a | Locking Button |

|
Lock in this Direction |
Connect the pretensioner connector and lock the locking button as shown in the illustration.
- NOTICE:
- ·
When handling the pretensioner connector, take care not to damage the pretensioner wire harness.
·Securely lock the locking button.
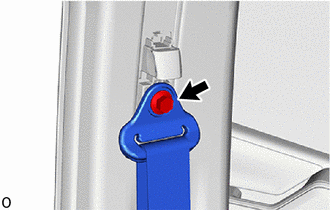
Install the bolt.
- Torque:
- 42 N*m (428 kgf*cm, 31 ft.*lbf)
62414A
6.INSTALL LOWER CENTER PILLAR GARNISH LH
- HINT:
-
Use the same procedure described for the RH side.
-
Click hereVehicle Interior>INTERIOR PANELS / TRIM>ROOF HEADLINING (for Full-trim)>INSTALLATION
74680
7.INSTALL PILLAR ASSIST GRIP ASSEMBLY B
74617A
8.INSTALL ASSIST GRIP PLUG
67872A
9.INSTALL NO. 1 SLIDE DOOR WEATHERSTRIP LH
- HINT:
-
Use the same procedure described for the RH side.
-
Click hereVehicle Exterior>DOOR / HATCH>REAR DOOR OPENING TRIM WEATHERSTRIP (for Wagon)>INSTALLATION
67918D
10.INSTALL REAR DOOR SCUFF PLATE LH
- HINT:
-
Use the same procedure described for the RH side.
-
Click hereVehicle Interior>INTERIOR PANELS / TRIM>ROOF HEADLINING (for Full-trim)>INSTALLATION
73220
11.INSTALL FRONT SEAT OUTER BELT ASSEMBLY LH (FLOOR ANCHOR)
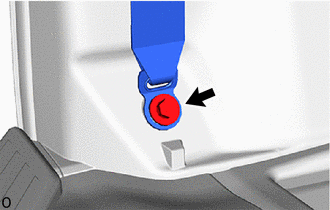
Install the floor anchor of the front seat outer belt assembly LH with the bolt.
- Torque:
- 42 N*m (428 kgf*cm, 31 ft.*lbf)
Check that the ELR locks.
With the front seat outer belt assembly LH installed to the vehicle, check that the belt locks when it is pulled out quickly.
73233
12.INSTALL OUTER LAP BELT ANCHOR COVER
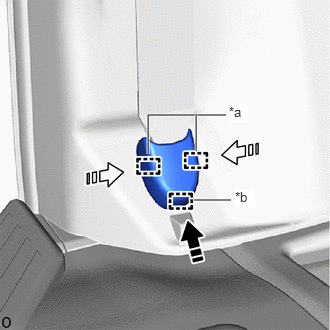
| *a | Guide A |
| *b | Guide B |
|
|
Install in this Direction (1) |

|
Install in this Direction (2) |
Attach the guide B in the installation direction (1) shown in the illustration.
Attach the guide A in the installation direction (2) shown in the illustration and install the outer lap belt anchor cover.
73178C
13.INSTALL SEAT BELT ANCHOR COVER CAP
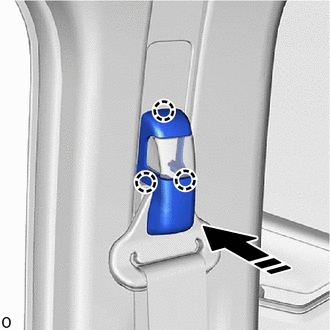
|
|
Install in this Direction |
Attach the claw and install the seat belt anchor cover cap as shown in the illustration.
14.INSTALL FRONT SEAT ASSEMBLY LH
for Power Seat:
Click hereVehicle Interior>SEAT>FRONT SEAT ASSEMBLY (for Power Seat)>INSTALLATION
for Separate Seat Type:
Click hereVehicle Interior>SEAT>FRONT SEAT ASSEMBLY (for Separate Seat Type)>INSTALLATION
62312B
15.INSTALL FRONT DOOR OPENING TRIM WEATHERSTRIP LH
67914B
16.INSTALL FRONT DOOR SCUFF PLATE LH
67912A
17.INSTALL FRONT DOOR OUTSIDE SCUFF PLATE LH
18.CONNECT CABLE TO NEGATIVE BATTERY TERMINAL
for 7GR-FKS:
for 1GD-FTV:
19. INITIALIZATION AFTER RECONNECTING BATTERY TERMINAL
Click hereGeneral>SETUP>WHEN DISCONNECTING OR RECONNECTING BATTERY TERMINAL>WORK PROCEDURE
- HINT:
-
When disconnecting and reconnecting the battery, there is an automatic learning function that completes learning when the respective system is used.
-
Click hereGeneral>SETUP>WHEN DISCONNECTING OR RECONNECTING BATTERY TERMINAL>AUTOMATIC LEARNING CHART
20. PERFORM DIAGNOSTIC SYSTEM CHECK
21.CHECK SRS WARNING LIGHT
22.INSPECT SEAT BELT WARNING SYSTEM