STOP AND START ENGINE STOP AND START ECU REMOVAL
CAUTION / NOTICE / HINT
The necessary procedures (adjustment, calibration, initialization or registration) that must be performed after parts are removed and installed, or replaced during engine stop and start ECU removal/installation are shown below.
| Replaced Part or Performed Procedure | Necessary Procedure | Effect/Inoperative Function when Necessary Procedure not Performed | Link |
|---|---|---|---|
| Battery terminal is disconnected/reconnected | Memorize steering angle neutral point | Parking assist monitor system | ( ) |
| Panoramic view monitor system | ()
|
||
| Replacement of engine stop and start ECU | ·
Download the engine stop and start ECU data ·
Write the engine stop and start ECU data to the new engine stop and start ECU ·
Check electromagnetic oil pump (for automatic transmission) ·
Reset air conditioning information ·
Learning air conditioning information ·
Clear the zero point calibration data ·
Deceleration sensor zero point calibration |
Stop and start system | ()
|
- HINT:
-
When the cable is disconnected / reconnected to the battery terminal, systems temporarily stop operating. However, each system has a function that completes learning the first time the system is used.
- ·
Learning completes when vehicle is driven
Effect/Inoperative when not Performed Necessary Procedures Link Stop and start system Drive the vehicle until stop and start control is permitted (approximately 5 to 60 minutes). ( )
Lane control system Drive the vehicle straight ahead at 15 km/h (10 mph) or more for 1 second or more. ( )
Pre-collision system
·Learning completes when vehicle is operated normally
Effect/Inoperative when not Performed Necessary Procedures Link Power slide door system Fully close the slide door by hand.
- HINT:
-
Initialization is not necessary if the above procedures are performed while the slide door is closed.
( )
Air conditioning system After the ignition switch is turned to ON, the servo motor standard position is recognized. -
PROCEDURE

 1. PRECAUTION
- NOTICE:
-
After turning the ignition switch is turned off, there may be a waiting time before disconnecting the negative (-) battery terminal.
-
Click hereGeneral>INTRODUCTION>REPAIR INSTRUCTION>PRECAUTION
2. READ NUMBER OF STARTER OPERATIONS
3.DISCONNECT CABLE FROM NEGATIVE BATTERY TERMINAL
4.REMOVE FRONT DORR OUTSIDE SCUFF PLATE RH
67913B
5.REMOVE FRONT DOOR SCUFF PLATE RH
62111C
6.REMOVE COWL SIDE TRIM BOARD RH
55631A
7.REMOVE NO. 1 INSTRUMENT PANEL UNDER TRAY STOPPER
55011A
8.REMOVE NO. 1 INSTRUMENT PANEL GARNISH SUB-ASSEMBLY
55317A
9.REMOVE INSTRUMENT SIDE PANEL RH
55641
10.REMOVE NO. 1 INSTRUMENT PANEL UNDER COVER
55432D
11.REMOVE LOWER NO. 1 INSTRUMENT PANEL FINISH PANEL
89261A
12.REMOVE ENGINE STOP AND START ECU
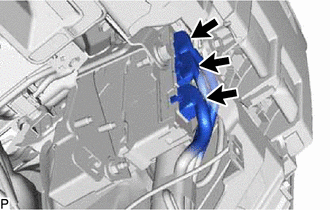
Disconnect the 3 connectors from the engine stop and start ECU.
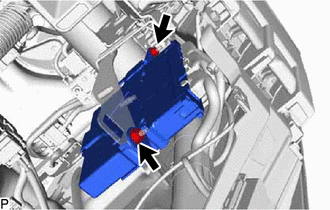
Remove the 2 nuts and engine stop and start ECU.