Front Passenger Side Door Entry Lock and Unlock Functions do not Operate
Circuit diagnosis · Vehicles built from Jul 2010
Versions by build date: May 2007 – Jul 2008 Aug 2008 – Jun 2010 from Jul 2010
DESCRIPTION
When the front passenger door entry lock and unlock functions do not operate, one of the following may be malfunctioning: 1) power door lock system, 2) front passenger side door electrical key oscillator, or 3) certification ECU (smart key ECU assembly).WIRING DIAGRAM
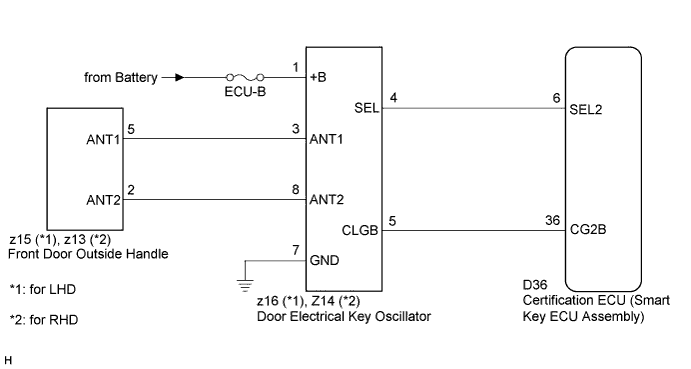

INSPECTION PROCEDURE
- NOTICE:
- Before performing the inspection, check that there are no problems related to "CAN COMMUNICATION SYSTEM" and "LIN COMMUNICATION SYSTEM".
| 1. CHECK POWER DOOR LOCK OPERATION |

When the door control switch on the master switch assembly is operated, check that the locked doors unlock (Click here).
- OK:
- Locked doors unlock.
|
|
||||

| OK | |
 |
| 2. READ VALUE ON INTELLIGENT TESTER (DOOR OUTSIDE HANDLE) |
Connect the intelligent tester to the DLC3.
Turn the engine switch on (IG).
Turn the tester on.
Select P Touch Sensor or P Trigger SW in the Data List and read the tester display.
Entry & Start (Certification ECU (Smart Key ECU Assembly)): Tester Display
Measurement Item/Range
Normal Condition
Diagnostic Note
P Touch Sensor
Front passenger side door touch sensor / ON or OFF
ON: Touch sensor is touched
OFF: Touch sensor is not touched
-
P Trigger SW
Front passenger side door lock switch / ON or OFF
ON: Entry lock switch is pressed
OFF: Entry lock switch is not pressed
-
- OK:
- On the tester screen, each item changes between ON and OFF according to the chart above.
|
|
||||
| OK | |
|
| 3. CHECK WAVE ENVIRONMENT |
Bring the electrical key transmitter near the front passenger door outside handle, and perform a front passenger door entry lock and unlock operation check.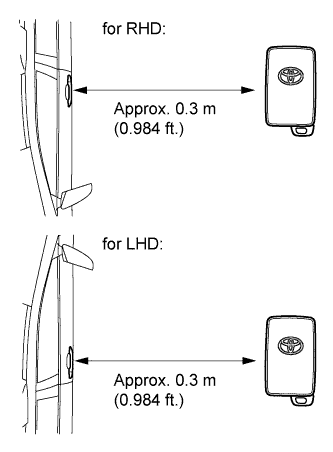
- NOTICE:
- If the key is brought within 0.2 m (0.656 ft.) of the door outside handle, communication is not possible.
- HINT:
- When the electrical key transmitter is brought near the front passenger door outside handle, the possibility of wave interference decreases, and it can be determined if wave interference is causing the problem symptom.
- If the inspection result is that the operation check is normal, the possibility of wave interference is high. Also, added vehicle components may cause wave interference. If installed, remove them and perform the operation check.
- When the electrical key transmitter is brought near the front passenger door outside handle, the possibility of wave interference decreases, and it can be determined if wave interference is causing the problem symptom.
- OK:
- Entry functions operate normally.
|
|
||||

| OK | ||
 |
||
| ||
| 4. PERFORM KEY DIAGNOSTIC MODE INSPECTION |
Diagnostic mode inspection (front passenger door electrical key oscillator)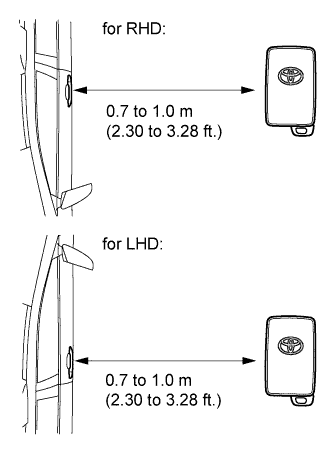
Connect the intelligent tester to the DLC3.
Turn the engine switch on (IG).
Turn the tester on.
Enter the following menus:Body / Entry & Start / Key Communication Check / Overhead + Passenger Side.
When the electrical key transmitter is in the position shown in the illustration, check that the wireless door lock buzzer sounds.
- HINT:
- If the buzzer sounds, it can be determined that the front passenger door electrical key oscillator is operating normally.
- OK:
- Wireless door lock buzzer sounds.
|
|
||||
| OK | ||
|
||
| ||
| 5. CHECK HARNESS AND CONNECTOR (CERTIFICATION ECU - DOOR ELECTRICAL KEY OSCILLATOR) |
Disconnect the certification ECU (smart key ECU assembly) and door electrical key oscillator connectors.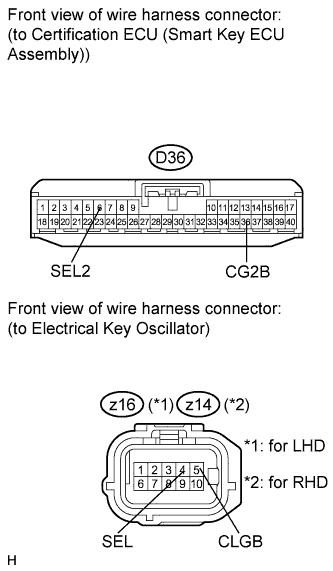
Measure the resistance according to the value(s) in the table below.
- Standard resistance:
- for LHD:
Tester Connection
Condition
Specified Condition
D36-6 (SEL2) - z16-4 (SEL)
Always
Below 1 Ω
D36-36 (CG2B) - z16-5 (CLGB)
Always
Below 1 Ω
D36-6 (SEL2) - Body ground
Always
10 kΩ or higher
D36-36 (CG2B) - Body ground
Always
10 kΩ or higher
- for RHD:
Tester Connection
Condition
Specified Condition
D36-6 (SEL2) - z14-4 (SEL)
Always
Below 1 Ω
D36-36 (CG2B) - z14-5 (CLGB)
Always
Below 1 Ω
D36-6 (SEL2) - Body ground
Always
10 kΩ or higher
D36-36 (CG2B) - Body ground
Always
10 kΩ or higher
|
|
||||
| OK | |
|
| 6. CHECK HARNESS AND CONNECTOR (DOOR ELECTRICAL KEY OSCILLATOR - FRONT DOOR OUTSIDE HANDLE) |
Remove the front door outside handle (Click here).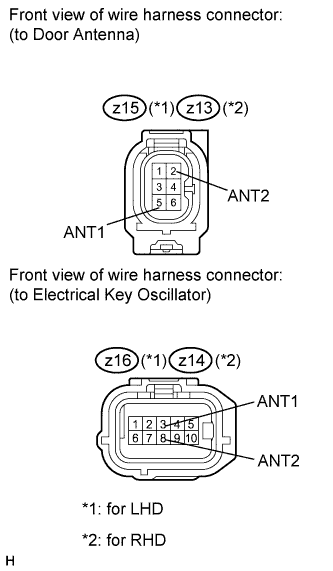
Disconnect the door antenna connectors.
Measure the resistance according to the value(s) in the table below.
- Standard resistance:
- for LHD:
Tester Connection
Condition
Specified Condition
z15-2 (ANT2) - z16-8 (ANT2)
Always
Below 1 Ω
z15-5 (ANT1) - z16-3 (ANT1)
Always
Below 1 Ω
z15-2 (ANT2) - Body ground
Always
10 kΩ or higher
z15-5 (ANT1) - Body ground
Always
10 kΩ or higher
- for RHD:
Tester Connection
Condition
Specified Condition
z13-2 (ANT2) - z14-8 (ANT2)
Always
Below 1 Ω
z13-5 (ANT1) - z14-3 (ANT1)
Always
Below 1 Ω
z13-2 (ANT2) - Body ground
Always
10 kΩ or higher
z13-5 (ANT1) - Body ground
Always
10 kΩ or higher
|
|
||||
| OK | |
|
| 7. INSPECT FUSE (ECU-B) |
Remove the ECU-B fuse from the engine room junction block.
Measure the resistance according to the value(s) in the table below.
- Standard resistance:
Tester Connection
Condition
Specified Condition
ECU-B fuse
Always
Below 1 Ω
|
|
||||
| OK | |
|
| 8. CHECK HARNESS AND CONNECTOR (DOOR ELECTRICAL KEY OSCILLATOR - BATTERY AND BODY GROUND) |
Measure the voltage according to the value(s) in the table below.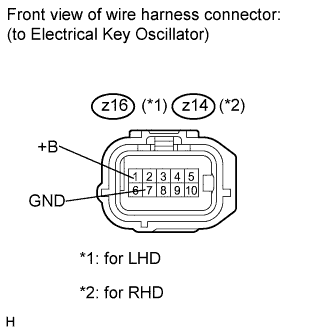
- Standard voltage:
- for LHD:
Tester Connection
Condition
Specified Condition
z16-1 (+B) - z16-7 (GND)
Always
11 to 14 V
- for RHD:
Tester Connection
Condition
Specified Condition
z14-1 (+B) - z14-7 (GND)
Always
11 to 14 V
|
|
||||
| OK | |
|
| 9. REPLACE DOOR ELECTRICAL KEY OSCILLATOR |
Replace the door electrical key oscillator (Click here).
| NEXT | |
|
| 10. CHECK DOOR ELECTRICAL KEY OSCILLATOR (OPERATION) |
Check that the entry functions operate normally.
- OK:
- Entry functions operate normally.
|
|
||||
| OK | ||
|
||
| ||