Steering Lock Motor Drive Power Circuit
Circuit diagnosis · Vehicles built from Jul 2010
Versions by build date: May 2007 – Jul 2008 Aug 2008 – Jun 2010 from Jul 2010
DESCRIPTION
The steering lock ECU is connected to the main body ECU and certification ECU (smart key ECU assembly). The steering lock ECU cannot activate the motor unless it receives permission signals from both ECUs. (The main body ECU permits the steering lock ECU to supply power to activate the motor.)WIRING DIAGRAM
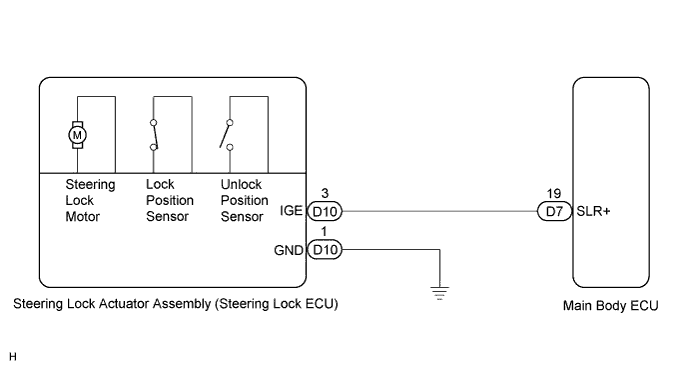

INSPECTION PROCEDURE
| 1. CHECK VEHICLE CONDITION |

Check the problem symptom of the steering lock system.
- Result:
Condition
Proceed to
Steering lock cannot be released
A
Steering cannot be locked
B
|
|
||||

| A | |
 |
| 2. READ VALUE USING INTELLIGENT TESTER |
Turn the engine switch off.
Connect the intelligent tester to the DLC3.
Turn the engine switch on (IG).
Turn the intelligent tester on.
Enter the following menus: Body / Entry & Start / Data List.
Select the item below in the Data List, and read its value displayed on the intelligent tester.
Entry & Start: Tester Display
Measurement Item/Range
Normal Condition
Diagnostic Note
Lck/Unlck Rec
Steering lock command reception record / YES or NO
YES: Steering lock / unlock signal received
NO: Steering lock / unlock signal not received
-
Check if a steering unlock command signal has been received.
- OK:
- "YES" is displayed on the tester display.
|
|
||||

| OK | |
|
| 3. INSPECT STEERING LOCK ACTUATOR ASSEMBLY (STEERING LOCK ECU) |
Measure the voltage according to the value(s) in the table below.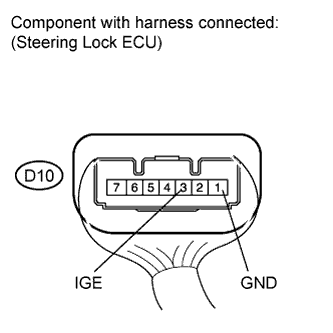
- Standard voltage:
Tester Connection
Switch Condition
Specified Condition
D10-3 (IGE) - D10-1 (GND)
- Engine switch off
- Engine switch on (ACC or IG)
- Motor activated: Below 1 V
- Motor not activated:
11 to 14 V
- Engine switch off
|
|
||||
| OK | ||
 |
||
| ||
| 4. CHECK HARNESS AND CONNECTOR (STEERING LOCK ACTUATOR ASSEMBLY - BODY GROUND) |
Disconnect the D10 connector from the steering lock actuator assembly.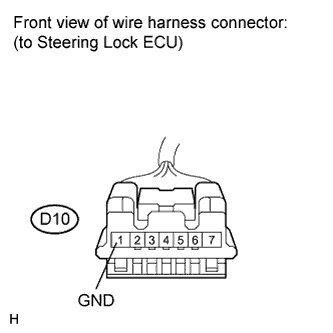
Measure the resistance according to the value(s) in the table below.
- Standard resistance:
Tester Connection
Switch Condition
Specified Condition
D10-1 (GND) - Body ground
Always
Below 1 Ω
|
|
||||
| OK | |
|
| 5. CHECK HARNESS AND CONNECTOR (STEERING LOCK ACTUATOR ASSEMBLY - MAIN BODY ECU) |
Disconnect the D7 connector from the main body ECU.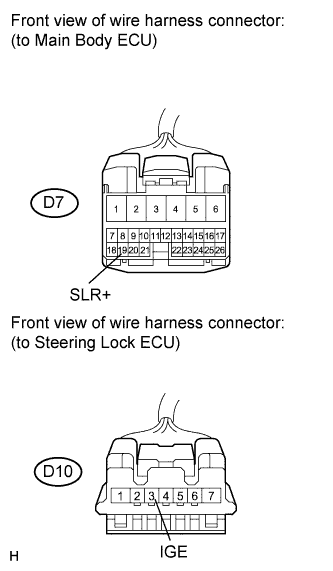
Measure the resistance according to the value(s) in the table below.
- Standard resistance:
Tester Connection
Switch Condition
Specified Condition
D10-3 (IGE) - D7-19 (SLR+)
Always
Below 1 Ω
D10-3 (IGE) - Body ground
Always
10 kΩ or higher
|
|
||||
| OK | ||
|
||
| ||
| 6. INSPECT STEERING LOCK ACTUATOR ASSEMBLY (STEERING LOCK ECU) |
Measure the voltage according to the value(s) in the table below.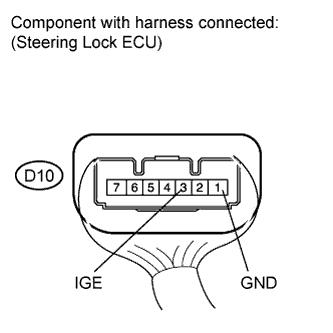
- Standard voltage:
Tester Connection
Condition
Specified Condition
D10-3 (IGE) - D10-1 (GND)
The specified condition should be checked after performing the following: - Move the shift lever to the N position
- Turn the engine switch off
- Open the driver's door
- Motor activated: Below 1 V
- Motor not activated:
11 to 14 V
- Move the shift lever to the N position
|
|
||||
| OK | ||
|
||
| ||
| 7. CHECK HARNESS AND CONNECTOR (STEERING LOCK ACTUATOR ASSEMBLY - MAIN BODY ECU) |
Disconnect the D10 connector from the steering lock actuator assembly.
Disconnect the D7 connector from the main body ECU.
Measure the resistance according to the value(s) in the table below.
- Standard resistance:
Tester Connection
Switch Condition
Specified Condition
D10-3 (IGE) - D7-19 (SLR+)
Always
Below 1 Ω
D10-3 (IGE) - Body ground
Always
10 kΩ or higher
|
|
||||
| OK | ||
|
||
| ||