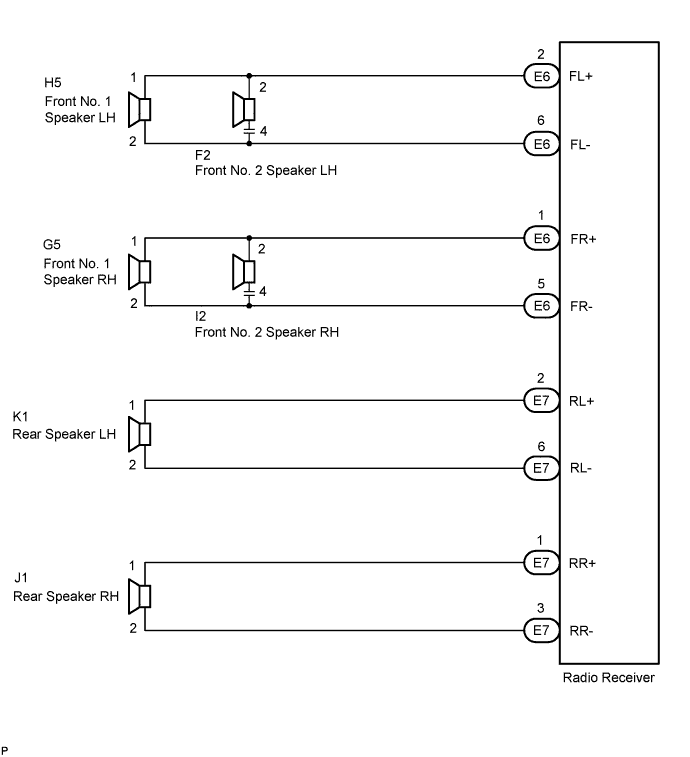
If there is a short in this circuit, the radio receiver detects it and stops output to the speakers. Thus sound cannot be heard from the speakers even if there is no malfunction in the radio receiver or speakers.
WIRING DIAGRAM
INSPECTION PROCEDURE
1. CHECK HARNESS AND CONNECTOR
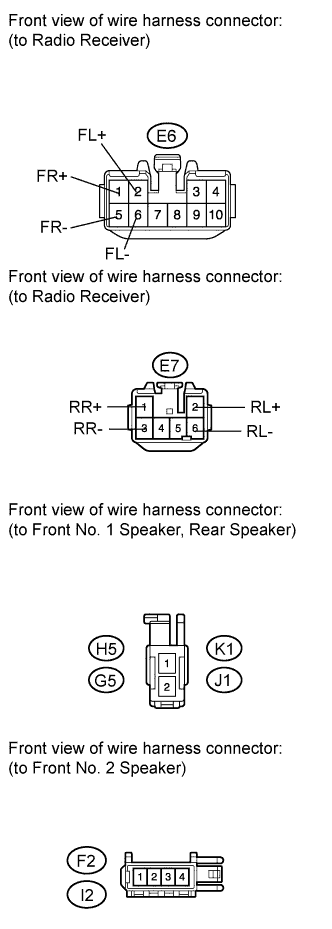
Disconnect the connectors shown in the illustration from the stereo component amplifier or radio receiver and speakers.
Measure the resistance between each of the front No. 2 speakers and the radio receiver to check for an open circuit in the wire harness.
Standard resistance:
Tester Connection
Condition
Specified Condition
E6-2 (FL+) - F2-2
Always
Below 1 Ω
E6-6 (FL-) - F2-4
Always
Below 1 Ω
E6-1 (FR+) - I2-2
Always
Below 1 Ω
E6-5 (FR-) - I2-4
Always
Below 1 Ω
Measure the resistance between each of the front No. 1 speakers and the radio receiver to check for an open circuit in the wire harness.
Standard resistance:
Tester Connection
Condition
Specified Condition
E6-2 (FL+) - H5-1
Always
Below 1 Ω
E6-6 (FL-) - H5-2
Always
Below 1 Ω
E6-1 (FR+) - G5-1
Always
Below 1 Ω
E6-5 (FR-) - G5-2
Always
Below 1 Ω
Measure the resistance between each of the rear speakers and the radio receiver to check for an open circuit in the wire harness.
Standard resistance:
Tester Connection
Condition
Specified Condition
E7-2 (RL+) - K1-1
Always
Below 1 Ω
E7-6 (RL-) - K1-2
Always
Below 1 Ω
E7-1 (RR+) - J1-1
Always
Below 1 Ω
E7-3 (RR-) - J1-2
Always
Below 1 Ω
Measure the resistance between each speaker and body ground to check for a short circuit in the wire harness.
Standard resistance:
Tester Connection
Condition
Specified Condition
E6-2 (FL+) - Body ground
Always
10 kΩ or higher
E6-6 (FL-) - Body ground
Always
10 kΩ or higher
E6-1 (FR+) - Body ground
Always
10 kΩ or higher
E6-5 (FR-) - Body ground
Always
10 kΩ or higher
E7-2 (RL+) - Body ground
Always
10 kΩ or higher
E7-6 (RL-) - Body ground
Always
10 kΩ or higher
E7-1 (RR+) - Body ground
Always
10 kΩ or higher
E7-3 (RR-) - Body ground
Always
10 kΩ or higher
NG
REPAIR OR REPLACE HARNESS OR CONNECTOR
OK
2. INSPECT FRONT NO. 1 SPEAKER
Resistance check
Measure the resistance between the terminals of the speaker.