Speaker Circuit
Circuit diagnosis · Vehicles built Aug 2008 – Jun 2010
Versions by build date: May 2007 – Jul 2008 Aug 2008 – Jun 2010 from Jul 2010
DESCRIPTION
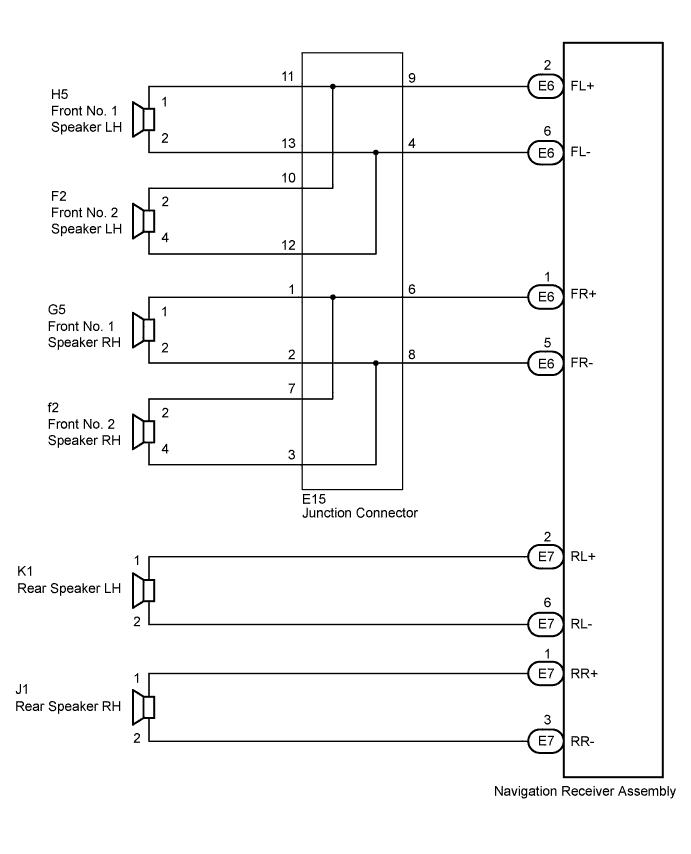
When the vehicle has a built-in type amplifier, the sound signals are sent from the navigation receiver assembly to the speakers via this circuit.WIRING DIAGRAM

INSPECTION PROCEDURE
| 1. CHECK HARNESS AND CONNECTOR |
 |
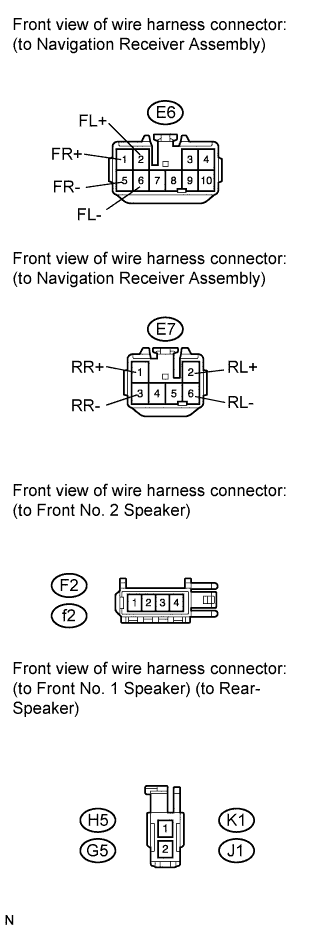
- Disconnect the connectors shown in the illustration from the navigation receiver assembly and speakers.
Measure the resistance between each of the front No. 2 speakers and the navigation receiver assembly to check for an open circuit in the wire harness.
- Standard resistance:
Tester Connection
|
Condition
|
Specified Condition
|
E6-2 (FL+) - F2-2
|
Always
|
Below 1 Ω
|
E6-6 (FL-) - F2-4
|
Always
|
Below 1 Ω
|
E6-1 (FR+) - f2-2
|
Always
|
Below 1 Ω
|
E6-5 (FR-) - f2-4
|
Always
|
Below 1 Ω
|
Measure the resistance between each of the front No. 1 speakers and the navigation receiver assembly to check for an open circuit in the wire harness.
- Standard resistance:
Tester Connection
|
Condition
|
Specified Condition
|
E6-2 (FL+) - H5-1
|
Always
|
Below 1 Ω
|
E6-6 (FL-) - H5-2
|
Always
|
Below 1 Ω
|
E6-1 (FR+) - G5-1
|
Always
|
Below 1 Ω
|
E6-5 (FR-) - G5-2
|
Always
|
Below 1 Ω
|
Measure the resistance between each of the rear speakers and the navigation receiver assembly to check for an open circuit in the wire harness.
- Standard resistance:
Tester Connection
|
Condition
|
Specified Condition
|
E7-2 (RL+) - K1-1
|
Always
|
Below 1 Ω
|
E7-6 (RL-) - K1-2
|
Always
|
Below 1 Ω
|
E7-1 (RR+) - J1-1
|
Always
|
Below 1 Ω
|
E7-3 (RR-) - J1-2
|
Always
|
Below 1 Ω
|
Measure the resistance between each speaker and body ground to check for a short circuit in the wire harness.
- Standard resistance:
Tester Connection
|
Condition
|
Specified Condition
|
E6-2 (FL+) - Body ground
|
Always
|
10 kΩ or higher
|
E6-6 (FL-) - Body ground
|
Always
|
10 kΩ or higher
|
E6-1 (FR+) - Body ground
|
Always
|
10 kΩ or higher
|
E6-5 (FR-) - Body ground
|
Always
|
10 kΩ or higher
|
E7-2 (RL+) - Body ground
|
Always
|
10 kΩ or higher
|
E7-6 (RL-) - Body ground
|
Always
|
10 kΩ or higher
|
E7-1 (RR+) - Body ground
|
Always
|
10 kΩ or higher
|
E7-3 (RR-) - Body ground
|
Always
|
10 kΩ or higher
|
|
NG |
 |
|
| REPAIR OR REPLACE HARNESS OR CONNECTOR |
|
|
| OK |
|
 |
|
| 2. INSPECT FRONT NO. 1 SPEAKER |
|
Resistance check
Measure the resistance between the terminals of the speaker.
- Standard resistance:
Tester Connection
|
Condition
|
Specified Condition
|
H5-1 - H5-2
|
Always
|
Approximately 4 Ω
|
G5-1 - G5-2
|
Always
|
Approximately 4 Ω
|
- NOTICE:
- The speaker should not be removed to check resistance.
|
NG |
|
|
|
|
| OK |
|
|
|
| 3. INSPECT FRONT NO. 2 SPEAKER |
|
Check that the malfunction disappears when another speaker in good condition is installed.
- Standard:
- Malfunction disappears.
- HINT:
- Connect all the connectors to the front No. 2 speaker.
- If there is a possibility that either the right or left front speaker is defective, inspect by interchanging the right one with the left one.
- Perform the above inspection on both LH and RH sides.
|
NG |
 |
|
|
|
| OK |
|
 |
|
|
| 4. INSPECT REAR SPEAKER |
|
Resistance check
Measure the resistance between the terminals of the speaker.
- Standard resistance:
Tester Connection
|
Condition
|
Specified Condition
|
K1-1 - K1-2
|
Always
|
Approximately 4 Ω
|
J1-1 - J1-2
|
Always
|
Approximately 4 Ω
|
- NOTICE:
- The speaker should not be removed to check resistance.
|
NG |
|
|
|
|
| OK |
|
|
|
| PROCEED TO NEXT CIRCUIT INSPECTION SHOWN IN PROBLEM SYMPTOMS TABLE (Click here)
|
|