ON-VEHICLE INSPECTION
Inspection · Vehicles built Aug 2008 – Jun 2010
Versions by build date: May 2007 – Jul 2008 Aug 2008 – Jun 2010 from Jul 2010
| INSPECT CLOCK ASSEMBLY (w/o Multi-information Display) |

Disconnect the E20 connector.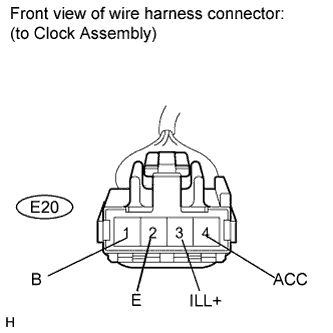

Measure the voltage according to the value(s) in the table below.
- Standard voltage:
Tester Connection
Condition
Specified Condition
E20-1 (B) - Body ground
Always
11 to 14 V
E20-3 (ILL+) - Body ground
Ignition switch on (IG), light control switch OFF
Below 1 V
Ignition switch on (IG), light control switch TAIL/HEAD
11 to 14 V
E20-4 (ACC) - Body ground
Ignition switch off
Below 1 V
Ignition switch on (ACC)
11 to 14 V
Waveform (Reference): Using oscilloscope: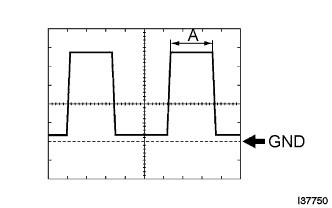
Item
Condition
Tool setting
2 V/DIV., 1 ms./DIV.
Vehicle condition
Ignition switch on (IG), light control switch TAIL/HEAD
- HINT:
- Duty ratio changes as the illumination becomes darker (the period "A" shown in the illustration becomes longer).
- If the value is not as specified, repair or replace the wire harness or connector.
- Duty ratio changes as the illumination becomes darker (the period "A" shown in the illustration becomes longer).
Measure the resistance according to the value(s) in the table below.
- Standard resistance:
Tester Connection
Condition
Specified Condition
E20-2 (E) - Body ground
Always
Below 1 Ω
- HINT:
- If the value is not as specified, repair or replace the wire harness or connector.
| INSPECT CLOCK ASSEMBLY (w/ Multi-information Display) |
Disconnect the E9 connector.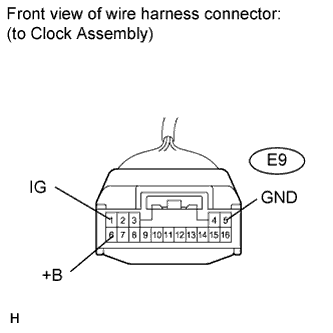
Measure the voltage according to the value(s) in the table below.
- Standard voltage:
Tester Connection
Condition
Specified Condition
E9-1 (IG) - Body ground
Ignition switch off
Below 1 V
Ignition switch on (IG)
11 to 14 V
E9-6 (+B) - Body ground
Always
11 to 14 V
- HINT:
- If the value is not as specified, repair or replace the wire harness or connector.
Measure the resistance according to the value(s) in the table below.
- Standard resistance:
Tester Connection
Condition
Specified Condition
E9-5 (GND) - Body ground
Always
Below 1 Ω
- HINT:
- If the value is not as specified, repair or replace the wire harness or connector.
| INSPECT CLOCK ASSEMBLY (w/ Multi-information Display) |
Ignition switch off.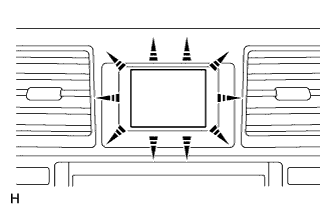
Press the "DISP" button and hold it down.
Ignition switch on (IG).
- OK:
- All the dots in the multi-information display come on.
- HINT:
- This test is also available on "Active Test" (Click here).
Ignition switch off to finish this test mode.
- HINT:
- If the result is not as specified, replace the clock assembly (Click here).