Steering Pad Switch Circuit
Circuit diagnosis · Vehicles built Aug 2008 – Jun 2010
Versions by build date: May 2007 – Jul 2008 Aug 2008 – Jun 2010 from Jul 2010
DESCRIPTION
AUTO, OFF, TEMP UP (+), and TEMP DOWN (-) switches are located on the steering pad switch. The resistance of the steering pad switch changes in accordance with switch operation. The air conditioning control assembly outputs voltage to the steering pad switch and reads voltage changes due to the resistance changes that result from switch operation.- HINT:
- If there is an open in the circuit, the air conditioning system cannot be operated by the steering pad switch assembly.
- If there is a short in the circuit, the resulting condition is the same as if the switch were continuously depressed. Therefore, the air conditioning control assembly cannot be operated by the steering pad switch assembly, and the air conditioning control assembly will not be able to function correctly.
WIRING DIAGRAM
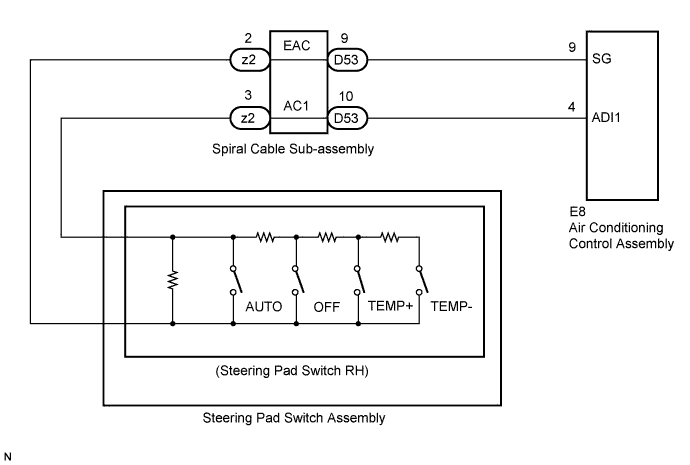

INSPECTION PROCEDURE
| 1. INSPECT AIR CONDITIONING CONTROL ASSEMBLY |

Remove the air conditioning control assembly (Click here) with the connectors still connected.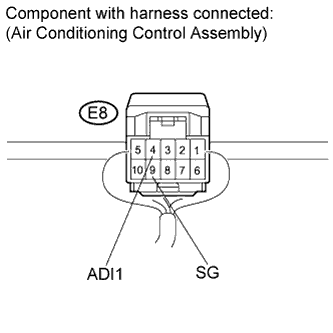
Measure the resistance according to the value(s) in the table below.
- Standard resistance:
Tester Connection
Condition
Specified Condition
E8-4 (ADI1) - E8-9 (SG)
AUTO switch: ON
Below 2.5 Ω
E8-4 (ADI1) - E8-9 (SG)
OFF switch: ON
Approx. 329 Ω
E8-4 (ADI1) - E8-9 (SG)
TEMP+ switch: ON
Approx. 1000 Ω
E8-4 (ADI1) - E8-9 (SG)
TEMP- switch: ON
Approx. 3110 Ω
|
|
||||

| OK | ||
 |
||
| ||
| 2. INSPECT STEERING PAD SWITCH ASSEMBLY |
Remove the steering pad switch assembly.
Disconnect the connector from the steering pad switch assembly.
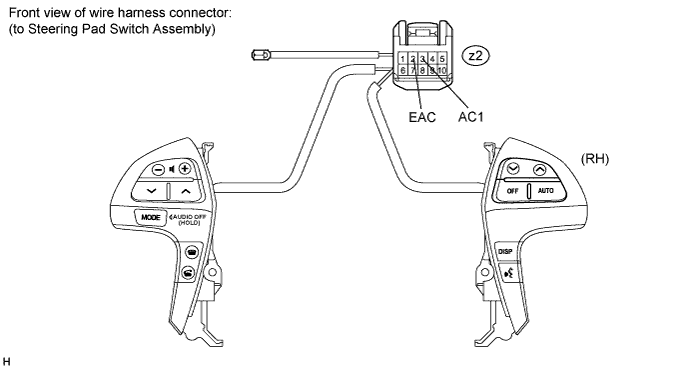
Measure the resistance according to the value(s) in the table below.
- Standard resistance:
Tester Connection (Symbols)
Condition
Specified Condition
z2-3 (AC1) - z2-2 (EAC)
AUTO switch: ON
Below 2.5 Ω
z2-3 (AC1) - z2-2 (EAC)
OFF switch: ON
Approx. 329 Ω
z2-3 (AC1) - z2-2 (EAC)
TEMP+ switch: ON
Approx. 1000 Ω
z2-3 (AC1) - z2-2 (EAC)
TEMP- switch: ON
Approx. 3110 Ω
|
|
||||

| OK | |
 |
| 3. INSPECT SPIRAL CABLE SUB-ASSEMBLY |
Disconnect the connector from the spiral cable sub-assembly.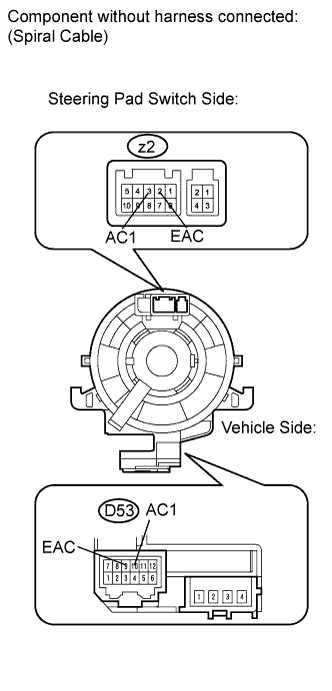
Measure the resistance according to the value(s) in the table below.
- Standard resistance:
Tester Connection
Condition
Specified Condition
D53-10 (AC1) - z2-3 (AC1)
Center
Below 1 Ω
D53-10 (AC1) - z2-3 (AC1)
2.5 rotations to the left
Below 1 Ω
D53-10 (AC1) - z2-3 (AC1)
2.5 rotations to the right
Below 1 Ω
D53-9 (EAC) - z2-2 (EAC)
Center
Below 1 Ω
D53-9 (EAC) - z2-2 (EAC)
2.5 rotations to the left
Below 1 Ω
D53-9 (EAC) - z2-2 (EAC)
2.5 rotations to the right
Below 1 Ω
- NOTICE:
- The spiral cable is an important part of the SRS airbag system. Incorrect removal or installation of the spiral cable may prevent the airbag from deploying. Be sure to read the pages shown in the brackets below.
- HINT:
- The spiral cable makes a maximum of approximately 5 rotations.
|
|
||||
| OK | |
|
| 4. CHECK HARNESS AND CONNECTOR (A/C CONTROL ASSEMBLY - SPIRAL CABLE SUB-ASSEMBLY) |
Disconnect the connector from the air conditioning control assembly.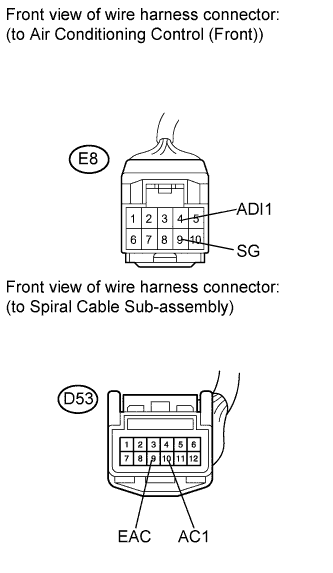
Disconnect the connector from the spiral cable sub-assembly.
Measure the resistance according to the value(s) in the table below.
- Standard resistance:
Tester Connection
Condition
Specified Condition
E8-4 (ADI1) - D53-10 (AC1)
Always
Below 1 Ω
E8-9 (SG) - D53-9 (EAC)
Always
Below 1 Ω
E8-9 (ADI1) - D53-10 (AC1)
Always
10 kΩ or higher
E8-8 (SG) - D53-9 (EAC)
Always
10 kΩ or higher
|
|
||||
| OK | ||
|
||
| ||