P0136 Oxygen Sensor Circuit Malfunction (Bank 1 Sensor 2)
Diagnostic trouble codes · Vehicles built Aug 2008 – Jun 2010
Also covers:
- P0137 Oxygen Sensor Circuit Low Voltage (Bank 1 Sensor 2)
- P0138 Oxygen Sensor Circuit High Voltage (Bank 1 Sensor 2)
- P0156 Oxygen Sensor Circuit Malfunction (Bank 2 Sensor 2)
- P0157 Oxygen Sensor Circuit Low Voltage (Bank 2 Sensor 2)
- P0158 Oxygen Sensor Circuit High Voltage (Bank 2 Sensor 2)
Versions by build date: May 2007 – Jul 2008 Aug 2008 – Jun 2010 from Jul 2010
CAUTION / NOTICE / HINT
- HINT:
- Sensor 2 refers to the sensor mounted behind the three-way catalytic converter and located far from the engine assembly.
DESCRIPTION
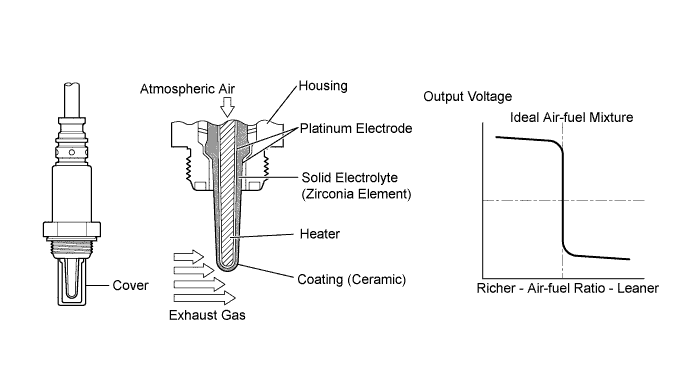
A three-way catalytic converter is used in order to convert the carbon monoxide (CO), hydrocarbon (HC), and nitrogen oxide (HOx) into less harmful substances. To allow the three-way catalytic converter to function effectively, it is necessary to keep the air fuel ratio of the engine near the stoichiometric air fuel ratio. For helping the ECM to deliver accurate air fuel ratio control, a heated oxygen sensor is used.The heated oxygen sensor is located behind the three-way catalytic converter, and detects the oxygen concentration in the exhaust gas. Since the sensor is integrated with the heater that heats the sensing portion, it is possible to detect the oxygen concentration even when the intake air volume is low (the exhaust gas temperature is low).
When the air fuel ratio becomes lean, the oxygen concentration in the exhaust gas becomes rich. The heated oxygen sensor informs the ECM that the post-three-way catalytic converter air fuel ratio is lean (low voltage, i.e. less than 0.45 V).
Conversely, when the air fuel ratio is richer than the stoichiometric air fuel level, the oxygen concentration in the exhaust gas becomes lean. The heated oxygen sensor informs the ECM that the post-three-way catalytic converter air fuel ratio is rich (high voltage, i.e. more than 0.45 V). The heated oxygen sensor has the property of changing its output voltage drastically when the air fuel ratio is close to the stoichiometric level.
The ECM uses the supplementary information from the heated oxygen sensor to determine whether the air fuel ratio after the three-way catalytic converter is rich or lean, and adjusts the fuel injection time accordingly. Thus, if the heated oxygen sensor is working improperly due to internal malfunctions, the ECM is unable to compensate for deviations in the primary air fuel ratio control.

| DTC No. |
DTC Detection Condition |
Trouble Area |
| P0136 P0156 |
|
|
| P0137 P0157 |
|
|
| P0138 P0158 |
|
|
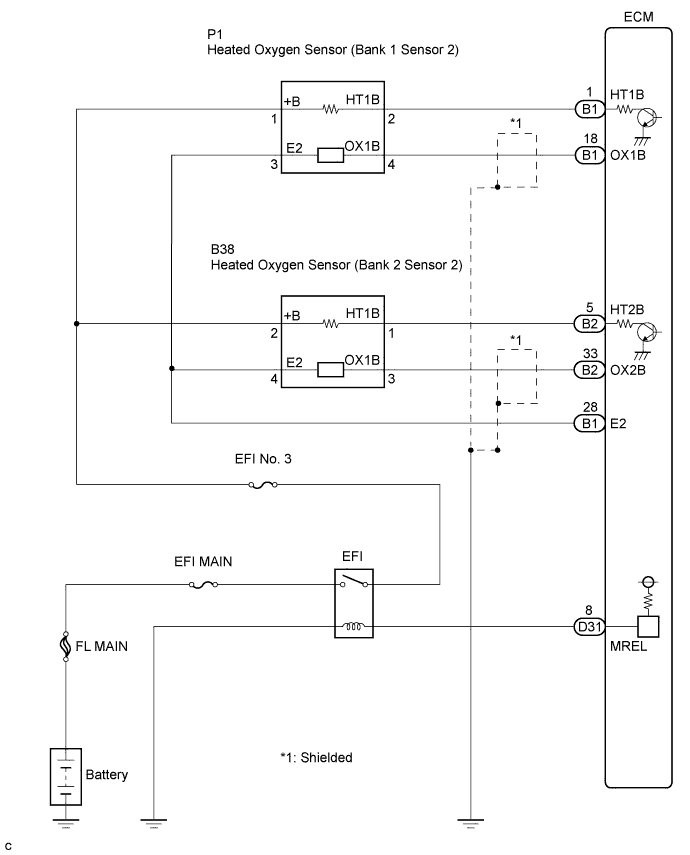
WIRING DIAGRAM
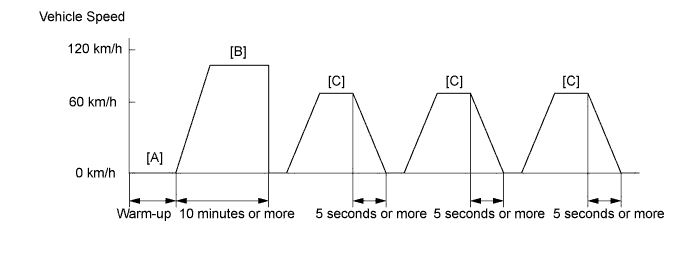
CONFIRMATION DRIVING PATTERN
- Connect the intelligent tester to the DLC3.
- Warm-up the engine until the engine coolant temperature is 75°C (167°F) or more [A].
- Drive the vehicle at 60 to 120 km/h (40 to 75 mph) for at 10 minutes [B].
- Drive the vehicle 60 km/h (40 mph) or more and decelerate the vehicle for 5 seconds or more. Perform this 3 times [C].
- Turn the tester on.
- Select the following menu items: Powertrain / Engine / Utility / All Readiness.
- Input DTCs: P0136, P0137, P0138, P0156, P0157 and P0158.
- Check that DTC MONITOR is NORMAL. If DTC MONITOR is INCOMPLETE, perform the drive pattern adding the vehicle speed and using the second gear to decelerate the vehicle.
INSPECTION PROCEDURE
- HINT:
- For use of the intelligent tester only:
- Malfunctioning areas can be identified by performing the Control the Injection Volume for air fuel ratio sensor function provided in the Active Test. The Control the Injection Volume for air fuel ratio sensor function can help to determine whether the air fuel ratio sensor, heated oxygen sensor and other potential trouble areas are malfunctioning.
- The following instructions describe how to conduct the Control the Injection Volume for air fuel ratio sensor operation using the intelligent tester.
- Connect the intelligent tester to the DLC3.
- Start the engine and turn the tester on.
- Warm up the engine at an engine speed of 2500 rpm for approximately 90 seconds.
- Select the following menu items on the tester: Powertrain / Engine and ECT / Active Test / Control the Injection Volume for air fuel ratio sensor.
- Perform the Control the Injection Volume for air fuel ratio sensor operation with the engine in an idling condition (press the Right or Left button to change the fuel injection volume).
- Monitor the voltage outputs of the air fuel ratio and heated oxygen sensors (AFS B1S1 and O2S B1S2 or AFS B2S1 and O2S B2S2) displayed on the tester.
- HINT:
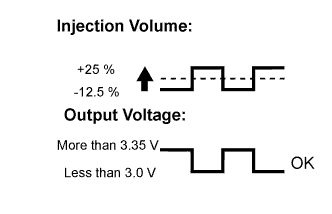
- The Control the Injection Volume for air fuel ratio sensor operation lowers the fuel injection volume by 12.5% or increases the injection volume by 25%.
- Each sensor reacts in accordance with increases and decreases in the fuel injection volume.
- The Control the Injection Volume for air fuel ratio sensor operation lowers the fuel injection volume by 12.5% or increases the injection volume by 25%.
- Standard voltage:
Tester Display (Sensor)
Injection Volume
Status
Voltage
AFS B1S1 or AFS B2S1 (Air fuel ratio)
+25%
Rich
Less than 3.0
AFS B1S1 or AFS B2S1 (Air fuel ratio)
-12.5%
Lean
More than 3.35
O2S B1S2 or O2S B2S2 (Heated oxygen)
+25%
Rich
More than 0.55
O2S B1S2 or O2S B2S2 (Heated oxygen)
-12.5%
Lean
Less than 0.4
- NOTICE:
- The air fuel ratio sensor has an output delay of a few seconds and the heated oxygen sensor has a maximum output delay of approximately 20 seconds.
Case
Air Fuel Ratio Sensor (Sensor 1)
Output Voltage
Heated Oxygen Sensor (Sensor 2)
Output Voltage
Main Suspected Trouble Area
1
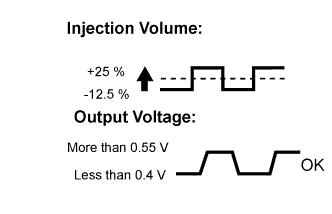
-
2
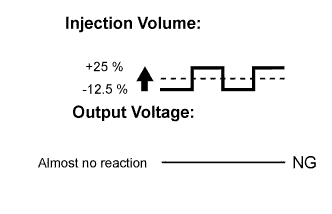
- Air fuel ratio sensor
- Air fuel ratio sensor heater
- Air fuel ratio sensor circuit
3
- Heated oxygen sensor
- Heated oxygen sensor heater
- Heated oxygen sensor circuit
4
- Fuel pressure
- Gas leakage from exhaust system
(Air fuel ratio extremely lean or rich)
- Following the Control the Injection Volume for air fuel ratio sensor procedure enables technicians to check and graph the voltage outputs of both the air fuel ratio and heated oxygen sensors.
- The following air fuel ratio control procedure enables the technician to check and graph the voltage output of both the heated oxygen sensors. To display the graph, select the following menu items on the tester: View / Line Graph.
- HINT:
- If other DTCs relating to different systems that have terminal E2 as the ground terminal are output simultaneously, terminal E2 may have an open circuit.
- Read freeze frame data using the intelligent tester. The ECM records vehicle and driving condition information as freeze frame data the moment a DTC is stored. When troubleshooting, freeze frame data can be helpful in determining whether the vehicle was running or stopped, whether the engine was warmed up or not, whether the air fuel ratio was lean or rich, as well as other data recorded at the time of a malfunction.
- If the OX1B wire from the ECM connector is short-circuited to the +B wire, DTC P0136 will be set.
- If the OX2B wire from the ECM connector is short-circuited to the +B wire, DTC P0156 will be set.
- If other DTCs relating to different systems that have terminal E2 as the ground terminal are output simultaneously, terminal E2 may have an open circuit.
| 1. READ DTC OUTPUT (DTC P0136, P0137, P0138, P0156, P0157 or P0158) |

Connect the intelligent tester to the DLC3.
Turn the ignition switch on (IG) and turn the tester on.
Select the following menu items: Powertrain / Engine and ECT / DTC.
Read the DTCs.
- Result:
Display (DTC Output)
Proceed to
P0138 or P0158
A
P0137 or P0157
B
P0136 or P0156
C
|
|
||||
|
|
||||

| A | |
 |
| 2. READ VALUE USING INTELLIGENT TESTER (OUTPUT VOLTAGE OF HEATED OXYGEN SENSOR) |
Connect the intelligent tester to the DLC3.
Turn the ignition switch on (IG) and turn the tester on.
Select the following menu items: Powertrain / Engine and ECT / Data List / A/F Control System / O2S B1S2 or O2S B2S2.
Allow the engine to idle.
Read the Heated Oxygen (HO2) sensor output voltage while idling.
- Result:
HO2 Sensor Output Voltage
Proceed to
More than 1.2 V
A
Less than 1.0 V
B
|
|
||||
| A | |
|
| 3. INSPECT HEATED OXYGEN SENSOR (CHECK FOR SHORT) |
Disconnect the heated oxygen sensor connector.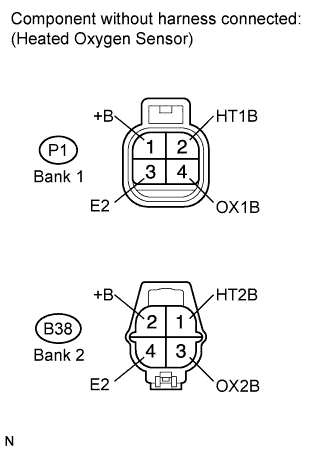
Measure the resistance according to the value(s) in the table below.
- Standard resistance:
- Bank 1:
Tester Connection
Condition
Specified Condition
1 (+B) - 3 (E2)
Always
10 kΩ or higher
1 (+B) - 4 (OX1B)
Always
10 kΩ or higher
- Bank 2:
Tester Connection
Condition
Specified Condition
2 (+B) - 4 (E2)
Always
10 kΩ or higher
2 (+B) - 3 (OX2B)
Always
10 kΩ or higher
Reconnect the heated oxygen sensor connector.
|
|
||||

| OK | |
|
| 4. CHECK HARNESS AND CONNECTOR (CHECK FOR SHORT) |
Turn the ignition switch off and wait for 5 minutes.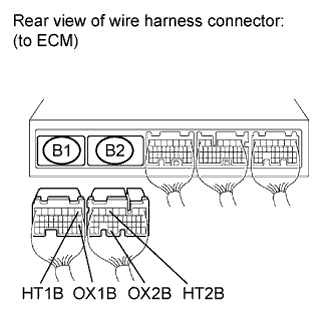
Disconnect the ECM connectors.
Measure the resistance according to the value(s) in the table below.
- Standard resistance:
- Bank 1:
Tester Connection
Condition
Specified Condition
B1-1 (HT1B) - B1-18 (OX1B)
Always
10 kΩ or higher
- Bank 2:
Tester Connection
Condition
Specified Condition
B2-5 (HT2B) - B2-33 (OX2B)
Always
10 kΩ or higher
Reconnect the ECM connectors.
|
|
||||
| OK | ||
 |
||
| ||
| 5. INSPECT AIR FUEL RATIO SENSOR |
- HINT:
- This air fuel ratio sensor test is to check the air fuel ratio sensor current during the fuel-cut operation. When the sensor is normal, the sensor current will indicate below 3 mA in this test.
Connect an intelligent tester to the DLC3.
Turn the ignition switch on (IG).
Turn the tester on.
Select the following menu items: Powertrain / Engine and ECT / DTC / Clear.
Clear DTCs.
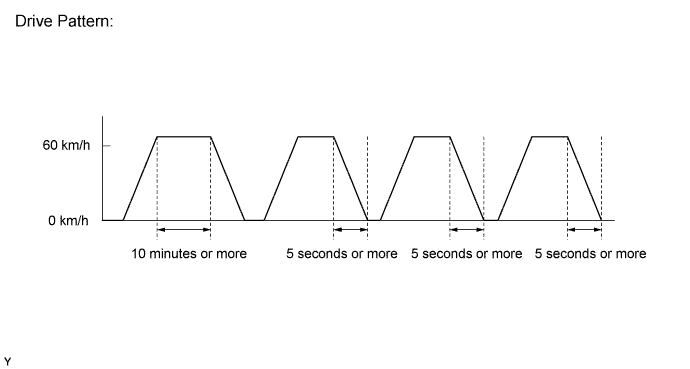
Drive the vehicle by the drive pattern as listed below:
Warm up the engine.
Drive the vehicle at 60 km/h (40 mph) or more for 10 minutes or more.
Stop the vehicle.
Accelerate the vehicle up to 60 km/h (40 mph) or more and then decelerate for 5 seconds or more. Repeat this process at least 3 times.
Select the following menu items: Powertrain / Engine and ECT / Data List / A/F Control System / AFS B1S1 and AFS B2S1.
Read the value of the air fuel ratio sensor current while the fuel-cut operation is performing.
- Standard current:
- Less than 3.0 mA
- HINT:
- To measure the air fuel ratio sensor current precisely, perform the fuel-cut operation as long as possible.
- If it is difficult to measure the air fuel ratio sensor current, use the snapshot function of the intelligent tester.
- To measure the air fuel ratio sensor current precisely, perform the fuel-cut operation as long as possible.
- Result:
Result
Proceed to
Outside standard range
A
Within standard range
B
|
|
||||
|
|
||||
| 6. READ VALUE USING INTELLIGENT TESTER (OUTPUT VOLTAGE OF HEATED OXYGEN SENSOR) |
Connect the intelligent tester to the DLC3.
Turn the ignition switch on (IG) and turn the tester on.
Start the engine.
Select the following menu items: Powertrain / Engine and ECT / Data List / A/F Control System / O2S B1S2 or O2S B1S2.
After warming up the engine, run the engine at an engine speed of 2500 rpm for 3 minutes.
Read the output voltage of the heated oxygen sensor when the engine rpm is suddenly increased.
- HINT:
- Quickly accelerate the engine to 4000 rpm 3 times using the accelerator pedal.
- Standard:
- Fluctuates between 0.4 V or less and 0.5 V or more.
|
|
||||
| OK | |
|
| 7. PERFORM ACTIVE TEST USING INTELLIGENT TESTER (INJECTION VOLUME) |
Connect the intelligent tester to the DLC3.
Start the engine and turn the tester on.
Warm up the engine.
Select the following menu items: Powertrain / Engine and ECT / Active Test / Control the Injection Volume.
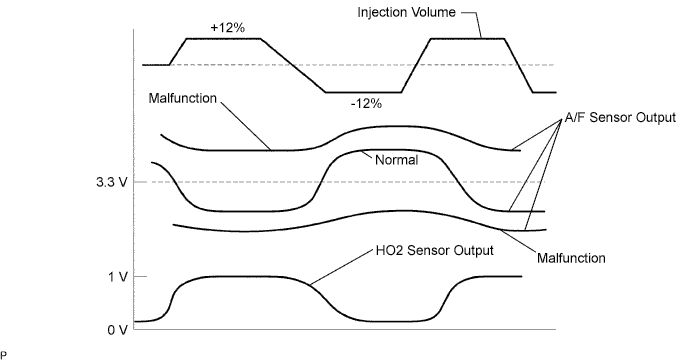
Change the fuel injection volume using the tester, while monitoring the voltage output of air fuel ratio and heated oxygen sensors displayed on the tester.
- HINT:
- Change the fuel injection volume within the range of -12% and +12%. The injection volume can be changed in 1% graduations within the range.
- The air fuel ratio sensor is displayed as AFS B1S1 or AFS B2S1, and the heated oxygen sensor is displayed as O2S B1S2 or O2S B2S2, on the intelligent tester.
- Change the fuel injection volume within the range of -12% and +12%. The injection volume can be changed in 1% graduations within the range.
- Result:
Tester Display (Sensor)
Voltage Variation
Proceed to
AFS B1S1 (Air fuel ratio)
AFS B2S1 (Air fuel ratio)
Alternates between more and less than 3.3 V
OK
AFS B1S1 (Air fuel ratio)
AFS B2S1 (Air fuel ratio)
Remains at more than 3.3 V
NG
AFS B1S1 (Air fuel ratio)
AFS B2S1 (Air fuel ratio)
Remains at less than 3.3 V
NG
- HINT:
- A normal heated oxygen sensor voltage (O2S B1S2 or O2S B2S2) reacts in accordance with increases and decreases in fuel injection volumes. When the air fuel ratio sensor voltage remains at either less or more than 3.3 V despite the heated oxygen sensor indicating a normal reaction, the air fuel ratio sensor is malfunctioning.
|
|
||||
| OK | ||
|
||
| ||
| 8. CHECK FOR EXHAUST GAS LEAKAGE |
- OK:
- No gas leakage.
|
|
||||
| OK | |
|
| 9. INSPECT HEATED OXYGEN SENSOR (HEATER RESISTANCE) |
Disconnect the heated oxygen sensor connector.
Measure the resistance according to the value(s) in the table below.
- Standard resistance:
- Bank 1:
Tester Connection
Condition
Specified Condition
2 (HT1B) - 1 (+B)
20°C (68°F)
11 to 16 Ω
2 (HT1B) - 3 (E2)
Always
10 kΩ or higher
- Bank 2:
Tester Connection
Condition
Specified Condition
1 (HT2B) - 2 (+B)
20°C (68°F)
11 to 16 Ω
1 (HT2B) - 4 (E2)
Always
10 kΩ or higher
Reconnect the heated oxygen sensor connector.
|
|
||||
| OK | |
|
| 10. CHECK HARNESS AND CONNECTOR (HEATED OXYGEN SENSOR - ECM) |
Disconnect the heated oxygen sensor connector.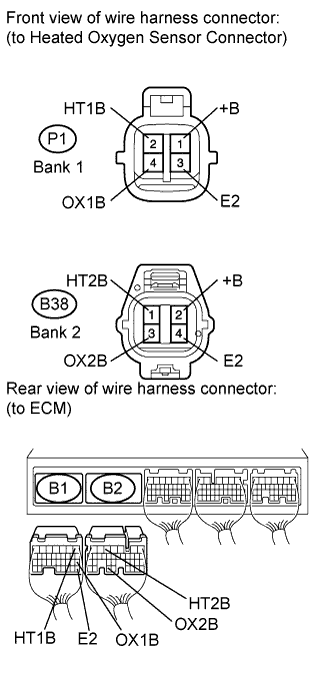
Disconnect the ECM connectors.
Measure the resistance according to the value(s) in the table below.
- Standard resistance (Check for open):
- Bank 1:
Tester Connection
Condition
Specified Condition
P1-4 (OX1B) - B1-18 (OX1B)
Always
Below 1 Ω
P1-3 (E2) - B1-28 (E2)
Always
Below 1 Ω
- Bank 2:
Tester Connection
Condition
Specified Condition
B38-3 (OX2B) - B2-33 (OX2B)
Always
Below 1 Ω
B38-4 (E2) - B1-28 (E2)
Always
Below 1 Ω
- Standard resistance (Check for short):
- Bank 1:
Tester Connection
Condition
Specified Condition
P1-4 (OX1B) or B1-18 (OX1B) - Body ground
Always
10 kΩ or higher
P1-3 (E2) or B1-28 (E2) - Body ground
Always
10 kΩ or higher
- Bank 2:
Tester Connection
Condition
Specified Condition
B38-3 (OX2B) or B2-33 (OX2B) - Body ground
Always
10 kΩ or higher
B38-4 (E2) or B1-28 (E2) - Body ground
Always
10 kΩ or higher
Reconnect the heated oxygen sensor connector.
Reconnect the ECM connectors.
|
|
||||
| OK | ||
|
||
| ||
| 11. REPLACE HEATED OXYGEN SENSOR |
Replace the heated oxygen sensor (Click here).
| NEXT | |
|
| 12. PERFORM CONFIRMATION DRIVING PATTERN |
Perform confirmation driving pattern.
| NEXT | |
|
| 13. CHECK WHETHER DTC OUTPUT RECURS (DTC P0136, P0137, P0137, P0156, P0157 OR P0156) |
Connect the intelligent tester to the DLC3.
Turn the ignition switch on (IG) and turn the tester on.
Select the following menu items: Powertrain / Engine and ECT / DTC.
Read the DTCs.
- Result:
Display (DTC Output)
Proceed to
P0136 or P0156
A
No output
B
|
|
||||
| A | ||
|
||
| ||
| 14. REPLACE AIR FUEL RATIO SENSOR |
Replace the air fuel ratio sensor (Click here).
| NEXT | |
|
| 15. PERFORM CONFIRMATION DRIVING PATTERN |
Perform confirmation driving pattern.
| NEXT | |
|
| 16. CHECK WHETHER DTC OUTPUT RECURS (DTC P0136, P0137, P0138, P0156, P0157 OR P0158) |
Connect the intelligent tester to the DLC3.
Turn the ignition switch on (IG) and turn the tester on.
Select the following menu items: Powertrain / Engine and ECT / DTC.
Read the DTCs.
- Result:
Display (DTC Output)
Proceed to
P0136, P0137, P0138, P0156, P0157 or P0158
A
No output
B
|
|
||||
| A | ||
|
||
| ||