P2237 Oxygen (A/F) Sensor Pumping Current Circuit / Open (Bank 1 Sensor 1)
Diagnostic trouble codes · Vehicles built from Jul 2010
Also covers:
- P2238 Oxygen (A/F) Sensor Pumping Current Circuit Low (Bank 1 Sensor 1)
- P2239 Oxygen (A/F) Sensor Pumping Current Circuit High (Bank 1 Sensor 1)
- P2240 Oxygen (A/F) Sensor Pumping Current Circuit / Open (Bank 2 Sensor 1)
- P2241 Oxygen (A/F) Sensor Pumping Current Circuit Low (Bank 2 Sensor 1)
- P2242 Oxygen (A/F) Sensor Pumping Current Circuit High (Bank 2 Sensor 1)
- P2252 Oxygen (A/F) Sensor Reference Ground Circuit Low (Bank 1 Sensor 1)
- P2253 Oxygen (A/F) Sensor Reference Ground Circuit High (Bank 1 Sensor 1)
- P2255 Oxygen (A/F) Sensor Reference Ground Circuit Low (Bank 2 Sensor 1)
- P2256 Oxygen (A/F) Sensor Reference Ground Circuit High (Bank 2 Sensor 1)
Versions by build date: May 2007 – Jul 2008 Aug 2008 – Jun 2010 from Jul 2010
CAUTION / NOTICE / HINT
DESCRIPTION
Refer to DTC P2195 (Click here).| DTC No. |
DTC Detection Condition |
Trouble Area |
| P2237 P2240 |
Open in the circuit between terminals A1A+ and A1A-/A2A+ and A2A- the air fuel ratio sensor while engine running. (2 trip detection logic) |
|
| P2238 P2241 |
|
|
| P2239 P2242 |
A1A+/A2A+ voltage is more than 4.5 V for 5.0 seconds or more (2 trip detection logic) |
|
| P2252 P2255 |
A1A-/A2A- voltage is 0.5 V or less for 5.0 seconds or more (2 trip detection logic) |
|
| P2253 P2256 |
A1A-/A2A- voltage is more than 4.5 V for 5.0 seconds or more (2 trip detection logic) |
|
- HINT:
- DTC P2237, P2238, P2239, P2252 and P2253 indicate malfunctions related to the bank 1 air fuel ratio sensor circuit.
- DTC P2240, P2241, P2242, P2255 and P2256 indicate malfunctions related to the bank 2 air fuel ratio sensor circuit.
- DTC P2237, P2238, P2239, P2252 and P2253 indicate malfunctions related to the bank 1 air fuel ratio sensor circuit.
WIRING DIAGRAM
Refer to DTC P2195 (Click here).CONFIRMATION DRIVING PATTERN
- Connect the intelligent tester to the DLC3.
- Turn the ignition switch on (IG) and turn the tester on.
- Clear DTCs (even if no DTCs are stored, perform the clear DTC operation).
- Turn the ignition switch off and wait for at least 30 seconds.
- Turn the ignition switch on (IG) and turn the tester on.
- Start the engine and wait 5 minutes.
- Enter the following menus: Powertrain / Engine and ECT / DTC.
- Read the pending DTCs.
- HINT:
- If a pending DTC is output, the system is malfunctioning.
- If a pending DTC is not output, perform the following procedure.
- If a pending DTC is output, the system is malfunctioning.
- Enter the following menus: Powertrain / Engine and ECT / Utility / All Readiness.
- Input the DTC: P2237, P2238, P2239, P2240, P2241, P2242, P2252, P2253, P2255 or P2256.
- Check the DTC judgment result.
Tester Display
Description
NORMAL
- DTC judgment completed
- System normal
ABNORMAL
- DTC judgment completed
- System abnormal
INCOMPLETE
- DTC judgment not completed
- Perform driving pattern after confirming DTC enabling conditions
UNKNOWN
- Unable to perform DTC judgment
- Number of DTCs which do not fulfill DTC preconditions has reached ECU memory limit
- HINT:
- If the judgment result shows NORMAL, the system is normal.
- If the judgment result shows ABNORMAL, the system has a malfunction.
- If the judgment result shows INCOMPLETE or UNKNOWN, idle the engine for 5 minutes and check the DTC judgment result again.
- If the judgment result shows NORMAL, the system is normal.
- DTC judgment completed
INSPECTION PROCEDURE
- HINT:
- Malfunctioning areas can be identified by performing the Control the Injection Volume for A/F Sensor function provided in the Active Test. The Control the Injection Volume for A/F Sensor function can help to determine whether the air fuel ratio sensor, heated oxygen sensor and other potential trouble areas are malfunctioning.
- The following instructions describe how to conduct the Control the Injection Volume for A/F Sensor operation using the intelligent tester.
- Connect the intelligent tester to the DLC3.
- Start the engine and turn the tester on.
- Warm up the engine at an engine speed of 2500 rpm for approximately 90 seconds.
- Enter the following menus: Powertrain / Engine and ECT / Active Test / Control the Injection Volume for A/F Sensor.
- Perform the Control the Injection Volume for A/F Sensor operation with the engine in an idling condition (press the RIGHT or LEFT button to change the fuel injection volume).
- Monitor the voltage outputs of the air fuel ratio and heated oxygen sensors (AFS Voltage B1S1 and O2S B1S2 or AFS Voltage B2S1 and O2S B2S2) displayed on the tester.
- HINT:
- The Control the Injection Volume for A/F Sensor operation lowers the fuel injection volume by 12.5% or increases the injection volume by 25%.
- Each sensor reacts in accordance with increases and decreases in the fuel injection volume.
- The Control the Injection Volume for A/F Sensor operation lowers the fuel injection volume by 12.5% or increases the injection volume by 25%.
- Standard voltage:
Tester Display
Injection Volumes
Status
Voltages
AFS Voltage B1S1 or AFS Voltage B2S1 (Air fuel ratio)
+25%
Rich
Less than 3.1 V
AFS Voltage B1S1 or AFS Voltage B2S1 (Air fuel ratio)
-12.5%
Lean
More than 3.4 V
O2S B1S2 or O2S B2S2 (Heated oxygen)
+25%
Rich
More than 0.55 V
O2S B1S2 or O2S B2S2 (Heated oxygen)
-12.5%
Lean
Less than 0.4 V
- NOTICE:
- The air fuel ratio sensor has an output delay of a few seconds and the heated oxygen sensor has a maximum output delay of approximately 20 seconds.
Case
Air Fuel Ratio Sensor (Sensor 1)
Output Voltage
Heated Oxygen Sensor (Sensor 2)
Output Voltage
Main Suspected Trouble Area
1
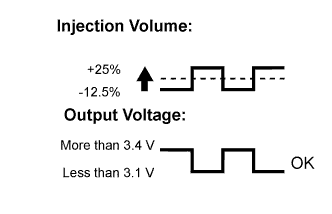

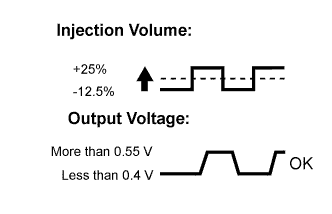
-
2
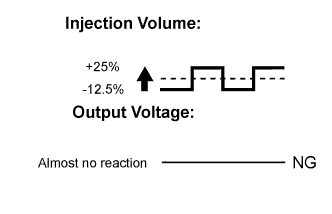
- Air fuel ratio sensor
- Air fuel ratio sensor heater
- Air fuel ratio sensor circuit
3
- Heated oxygen sensor
- Heated oxygen sensor heater
- Heated oxygen sensor circuit
4
- Fuel pressure
- Gas leakage from exhaust system
(Air fuel ratio extremely lean or rich)
- Following the Control the Injection Volume for A/F Sensor procedure enables technicians to check and graph the voltage outputs of both the air fuel ratio and heated oxygen sensors.
- To display the graph, enter the following menus on the tester: Control the Injection Volume for A/F Sensor / All Data / AFS Voltage B1S1 or AFS Voltage B2S1 and O2S B1S2 or O2S B2S2. Then press the graph button on the Data List view.
- HINT:
- Refer to "Data List / Active Test" [AFS Voltage B1S1 and AFS Voltage B2S1] (Click here).
- Bank 1 refers to the bank that includes the No. 1 cylinder*.
*: The No. 1 cylinder is the cylinder which is farthest from the transmission.
- Bank 2 refers to the bank that does not include the No. 1 cylinder.
- Read freeze frame data using the intelligent tester. The ECM records vehicle and driving condition information as freeze frame data the moment a DTC is stored. When troubleshooting, freeze frame data can be helpful in determining whether the vehicle was running or stopped, whether the engine was warmed up or not, whether the air fuel ratio was lean or rich, as well as other data recorded at the time of a malfunction.
- Sensor 1 refers to the sensor closest to the engine assembly.
- Sensor 2 refers to the sensor farthest away from the engine assembly.
- Refer to "Data List / Active Test" [AFS Voltage B1S1 and AFS Voltage B2S1] (Click here).
| 1. CHECK HARNESS AND CONNECTOR (AIR FUEL RATIO SENSOR - ECM) |

Disconnect the air fuel ratio sensor connector.
Disconnect the ECM connector.
Measure the resistance according to the value(s) in the table below.
- Standard resistance (Check for open):
- Bank 1:
Tester Connection
Condition
Specified Condition
B20-1 (HA1A) - B47-17 (HA1A)
Always
Below 1 Ω
B20-3 (A1A+) - B48-1 (A1A+)
Always
Below 1 Ω
B20-4 (A1A-) - B48-2 (A1A-)
Always
Below 1 Ω
- Bank 2:
Tester Connection
Condition
Specified Condition
B19-1 (HA2A) - B47-19 (HA2A)
Always
Below 1 Ω
B19-3 (A2A+) - B48-7 (A2A+)
Always
Below 1 Ω
B19-4 (A2A-) - B48-8 (A2A-)
Always
Below 1 Ω
- Standard resistance (Check for short):
- Bank 1:
Tester Connection
Condition
Specified Condition
B20-1 (HA1A) or B47-17 (HA1A) - Body ground
Always
Below 1 Ω
B20-3 (A1A+) or B48-1 (A1A+) - Body ground
Always
Below 1 Ω
B20-4 (A1A-) or B48-2 (A1A-) - Body ground
Always
Below 1 Ω
- Bank 2:
Tester Connection
Condition
Specified Condition
B19-1 (HA2A) or B47-19 (HA2A) - Body ground
Always
Below 1 Ω
B19-3 (A2A+) or B48-7 (A2A+) - Body ground
Always
Below 1 Ω
B19-4 (A2A-) or B48-8 (A2A-) - Body ground
Always
Below 1 Ω
Reconnect the ECM connector.
Reconnect the air fuel ratio sensor connector.
|
|
||||

| OK | |
 |
| 2. REPLACE AIR FUEL RATIO SENSOR |
Replace the air fuel ratio sensor (Click here).
| NEXT | |
|
| 3. CHECK WHETHER DTC OUTPUT RECURS |
Connect the intelligent tester to the DLC3.
Turn the ignition switch on (IG).
Turn the tester on.
Drive the vehicle in accordance with the driving pattern described in the Confirmation Driving Pattern.
Enter the following menus: Powertrain / Engine and ECT / DTC / Pending.
Read the pending DTCs.
- Result:
Result
Proceed to
No output
A
P2237, P2238, P2239, P2240, P2241, P2242, P2252, P2253, P2255 or P2256
B
|
|
||||
| A | ||
 |
||
| ||