Home › HEATER & AIR CONDITIONING SYSTEM › AIR CONDITIONING › AIR MIX CONTROL SERVO MOTOR (for Rear)INSTALLATION
Removal / installation · Vehicles built from Jul 2010
Versions by build date: May 2007 – Jul 2008 Aug 2008 – Jun 2010 from Jul 2010
1.
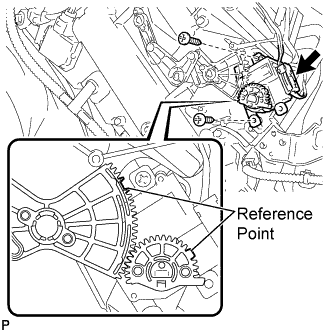
INSTALL REAR AIR MIX CONTROL SERVO MOTOR SUB-ASSEMBLY
Using the reference point, install the rear air mix control servo motor sub-assembly with the 2 screws. Connect the connector.
2.
INSTALL ROOF SIDE INNER GARNISH ASSEMBLY RH
HINT:
Use the same procedure for the RH side and the LH side.
3.
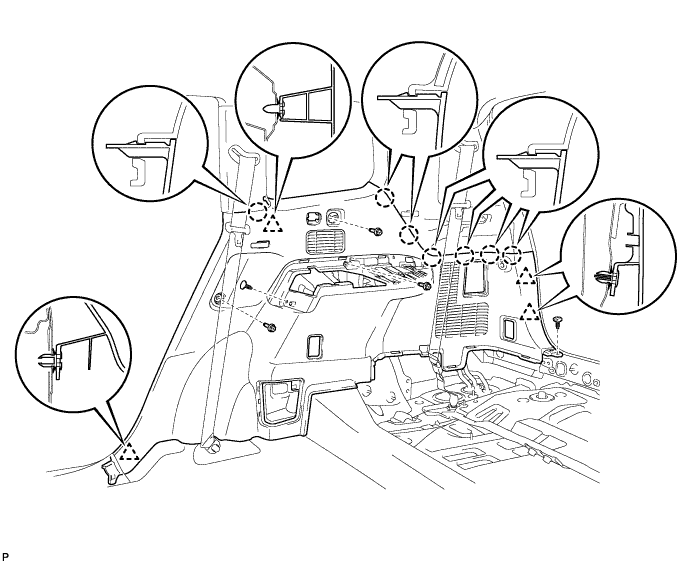
INSTALL DECK TRIM SIDE PANEL ASSEMBLY RH
Engage the 4 clips and 7 claws.
Install the 2 clips.
Install the deck trim side panel assembly RH with the 3 bolts.
4.
INSTALL FRONT DECK SIDE TRIM COVER RH
HINT:
Use the same procedure for the RH side and the LH side.
5.
INSTALL NO. 1 LUGGAGE COMPARTMENT TRIM HOOK
HINT:
Use the same procedure for the No. 1 luggage compartment trim hook and the No. 2 deck side trim hook.
6.
INSTALL ROPE HOOK ASSEMBLY (for RH Side)
HINT:
Use the same procedure for the RH side and the LH side.
7.
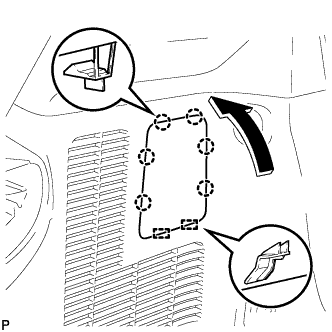
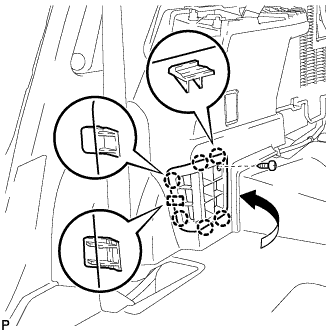
INSTALL REAR COMBINATION LIGHT SERVICE COVER RH
Engage the 2 guides and 6 claws, and install the rear combination light service cover RH.
8.
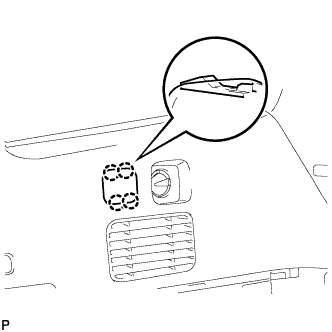
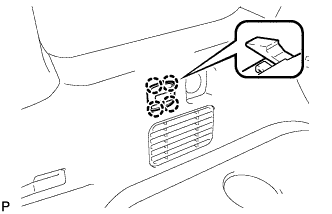
INSTALL SIDE TRIM COVER RH (for Manual Air Conditioning System)
Engage the 4 claws, and install the side trim cover RH.
9.
INSTALL REAR ROOM TEMPERATURE SENSOR (for Automatic Air Conditioning System)
Connect the connector.
Engage the 4 claws and install the rear room temperature sensor.
10.
INSTALL DECK SIDE TRIM RH
HINT:
Use the same procedure for the RH side and the LH side.
11.
INSTALL DECK SIDE TRIM COVER NO.1
HINT:
Use the same procedure for the RH side and the LH side.
12.
INSTALL REAR SEAT SIDE GARNISH CAP
Engage the guide and 6 claws. Install the rear seat side garnish cap with the screw.
13.
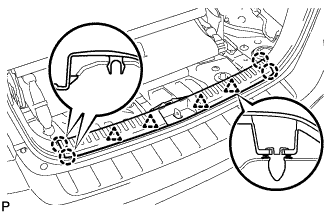
INSTALL REAR FLOOR FINISH PLATE
Engage the 4 clips and 4 claws, and install the rear floor finish plate.
14.
INSTALL REAR NO. 2 SEAT ASSEMBLY
(Click here )
15.
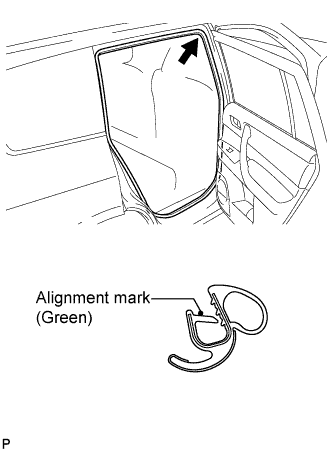
INSTALL REAR DOOR OPENING TRIM WEATHERSTRIP RH
Align the alignment mark (green) on the weatherstrip with the protruding portion on the body indicated by the arrow in the illustration, and install the rear door opening trim weatherstrip RH.
NOTICE:
After installation, check that the corners fit correctly.
16.
INSTALL REAR DOOR SCUFF PLATE RH
HINT:
Use the same procedure for the RH side and the LH side.