INSTALLATION
Removal / installation · Vehicles built May 2007 – Jun 2010
Versions by build date: May 2007 – Jun 2010 from Jul 2010
- NOTICE:
- Because the left and right hoses are not interchangeable, verify the part number when installing the flexible hoses.
- If the hoses are to be reused, connect them after checking the identification marks placed when each hose was disconnected.
- Because the left and right hoses are not interchangeable, verify the part number when installing the flexible hoses.
| 1. INSTALL REAR FLEXIBLE HOSE |

Connect the rear flexible hose to the disc brake cylinder assembly with a new union bolt and a new gasket.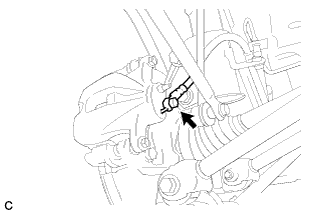

- Torque:
- 33 N*m{ 336 kgf*cm , 24 ft.*lbf }
Install the rear flexible hose to the bracket with a new clip.
- NOTICE:
- Install the clip as far as it will go.
Using a union nut wrench (10 mm), connect the brake line to the front brake flexible hose while holding the flexible hose with a wrench.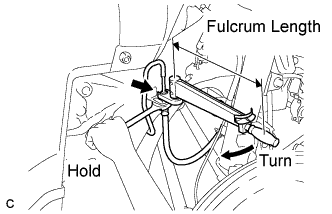
- Torque:
- without union nut wrench:
- 15 N*m{ 155 kgf*cm , 11 ft.*lbf }
- with union nut wrench:
- 14 N*m{ 143 kgf*cm , 10 ft.*lbf }
- NOTICE:
- Do not bend or damage the brake line.
- Do not allow any foreign matter such as dirt and dust to enter the brake line.
- Use a torque wrench with a fulcrum length of 250 mm (9.84 in.).
- This torque value is effective when the union nut wrench is parallel to the torque wrench.
- Do not bend or damage the brake line.
Install the rear flexible hose to the absorber bracket with the bolt.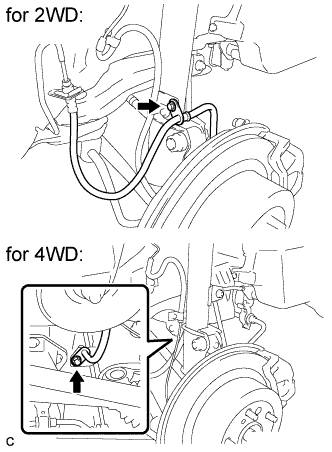
- Torque:
- 19 N*m{ 194 kgf*cm , 14 ft.*lbf }
| 2. FILL BRAKE FLUID RESERVOIR |
Fill the reservoir with brake fluid.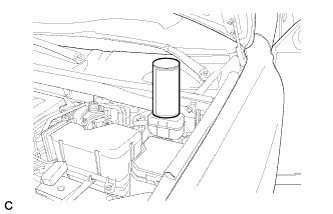
- Brake Fluid:
- SAE J1703 or FMVSS No. 116 DOT 3
- NOTICE:
- Make sure that there is sufficient brake fluid in the reservoir.
| 3. BLEED BRAKE LINE |
- NOTICE:
- Bleed the brake line of the wheel farthest from the master cylinder first.
- Add brake fluid to keep the level between the MIN and MAX lines of the reservoir while bleeding the brakes.
- Bleed the brake line of the wheel farthest from the master cylinder first.
Connect a vinyl tube to the bleeder plug.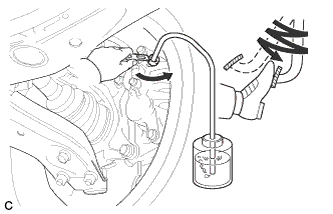
Depress the brake pedal several times, and then loosen the bleeder plug with the pedal depressed (*3).
When fluid stops coming out, tighten the bleeder plug, and then release the brake pedal (*4).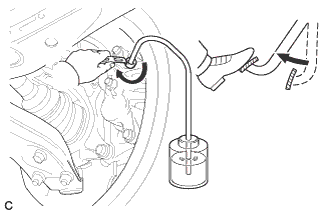
Repeat (*3) and (*4) until all the air in the fluid is completely bled out.
Tighten the bleeder plug completely.
- Torque:
- 8.3 N*m{ 85 kgf*cm , 73 in.*lbf }
Repeat the above procedure for each wheel to bleed the brake line.
| 4. BLEED BRAKE ACTUATOR |
- NOTICE:
- After bleeding the brake system, if the specified height or feel of the brake pedal cannot be obtained, bleed the brake actuator assembly with the intelligent tester by following the procedure below.
Depress the brake pedal more than 20 times with the ignition switch off.
Connect the intelligent tester to the DLC3, and then turn the ignition switch on (IG).
- NOTICE:
- Do not start the engine.
Turn the intelligent tester on and select "AIR BLEEDING" on the screen.
- NOTICE:
- Refer to the intelligent tester operator's manual for further details.
- Bleed the air by following the steps displayed on the intelligent tester.
- Refer to the intelligent tester operator's manual for further details.
Bleed the air according to "Step 1: Increase" on the intelligent tester display.
- NOTICE:
- Make sure that the master cylinder reservoir tank does not run out of brake fluid.
- Add brake fluid to keep the level between the MIN and MAX lines of the reservoir while bleeding the brakes.
- Make sure that the master cylinder reservoir tank does not run out of brake fluid.
Connect a vinyl tube to either one of the bleeder plugs.
Depress the brake pedal several times, and then loosen the bleeder plug connected to the vinyl tube with the pedal depressed (*5).
When fluid stops coming out, tighten the bleeder plug, and then release the brake pedal (*6).
Repeat (*5) and (*6) until all the air in the fluid is completely bled out.
Tighten the bleeder plug completely.
- Torque:
- 8.3 N*m{ 85 kgf*cm , 73 in.*lbf }
Repeat the above procedure for the rest of the wheels to bleed the brake lines.
Bleed the suction line according to "Step 2: Inhalation" on the intelligent tester display.
- NOTICE:
- Bleed the suction line by following the steps displayed on the intelligent tester.
- Add brake fluid to keep the level between the MIN and MAX lines of the reservoir while bleeding the brakes.
- Bleed the suction line by following the steps displayed on the intelligent tester.
Connect a vinyl tube to the bleeder plug at the right front wheel or the right rear wheel and loosen the bleeder plug.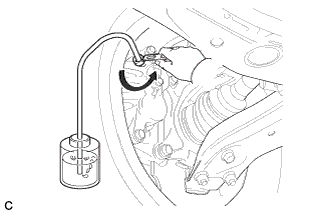
Operate the brake actuator assembly to bleed the air using the intelligent tester (*7).
- NOTICE:
- During this step, be sure to release the brake pedal.
- The actuator operation stops automatically in 4 seconds.
- During this step, be sure to release the brake pedal.
Check that the actuator operation has stopped by referring to the intelligent tester display, and tighten the bleeder plug (*8).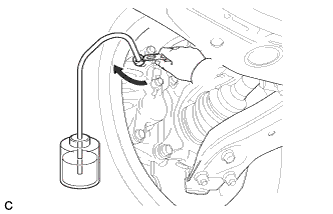
Repeat (*7) and (*8) until all the air in the fluid is completely bled out.
Tighten the bleeder plug completely.
- Torque:
- 8.3 N*m{ 85 kgf*cm , 73 in.*lbf }
For the rest of the wheels, bleed the air in the same way as stated in the above procedure.
- Torque:
- 8.3 N*m{ 85 kgf*cm , 73 in.*lbf }
Bleed the pressure reduction line according to "Step 3: Decrease" on the intelligent tester display.
- NOTICE:
- Bleed the pressure reduction line by following the steps displayed on the intelligent tester.
- Add brake fluid to keep the level between the MIN and MAX lines of the reservoir while bleeding the brakes.
- Bleed the pressure reduction line by following the steps displayed on the intelligent tester.
Connect a vinyl tube to either one of the bleeder plugs.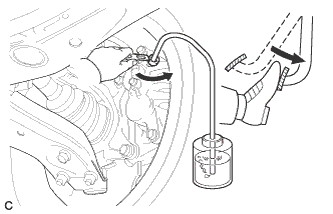
Loosen the bleeder plug (*9).
While keeping the brake pedal fully depressed, operate the brake actuator assembly using the intelligent tester.
- NOTICE:
- The actuator operation stops automatically in 4 seconds. When performing this procedure continuously, an interval of at least 20 seconds is required.
- After the operation is completed, the brake pedal goes down slightly. This is a normal phenomenon when the solenoid opens.
- During this procedure, the pedal seems heavy, but completely depress it so that the brake fluid comes out from the bleeder plug.
- Be sure to keep the brake pedal depressed. Never depress and release the pedal repeatedly.
- The actuator operation stops automatically in 4 seconds. When performing this procedure continuously, an interval of at least 20 seconds is required.
Tighten the bleeder plug, and then release the brake pedal (*10).
Repeat steps (*9) to (*10) until all the air in the fluid is completely bled out.
Tighten the bleeder plug completely.
- Torque:
- 8.3 N*m{ 85 kgf*cm , 73 in.*lbf }
Repeat the above procedures for the rest of the brakes to bleed the brake line.
Bleed the brake lines again according to "Step 4: Increase" on the intelligent tester display.
- NOTICE:
- Bleed the air by following the steps displayed on the intelligent tester.
- Add brake fluid to keep the level between the MIN and MAX lines of the reservoir while bleeding the brakes.
- Bleed the air by following the steps displayed on the intelligent tester.
Connect a vinyl tube to either one of the bleeder plugs.
Depress the brake pedal several times, and then loosen the bleeder plug connected to the vinyl tube with the pedal depressed (*11).
When fluid stops coming out, tighten the bleeder plug, and then release the brake pedal (*12).
Repeat (*11) and (*12) until all the air in the fluid is completely bled out.
Tighten the bleeder plug completely.
- Torque:
- 8.3 N*m{ 85 kgf*cm , 73 in.*lbf }
Repeat the above procedures for each brake to bleed the brake lines.
Finish "AIR BLEEDING" on the intelligent tester, and then turn off the tester.
Disconnect the intelligent tester from the DLC3.
Turn the ignition switch off.
| 5. INSPECT FLUID LEVEL |
Check the fluid level.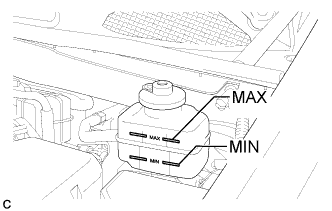
If brake fluid level is lower than the MIN line, check for leaks and inspect the disc brake pads. If necessary, refill the reservoir with brake fluid to the MAX line after repair or replacement.- Brake Fluid:
- SAE J1703 or FMVSS No. 116 DOT 3
| 6. INSPECT FOR BRAKE FLUID LEAK |
| 7. INSTALL REAR WHEEL |
- Torque:
- 103 N*m{ 1050 kgf*cm , 76 ft.*lbf }