REASSEMBLY
Removal / installation · Vehicles built from May 2007
| 1. INSTALL MASTER CYLINDER RESERVOIR GROMMET |

Apply lithium soap base glycol grease to 2 new master cylinder reservoir grommets.
Install the 2 master cylinder reservoir grommets to the brake master cylinder reservoir assembly.
| 2. INSTALL BRAKE MASTER CYLINDER RESERVOIR ASSEMBLY |
Install the brake master cylinder reservoir assembly to the master cylinder body.
Mount the brake master cylinder sub-assembly in a vise.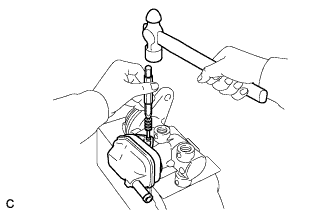

- NOTICE:
- Place aluminum plates on the vise to prevent damage to the brake master cylinder sub-assembly.
Using a pin punch and a hammer, tap in the straight pin.
| 3. INSTALL NO. 2 BRAKE TUBE WAY |
Install the No. 2 brake tube way to the brake master cylinder body.
| 4. INSTALL BRAKE MASTER CYLINDER TO WAY TUBE |
Secure the No. 2 brake tube way to the brake master cylinder body with the 2 bolts, 2 nuts and 4 washers as shown in the illustration.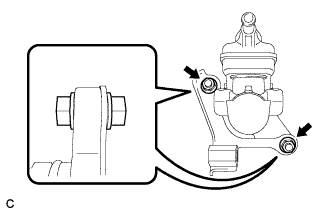
- Torque:
- 13 N*m{ 132 kgf*cm , 10 ft.*lbf }
Mount the brake master cylinder sub-assembly in a vise.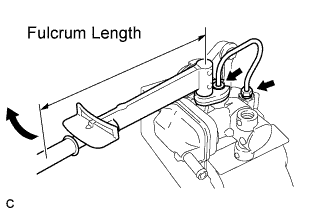
- NOTICE:
- Place aluminum plates on the vise to prevent damage to the brake master cylinder sub-assembly.
Using a union nut wrench (12 mm), install the brake master cylinder to way tube to the brake master cylinder body and No. 2 brake tube way.
- Torque:
- without union nut wrench:
- 20 N*m{ 204 kgf*cm , 15 ft.*lbf }
- with union nut wrench:
- 18 N*m{ 184 kgf*cm , 13 ft.*lbf }
- NOTICE:
- Use a torque wrench with a fulcrum length of 250 mm (9.84 in.).
- This torque value is effective when the union nut wrench is parallel to the torque wrench.
- Use a torque wrench with a fulcrum length of 250 mm (9.84 in.).
Remove the 2 bolts, 2 nuts and 4 washers.