INSTALLATION
Removal / installation · Vehicles built from Jul 2010
Versions by build date: May 2007 – Jul 2008 Aug 2008 – Jun 2010 from Jul 2010
| 1.
INSTALL BRAKE ACTUATOR |
 |
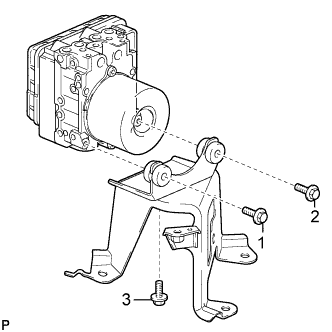
- Install the brake actuator to the brake actuator bracket assembly with the 3 bolts.
-
Torque:
- 5.4 N*m{
55 kgf*cm
, 48 in.*lbf
}
- NOTICE:
- Do not remove the hole plugs of a new brake actuator before connecting the 6 brake lines because the brake actuator is filled with brake fluid.
- Do not hold with the actuator by the connector.
- Tighten the 3 bolts in order the from shown in the illustration.
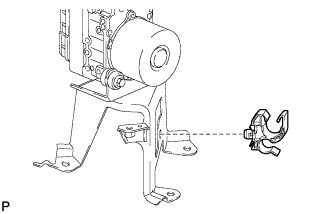
- Install the piping clamp to the brake actuator bracket assembly.
| 2.
INSTALL BRAKE ACTUATOR WITH BRACKET (for LHD) |
|
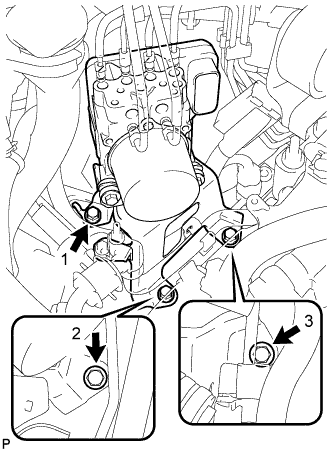
- Install the brake actuator with bracket to the body with the 3 bolts.
-
Torque:
- 19 N*m{
194 kgf*cm
, 14 ft.*lbf
}
- NOTICE:
- Do not damage the brake lines or wire harness.
- Tighten the 3 bolts in order the from shown in the illustration.
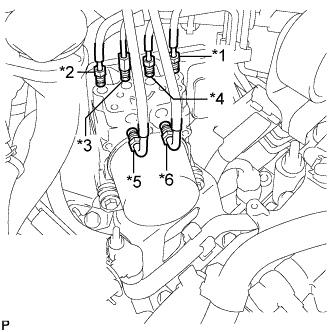
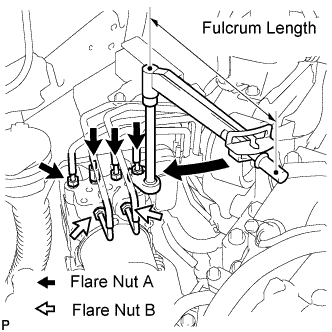
- Temporarily tighten each brake line to the correct positions of the brake actuator with bracket as shown in the illustration.
- HINT:
- *1: To front wheel cylinder RH
- *2: To front wheel cylinder LH
- *3: To rear wheel cylinder RH
- *4: To rear wheel cylinder LH
- *5: From 1st of master cylinder
- *6: From 2nd of master cylinder
- Using a union nut wrench (10 mm and 12 mm), fully tighten each brake line.
-
Torque:
- Flare Nut A (M10) without union nut wrench:
- 15 N*m{
155 kgf*cm
, 11 ft.*lbf
}
- Flare Nut A (M10) with union nut wrench:
- 14 N*m{
143 kgf*cm
, 10 ft.*lbf
}
- Flare Nut B (M12) without union nut wrench:
- 20 N*m{
204 kgf*cm
, 15 ft.*lbf
}
- Flare Nut B (M12) with union nut wrench:
- 18 N*m{
184 kgf*cm
, 13 ft.*lbf
}
- NOTICE:
- Use a torque wrench with a fulcrum length of 250 mm (9.84 in.).
- This torque value is effective when the union nut wrench is parallel to the torque wrench.
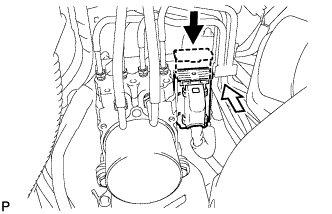
- Connect the brake actuator connector.
- NOTICE:
- Make sure that the connector is locked securely.
- Make sure that the actuator connector can be connected smoothly. Do not allow water, oil or dirt to enter.
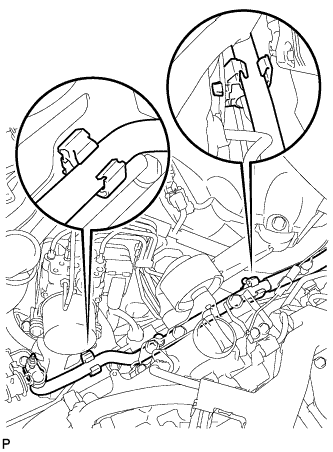
- Install the No. 1 cooler refrigerant suction tube to the 2 clamps.
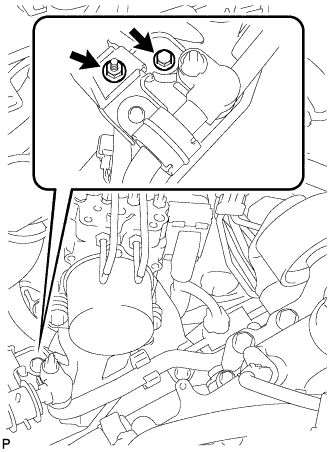
- Install the suction hose bracket to the brake actuator bracket assembly with the nut and bolt.
-
Torque:
- 9.8 N*m{
100 kgf*cm
, 87 in.*lbf
}
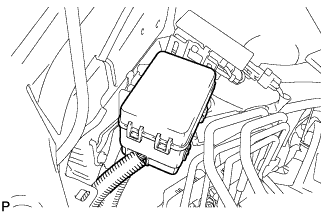
- Install the relay box.
| 3.
INSTALL BRAKE ACTUATOR WITH BRACKET (for RHD) |
|
- Install the brake actuator with bracket to the body with the 3 bolts.
-
Torque:
- 19 N*m{
194 kgf*cm
, 14 ft.*lbf
}
- NOTICE:
- Do not damage the brake lines or wire harness.
- Tighten the 3 bolts in order the from shown in the illustration.
- Temporarily tighten each brake line to the correct position of the brake actuator with bracket as shown in the illustration.
- HINT:
- *1: To front wheel cylinder RH
- *2: To front wheel cylinder LH
- *3: To rear wheel cylinder RH
- *4: To rear wheel cylinder LH
- *5: From 1st of master cylinder
- *6: From 2nd of master cylinder
- Using a union nut wrench (10 mm and 12 mm), fully tighten each brake line.
-
Torque:
- Flare Nut A (M10) without union nut wrench:
- 15 N*m{
155 kgf*cm
, 11 ft.*lbf
}
- Flare Nut A (M10) with union nut wrench:
- 14 N*m{
143 kgf*cm
, 10 ft.*lbf
}
- Flare Nut B (M12) without union nut wrench:
- 20 N*m{
204 kgf*cm
, 15 ft.*lbf
}
- Flare Nut B (M12) with union nut wrench:
- 18 N*m{
184 kgf*cm
, 13 ft.*lbf
}
- NOTICE:
- Use a torque wrench with a fulcrum length of 250 mm (9.84 in.).
- This torque value is effective when the union nut wrench is parallel to the torque wrench.
- Connect the brake actuator connector.
- NOTICE:
- Make sure that the connector is locked securely.
- Make sure that the actuator connector can be connected smoothly. Do not allow water, oil or dirt to enter.
- Install the No. 1 cooler refrigerant suction tube to the 2 clamps.
- Install the suction hose bracket to the brake actuator bracket assembly with the nut and bolt.
-
Torque:
- 9.8 N*m{
100 kgf*cm
, 87 in.*lbf
}
| 4.
BLEED BRAKE SYSTEM |
|
(Click here)
| 5.
INSTALL V-BANK COVER SUB-ASSEMBLY
|
|
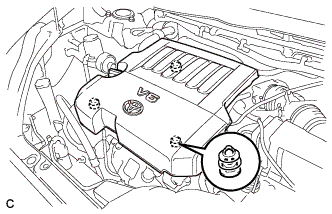
- Fit the 3 retainers and install the V-bank cover.
| 6.
CONNECT CABLE TO NEGATIVE BATTERY TERMINAL |
|
- NOTICE:
- When disconnecting the cable, some systems need to be initialized after the cable is reconnected (Click here).
| 7.
INSPECT BRAKE ACTUATOR WITH INTELLIGENT TESTER |
|
(Click here)
| 8.
PERFORM YAW RATE AND ACCELERATION SENSOR ZERO POINT CALIBRATION |
|
(Click here)
| 9.
CHECK AND CLEAR DTCS |
|
(Click here)