INSTALLATION
Removal / installation · Vehicles built from Jul 2010
Versions by build date: May 2007 – Jun 2010 from Jul 2010
- HINT:
- When installing the side mudguards, heat the vehicle body and side mudguards using a heat light.
- Heating temperature:
Item
Temperature
Vehicle Body
40 to 60°C (104 to 140°F)
Side Mudguard
20 to 30°C (68 to 86°F)
- NOTICE:
- Do not heat the vehicle body or side mudguards excessively.
| 1. INSTALL REAR DOOR OUTSIDE MOULDING SUB-ASSEMBLY |

Clean the vehicle body surface.
Using a heat light, heat the vehicle body surface.
Remove the double-sided tape from the vehicle body.
Wipe off any tape adhesive residue with cleaner.
Clean the rear door outside moulding sub-assembly (if reusing the rear door outside moulding sub-assembly).
Using a heat light, heat the rear door outside moulding sub-assembly.
Remove the double-sided tape from the rear door outside moulding sub-assembly.
Wipe off any tape adhesive residue with cleaner.
Apply new double-sided tape to the rear door outside moulding sub-assembly.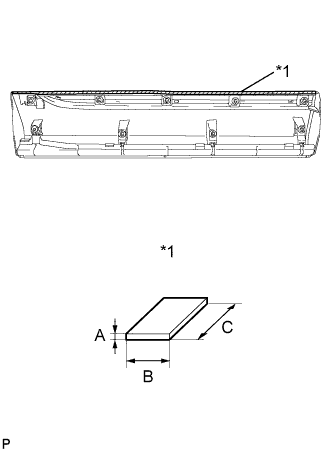

Text in Illustration *1
Double-sided Tape
Item
Dimension
A
1.2 mm (0.0472 in.)
B
6.0 mm (0.2362 in.)
C
722.0 mm (2.37 ft.)
Install 2 new No. 3 clips on the rear door outside moulding sub-assembly.
Install 6 new No. 4 clips on the rear door outside moulding sub-assembly.
Install a new gasket on the rear door outside moulding sub-assembly.
Install the rear door outside moulding sub-assembly.
Using a heat light, heat the vehicle body and rear door outside moulding sub-assembly.
Remove the release paper from the rear door outside moulding sub-assembly.
- HINT:
- After removing the release paper, keep the exposed adhesive free from foreign matter.
Engage the 8 clips and install the rear door outside moulding sub-assembly.
Install the nut.
- Torque:
- 5.0 N*m{ 51 kgf*cm , 44 in.*lbf }
Install the rear door No. 2 weatherstrip.
| 2. INSTALL FRONT DOOR OUTSIDE MOULDING SUB-ASSEMBLY |
Clean the vehicle body surface.
Using a heat light, heat the vehicle body surface.
Remove the double-sided tape from the vehicle body.
Wipe off any tape adhesive residue with cleaner.
Clean the front door outside moulding sub-assembly (if reusing the front door outside moulding sub-assembly).
Using a heat light, heat the front door outside moulding sub-assembly.
Remove the double-sided tape from the front door outside moulding sub-assembly.
Wipe off any tape adhesive residue with cleaner.
Apply new double-sided tape to the front door outside moulding sub-assembly.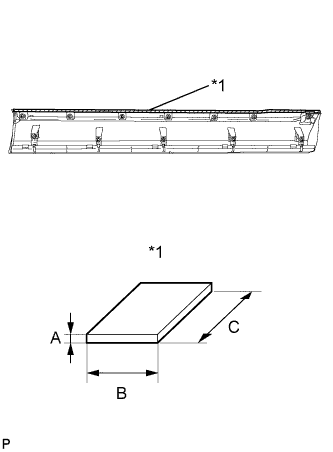
Text in Illustration *1
Double-sided Tape
Item
Dimension
A
1.2 mm (0.0472 in.)
B
6.0 mm (0.2362 in.)
C
1078.0 mm (3.54 ft.)
Install 3 new No. 3 clips on the front door outside moulding sub-assembly.
Install 8 new No. 4 clips on the front door outside moulding sub-assembly.
Install a new gasket on the front door outside moulding sub-assembly.
Install the front door outside moulding sub-assembly.
Using a heat light, heat the vehicle body and front door outside moulding sub-assembly.
Remove the release paper from the front door outside moulding sub-assembly.
- HINT:
- After removing the release paper, keep the exposed adhesive free from foreign matter.
Engage the 11 clips and install the front door outside moulding sub-assembly.
Install the nut.
- Torque:
- 5.0 N*m{ 51 kgf*cm , 44 in.*lbf }
Install the front door weatherstrip.
| 3. INSTALL FRONT FENDER OUTSIDE MOULDING PAD |
Wipe off any tape adhesive residue with cleaner.
Remove the release paper from the front fender outside moulding pad.
Install a new front fender outside moulding pad to the front fender moulding sub-assembly.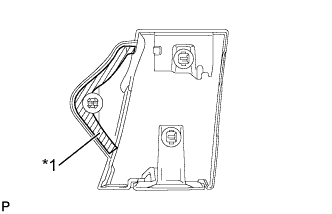
Text in Illustration *1
Front Fender Outside Moulding Pad
| 4. INSTALL FRONT FENDER MOULDING SUB-ASSEMBLY |
Clean the vehicle body surface.
Using a heat light, heat the vehicle body surface.
Remove the front fender side protector from the vehicle body.
Wipe off any tape adhesive residue with cleaner.
Clean the front fender moulding sub-assembly (if reusing the front fender moulding sub-assembly).
Using a heat light, heat the front fender moulding sub-assembly.
Remove the double-sided tape from the front fender moulding sub-assembly.
Wipe off any tape adhesive residue with cleaner.
Apply new double-sided tape to the front fender moulding sub-assembly.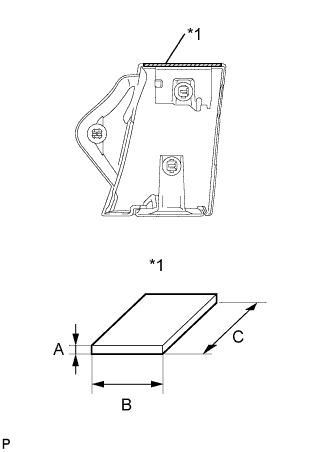
Text in Illustration *1
Double-sided Tape
Item
Dimension
A
1.2 mm (0.0472 in.)
B
3.0 mm (0.1181 in.)
C
72.0 mm (2.83 in.)
Install 2 new No. 4 clips on the front fender moulding sub-assembly.
Install a new pad on the front fender moulding sub-assembly.
Install the front fender moulding sub-assembly.
Using a heat light, heat the vehicle body and the front fender moulding sub-assembly.
Remove the release paper from the front fender moulding sub-assembly.
- HINT:
- After removing the release paper, keep the exposed adhesive free from foreign matter.
Engage the 3 clips and install the front fender moulding sub-assembly.
Using a 4 mm hexagon wrench, install the screw.
Install the clip.