2007-2013 Highlander Kluger · Service Manual ENGINE

INSTALLATION

Removal / installation · Vehicles built May 2007 – Jul 2008

Versions by build date: May 2007 – Jul 2008 Aug 2008 – Jun 2010 from Jul 2010


1. INSTALL FUEL SENDER GAUGE ASSEMBLY

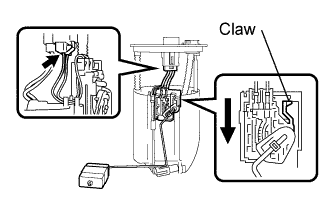
  1. A141357E02
    Slide the fuel sender gauge to fit the claw.


2. INSTALL FUEL SUCTION TUBE ASSEMBLY WITH PUMP AND GAUGE

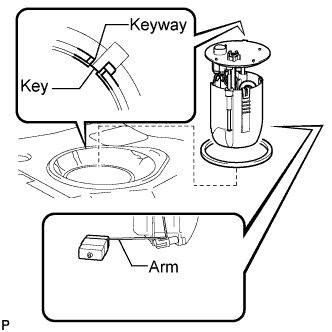
  1. A169371E01
    Install a new gasket to the fuel tank.

  1. Attach the fuel suction tube with pump and gauge to the fuel tank.

    NOTICE:
    Be careful not to bend the arm of the fuel sender gauge.

  1. Align the keyway of the fuel suction tube support with the key of the fuel suction tube with pump and gauge.

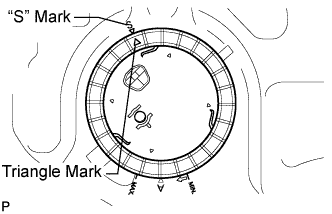
  1. A172551E01
    Align the triangle mark on a new fuel pump gauge retainer with the "S" mark on the fuel tank while pushing down the fuel suction tube with pump and gauge, and attach the fuel pump gauge retainer.

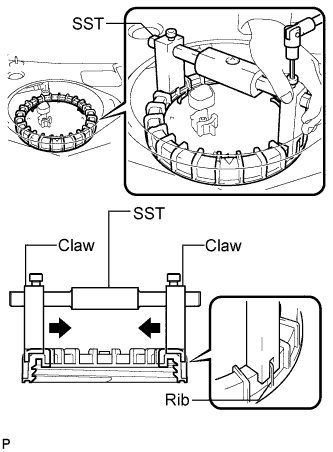
  1. A171922E01
    Using a 6 mm socket hexagon wrench, install SST to the fuel pump gauge retainer.
    SST
    09808-14020   (09808-01410, 09808-01420, 09808-01430)

    HINT:
    1. Engage the SST claws securely with the fuel pump gauge retainer ribs to secure SST.
    2. Install SST while pressing the SST claws toward the fuel pump gauge retainer (toward the center of SST).

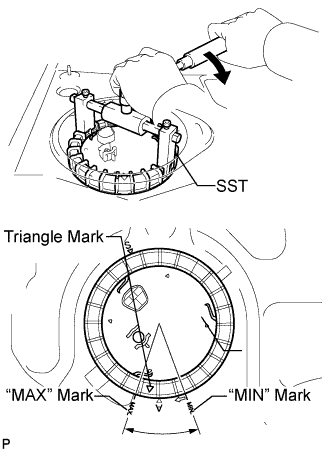
  1. A172552E01
    Rotate the fuel pump gauge retainer by hand, then tighten it one complete turn and another half turn using SST. The triangle mark on the fuel pump gauge retainer must be positioned between the "MIN" and "MAX" marks on the fuel tank.
    SST
    09808-14020   (09808-01410, 09808-01420, 09808-01430)

    NOTICE:
    1. Do not use any tools other than specified in this operation. Damage to the fuel pump gauge retainer or the fuel tank may result.
    2. Fully tighten the retainer by turning it clockwise while holding SST down. Do not allow the claw of the tank suction tube support to slip out of its groove on the fuel tank.

    HINT:
    The ribs on the fuel pump gauge retainer can be fitted into the tips of SST.

  1. A172553E01
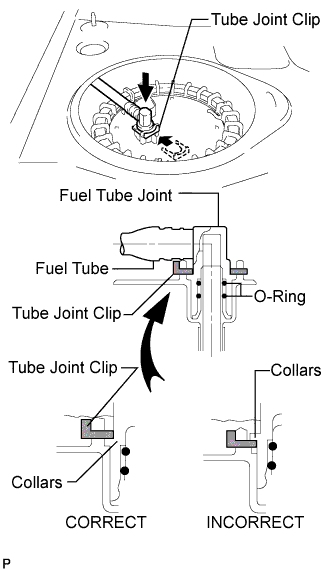
    Install the fuel pump tube and the tube joint clip.

    NOTICE:
    1. Check that there are no scratches or foreign objects on the connecting part.
    2. Check that the fuel tube joint is inserted securely.
    3. Check that the tube joint clip is correctly located on the collar of the fuel tube joint.
    4. After installing the tube joint clip, check that the fuel tube joint has not been pulled out of position.

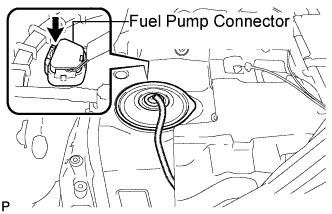
  1. Connect the fuel pump connector.


3. CONNECT CABLE TO NEGATIVE BATTERY TERMINAL

4. INSPECT FUEL LEAK
  1. Check fuel pump operation.

    1. Connect the intelligent tester to the DLC3.

    2. Turn the ignition switch on (IG) and turn the intelligent tester main switch on.

      NOTICE:
      Do not start the engine.

    3. Select the following menu items: DIAGNOSIS / ENHANCED OBD II / ACTIVE TEST / FUEL PUMP / SPD.

    4. Check for pressure in the fuel inlet tube from the fuel line. Check that sounds of fuel flowing from the fuel tank can be heard. If no sounds can be heard, check the integration relay, fuel pump, ECM and wiring connectors.

  1. Check for fuel leaks.

    1. Check that there are no fuel leaks from the fuel system after doing any maintenance or repairs. If there is a fuel leak, repair or replace parts as necessary.

  1. Turn the ignition switch off.

  1. Disconnect the intelligent tester from the DLC3.


5. DISCONNECT CABLE FROM NEGATIVE BATTERY TERMINAL

NOTICE:
When disconnecting the cable, some systems need to be initialized after the cable is reconnected (Click here).


6. REMOVE REAR FLOOR SERVICE HOLE COVER

  1. A171921E01
    Install new butyl tape to the rear floor service hole cover.

  1. Install the rear floor service hole cover.

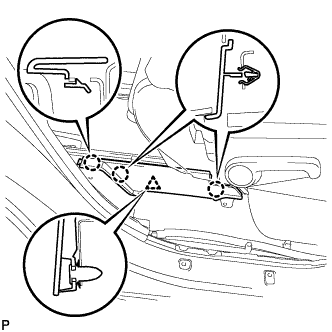
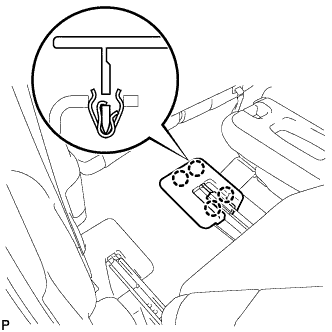
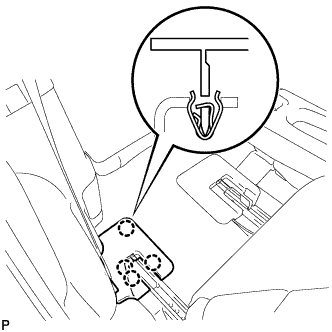
  1. Install the front floor carpet.

    1. A171920
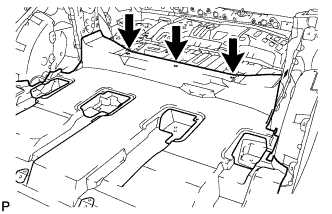
      Install the front floor carpet with the 3 clips. (w/ rear No. 2 seat)

    2. A176884
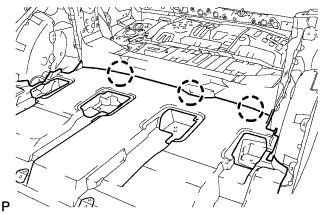
      Engage the 3 claws to install the front floor carpet. (w/o rear No. 2 seat)


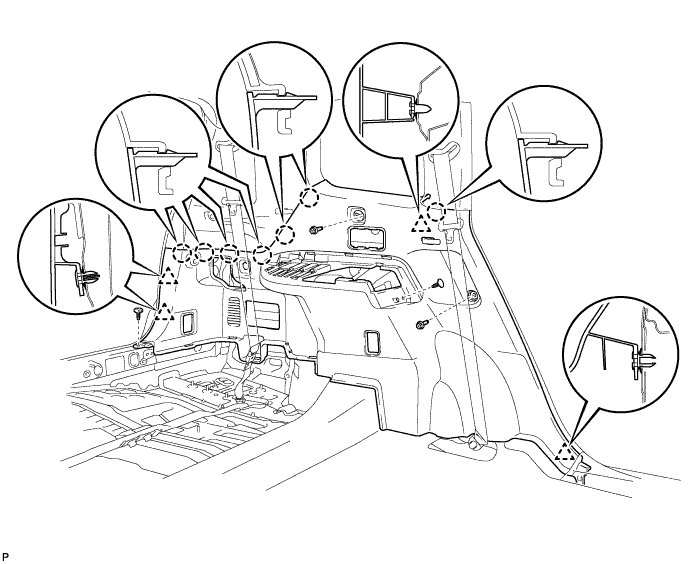
7. INSTALL DECK TRIM SIDE PANEL ASSEMBLY LH
  1. Engage the 4 clips and the 7 claws.

  1. Install the 2 clips.

  1. Install the deck trim side panel assembly LH with the 2 bolts.

    B173613


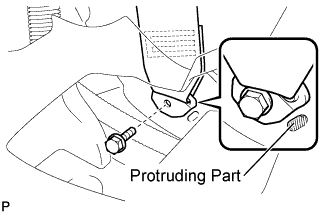
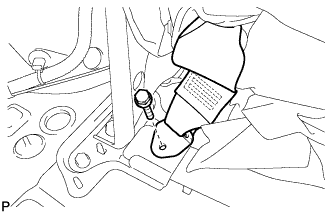
8. CONNECT REAR NO. 1 SEAT OUTER BELT ASSEMBLY LH

  1. B170934E01
    Connect the floor anchor end of the rear No. 1 seat outer belt assembly and install the bolt.

    Torque:
    42 N*m{ 428 kgf*cm , 31 ft.*lbf }

    NOTICE:
    Do not allow the anchor part of the rear No. 1 seat outer belt assembly to overlap the protruding part of the floor panel.


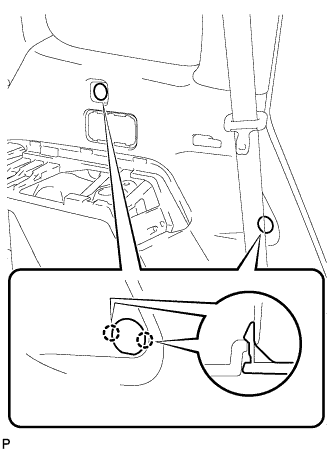
9. INSTALL FRONT DECK SIDE TRIM COVER LH

  1. B175145
    Engage the 4 claws and install the 2 front deck side trim covers LH.


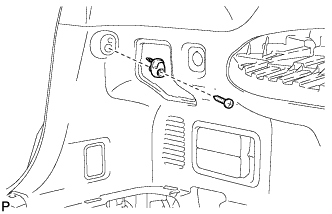
10. INSTALL NO. 2 DECK SIDE TRIM HOOK

  1. B173612
    Install the No. 2 deck side trim hook with the screw.


11. INSTALL ROPE HOOK ASSEMBLY (for LH Side)

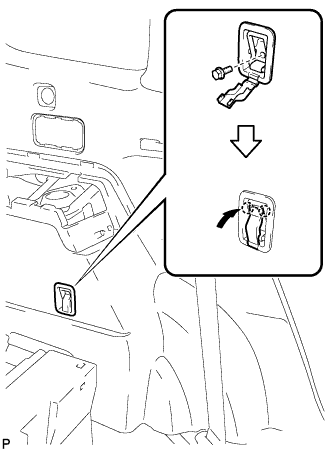
  1. B173599
    for Front Side:

    1. Install the rope hook assembly with the bolt.

      Torque:
      6.5 N*m{ 66 kgf*cm , 58 in.*lbf }

    2. Engage the 2 claws.

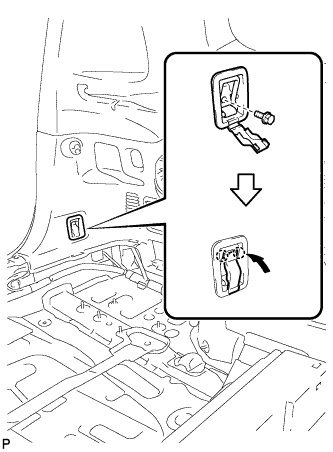
  1. B173601
    for Rear Side:

    1. Install the rope hook assembly with the bolt.

      Torque:
      6.5 N*m{ 66 kgf*cm , 58 in.*lbf }

    2. Engage the 2 claws.


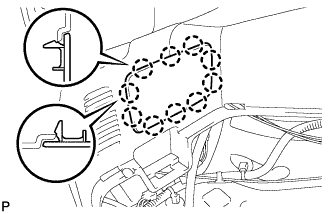
12. INSTALL REAR DECK TRIM COVER (w/o Remote Folding Function)

  1. B173602
    Engage the 10 claws and install the rear deck trim cover.


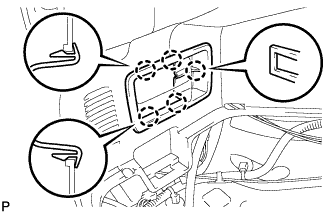
13. INSTALL RECLINING REMOTE CONTROL LEVER BEZEL LH (w/ Remote Folding Function)

  1. B173603
    Engage the 5 claws and install the reclining remote control bezel LH.


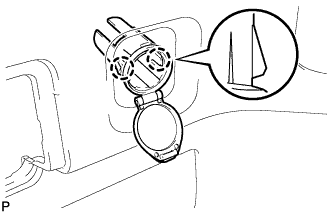
14. INSTALL REAR POWER OUTLET SOCKET COVER

  1. E151328
    Engage the 2 claws and install the rear power outlet socket cover.


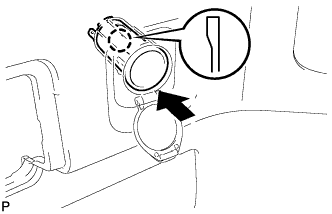
15. INSTALL REAR POWER POINT SOCKET ASSEMBLY

  1. E151490
    Engage the claw and install the rear power point socket assembly.

  1. Connect the connector.


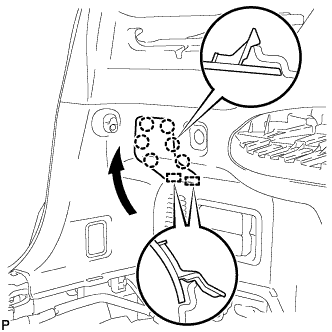
16. INSTALL REAR COMBINATION LIGHT SERVICE COVER LH

  1. B175146
    Engage the 2 guides and 6 claws, and install the rear combination light service cover LH.


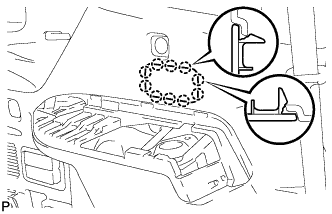
17. INSTALL SIDE TRIM COVER LH

  1. B173597
    Engage the 10 claws and install the side trim cover LH.


18. INSTALL DECK SIDE TRIM LH

  1. B173624
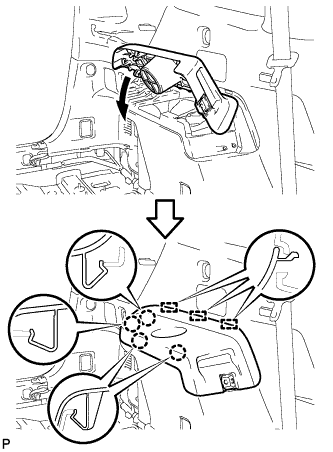
    Engage the 3 guides and 4 claws as shown in the illustration.

  1. B173596
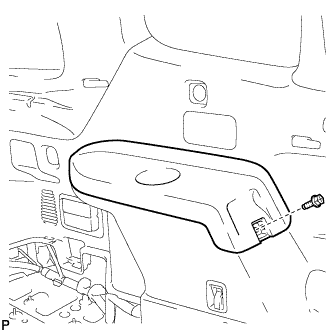
    Install the deck side trim LH with the bolt.


19. INSTALL DECK SIDE TRIM COVER NO.2

  1. B175144
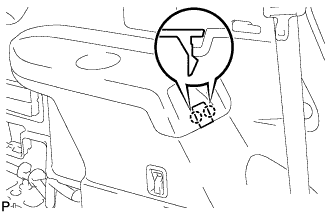
    Engage the 2 claws and install the deck side trim cover LH.


20. INSTALL REAR FLOOR FINISH PLATE

  1. B173609
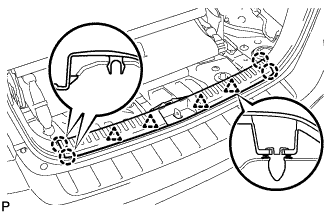
    Engage the 4 clips and the 4 claws, and install the rear floor finish plate.


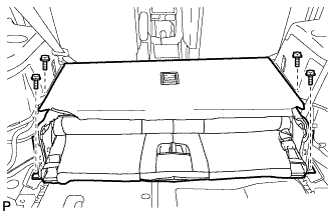
21. INSTALL REAR NO. 2 SEAT ASSEMBLY (w/ Rear No. 2 Seat)

  1. B173781
    Install the rear No. 2 seat assembly with the 4 bolts.

    Torque:
    37 N*m{ 377 kgf*cm , 27 ft.*lbf }


22. CONNECT REAR SEAT LAP TYPE BELT ASSEMBLY LH (w/ Rear No. 2 Seat)

  1. B170936
    Install the rear seat lap type belt assembly LH with the bolt.

    Torque:
    42 N*m{ 428 kgf*cm , 31 ft.*lbf }

    NOTICE:
    After installing the belt, check that it is not twisted.


23. CONNECT REAR SEAT LAP TYPE BELT ASSEMBLY RH (w/ Rear No. 2 Seat)
  1. Install the rear seat lap type belt assembly RH with the bolt.

    Torque:
    42 N*m{ 428 kgf*cm , 31 ft.*lbf }

    NOTICE:
    After installing the belt, check that it is not twisted.


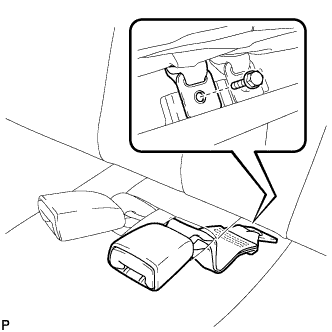
24. INSTALL REAR NO. 2 SEAT INNER BELT ASSEMBLY (w/ Rear No. 2 Seat)

  1. B170935
    Install the rear No. 2 seat inner belt assembly with the bolt.

    Torque:
    42 N*m{ 428 kgf*cm , 31 ft.*lbf }

    NOTICE:
    Do not allow the anchor part of the rear No. 2 seat inner belt assembly to overlap the protruding part of the rear No. 2 seat bracket.

    HINT:
    Use the same procedure for the RH side and LH side.


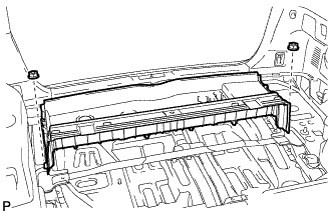
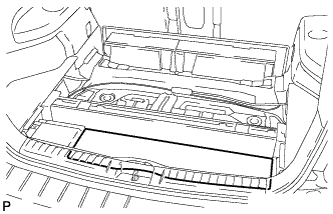
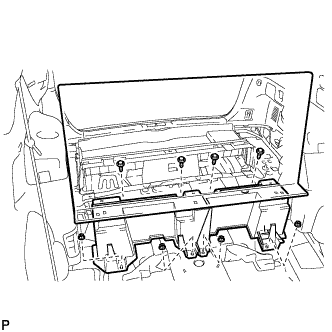
25. INSTALL REAR DECK FLOOR BOX (w/o Rear No. 2 Seat)

  1. B173679
    Install the rear deck floor box with the 2 nuts.


26. INSTALL DECK FLOOR BOARD ASSEMBLY (w/o Rear No. 2 Seat)

  1. B178561
    Install the 2 nuts and the deck floor board assembly.

  1. Engage the 3 claws.


27. INSTALL REAR MAT

  1. B173249
    Install the rear mat.


28. INSTALL DECK FLOOR BOARD ASSEMBLY (w/ Rear No. 2 Seat)

  1. B178560
    Install the rear deck floor board assembly with the 4 nuts and 4 bolts.


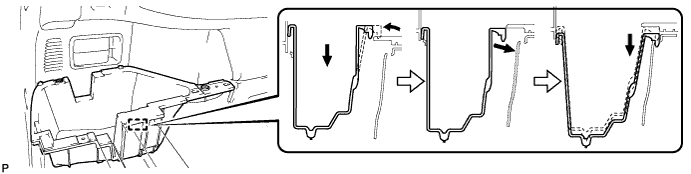
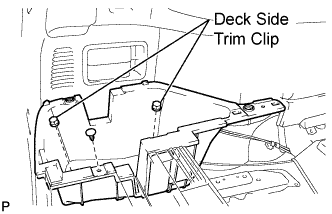
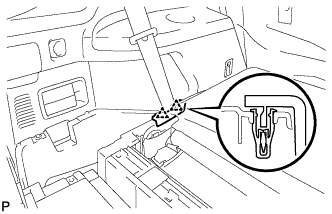
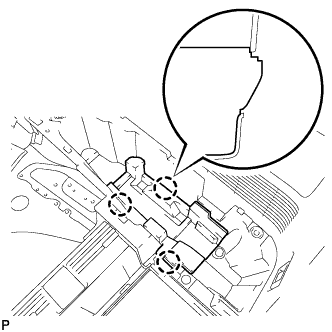
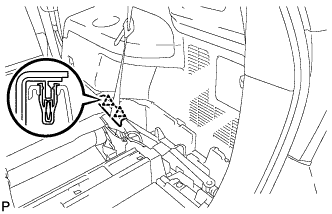
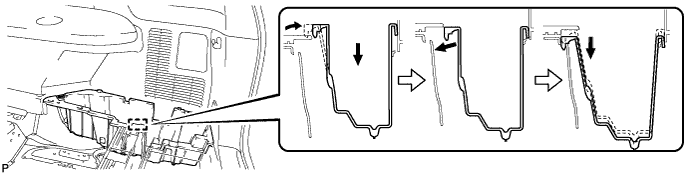
29. INSTALL DECK SIDE TRIM BOX LH

  1. Install the deck side trim box LH as shown in the illustration.

    B178555

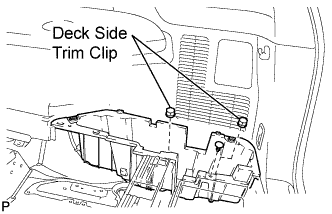
  1. B173243E01
    Install the 2 deck side trim clips and the clip.


30. INSTALL REAR SEAT SIDE COVER LH (w/ Rear No. 2 Seat)

  1. B173607
    Engage the 2 clips and install the rear seat side cover LH.


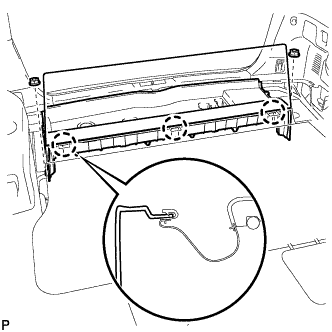
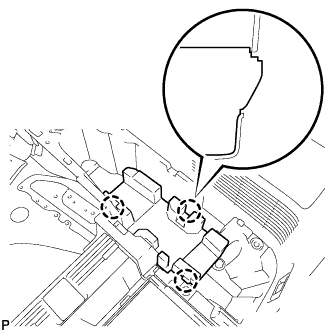
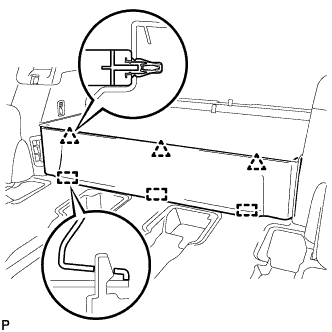
31. INSTALL DECK SIDE TRIM BOX RH

  1. Install the deck side trim box RH as shown in the illustration.

    B178553

  1. B173247E01
    Install the 2 deck side trim clips and the clip.


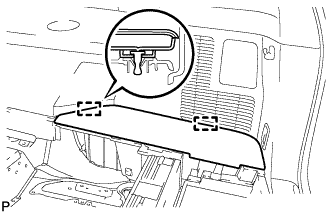
32. INSTALL JACK CARRIER ASSEMBLY (for LHD)

  1. B178549
    Engage the 3 claws, and install the jack carrier assembly.


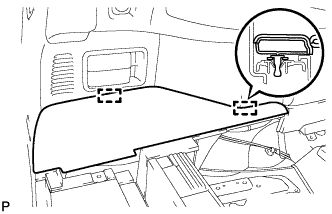
33. INSTALL JACK CARRIER ASSEMBLY (for RHD)

  1. B179786
    Engage the 3 claws, and install the jack carrier assembly.


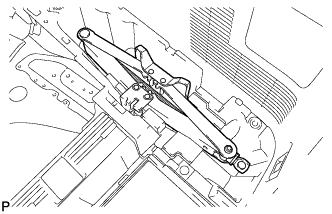
34. INSTALL JACK ASSEMBLY (for LHD)

  1. B173245
    Install the jack assembly.


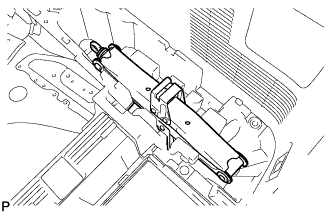
35. INSTALL JACK ASSEMBLY (for RHD)

  1. B178566
    Install the jack assembly.


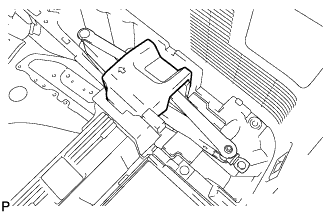
36. INSTALL JACK CARRIER CUSHION (for LHD)

  1. B178550
    Install the jack carrier cushion.


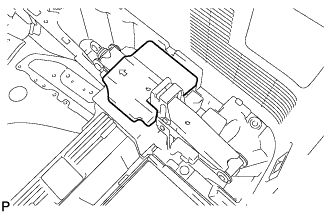
37. INSTALL JACK CARRIER CUSHION (for RHD)

  1. B178551
    Install the jack carrier cushion.


38. INSTALL JACK CARRIER SUPPORT

39. INSTALL REAR SEAT SIDE COVER RH (w/ Rear No. 2 Seat)

  1. B173608
    Engage the 2 clips and install the rear seat side cover RH.


40. INSTALL REAR NO. 1 FLOOR BOARD (w/o Rear No. 2 Seat)

  1. B175152
    Engage the 3 guides and 3 clips and install the rear No. 1 floor board.


41. INSTALL TONNEAU COVER ASSEMBLY (w/ Tonneau Cover)

42. INSTALL NO. 2 DECK BOARD SUB-ASSEMBLY

  1. B173244
    Engage the 2 guides and install the No. 2 deck board sub-assembly.


43. INSTALL NO. 3 DECK BOARD SUB-ASSEMBLY

  1. B173242
    Engage the 2 guides and install the No. 3 deck board sub-assembly.


44. INSTALL DECK BOARD ASSEMBLY

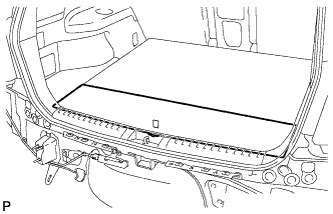
  1. B173240
    Install the deck board sub-assembly.


45. INSTALL REAR DOOR OPENING TRIM WEATHERSTRIP LH

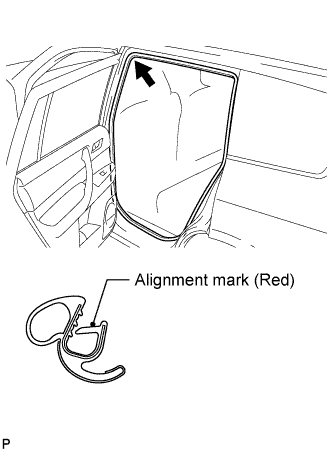
  1. B173233E01
    Align the alignment mark (red) on the weatherstrip with the protruding portion on the body indicated by the arrow in the illustration, and install the rear door opening trim weatherstrip LH.

    NOTICE:
    After installation, check that the corners fit correctly.


46. INSTALL REAR DOOR SCUFF PLATE LH

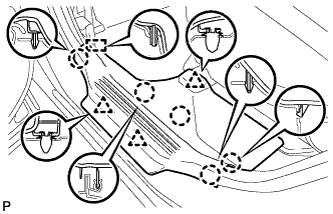
  1. B173228
    Engage the guide, 3 clips and 5 claws, and install the rear door scuff plate LH.


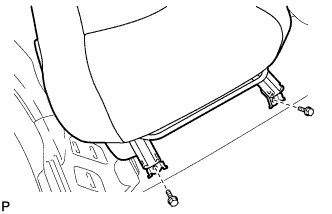
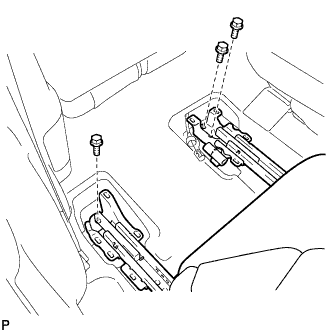
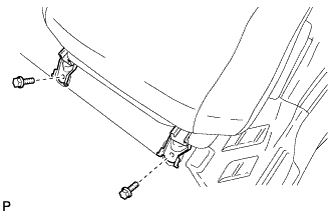
47. INSTALL REAR NO. 1 SEAT ASSEMBLY RH

  1. B173764
    Temporarily install the 2 bolts on the front side of the seat.

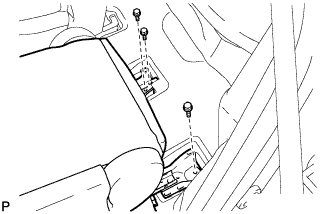
  1. B173774
    Temporarily Install the 3 bolts on the rear side of the seat.

  1. Install the rear No. 1 seat assembly with the 5 bolts.

    Torque:
    37 N*m{ 377 kgf*cm , 27 ft.*lbf }


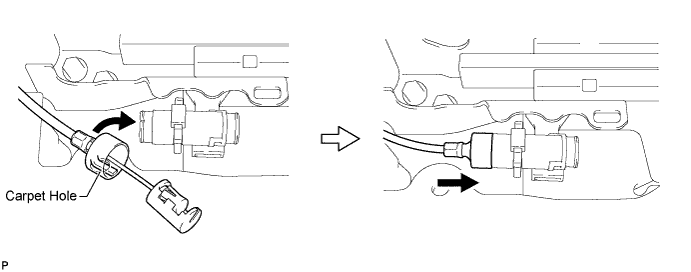
48. CONNECT REAR NO. 1 SEAT LOCK CABLE ASSEMBLY RH (w/ Remote Folding Function)

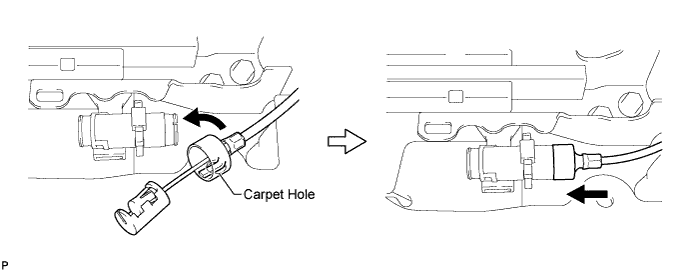
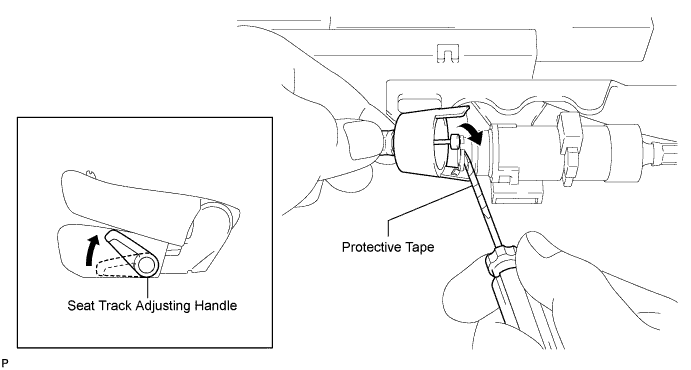
  1. Remove the rear seat reclining control cable from the carpet hole.

    B180394E01

  1. Connect the rear seat reclining control cable as shown in the illustration.

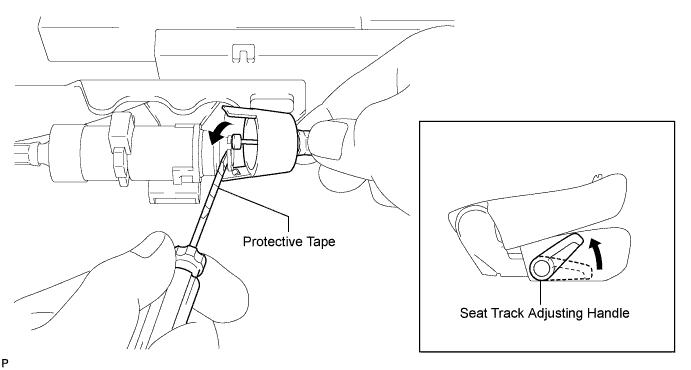
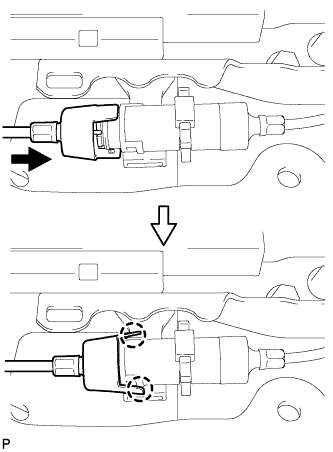
  1. Connect the rear No. 1 seat lock cable assembly as shown in the illustration.

    B173769E01

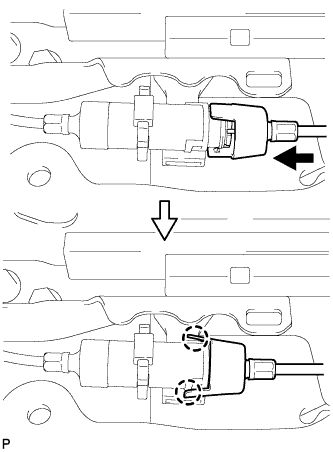
  1. B173767
    Engage the 2 claws and connect the rear No. 1 seat lock cable assembly as shown in the illustration.

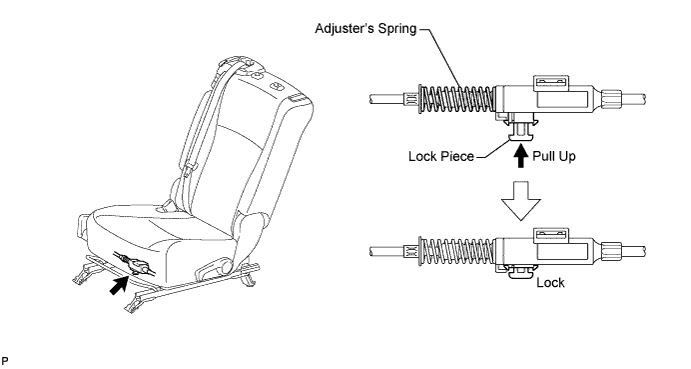
  1. Return the seatback to the upright position.

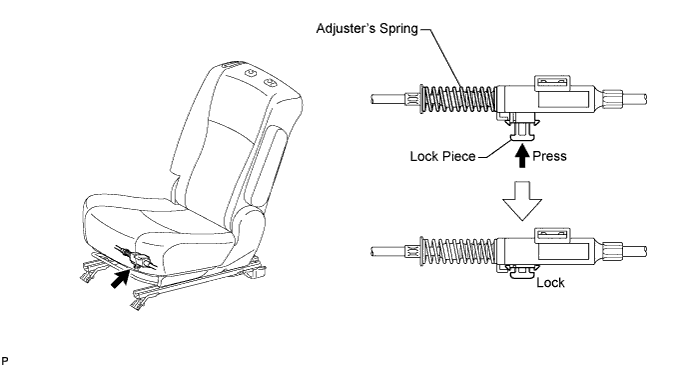
  1. Pull up the adjuster's lock piece to lock it as shown in the illustration.

    B180391E01

    NOTICE:
    When pressing the lock piece, make sure the adjuster's spring is not compress.


49. INSPECT REAR SEAT SLIDE ADJUSTER LOCK (for RH Side)
  1. Check that the left and right adjusters lock simultaneously when sliding the seat.

  1. If the left and right adjusters do not lock simultaneously, adjust by loosening the bolts securing the seat.


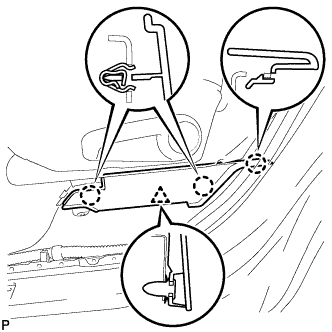
50. INSTALL REAR SEAT LEG SIDE COVER RH

  1. B173765
    Engage the clip.

  1. Engage the 3 claws and install the rear seat leg side cover.


51. INSTALL REAR INNER TRACK BRACKET COVER RH

  1. B173761
    Engage the 4 claws and install the rear inner track bracket cover.


52. INSTALL REAR OUTER TRACK BRACKET COVER RH

  1. B173763
    Engage the 4 claws and install the rear outer track bracket cover.


53. INSTALL SEAT TRACK BRACKET COVER RH

  1. B173760
    Engage the 8 claws and install the 2 seat track bracket covers.


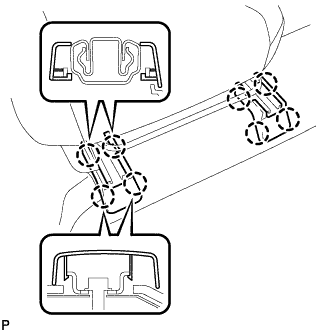
54. INSTALL REAR SEAT HEADREST ASSEMBLY (for RH Side)

55. INSTALL REAR NO. 1 SEAT ASSEMBLY LH

  1. B173778
    Temporarily install the 2 bolts on the front side of the seat.

  1. B173780
    Temporarily install the 3 bolts on the rear side of the seat.

  1. Install the rear No. 1 seat assembly with the 5 bolts.
    Torque:
    37 N*m{ 377 kgf*cm , 27 ft.*lbf }


56. CONNECT REAR NO. 1 SEAT LOCK CABLE ASSEMBLY LH (w/ Remote Folding Function)

  1. Remove the rear seat reclining control cable from the carpet hole.

    B180395E01

  1. Connect the rear seat reclining control cable as shown in the illustration.

  1. Connect the rear No. 1 seat lock cable assembly as shown in the illustration.

    B173771E01

  1. B174591
    Engage the 2 claws and connect the rear No. 1 seat lock cable assembly as shown in the illustration.

  1. Return the seatback to the upright position.

  1. Pull up the adjuster's lock piece to lock it as shown in the illustration.

    B180389E01

    NOTICE:
    When pressing the lock piece, make sure the adjuster's spring is not compress.

57. INSPECT REAR SEAT SLIDE ADJUSTER LOCK (for LH Side)
  1. Check that the left and right adjusters lock simultaneously when sliding the seat.

  1. If the left and right adjusters do not lock simultaneously, adjust by loosening the bolts securing the seat.


58. INSTALL REAR SEAT LEG SIDE COVER LH

  1. B173779
    Engage the clip.

  1. Engage the 3 claws and install the rear seat leg side cover.


59. INSTALL REAR INNER TRACK BRACKET COVER LH

  1. B173777
    Engage the 4 claws and install the rear inner track bracket cover.


60. INSTALL REAR OUTER TRACK BRACKET COVER LH

  1. B173776
    Engage the 4 claws and install the rear outer track bracket cover.


61. INSTALL SEAT TRACK BRACKET COVER LH

  1. B173775
    Engage the 8 claws and install the 2 rear seat track bracket covers.


62. INSTALL REAR SEAT HEADREST ASSEMBLY (for LH Side)

63. INSTALL REAR CENTER SEAT ASSEMBLY

64. CONNECT CABLE TO NEGATIVE BATTERY TERMINAL

NOTICE:
When disconnecting the cable, some systems need to be initialized after the cable is reconnected (Click here).


65. INSPECT SRS WARNING LIGHT
  1. Inspect the SRS warning light (Click here).

← INSPECTION (from May 2007)INSTALLATION (Aug 2008 – Jun 2010) →