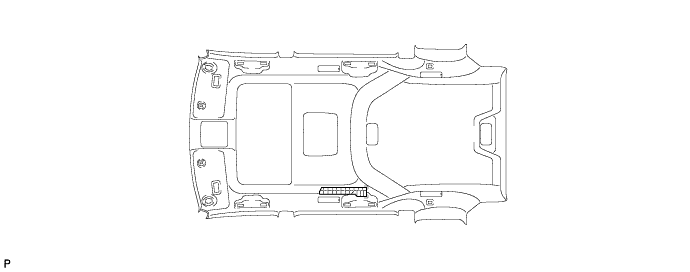
Home › BODY › INTERIOR › ROOF HEADLININGREMOVAL
Removal / installation · Vehicles built from Jul 2010
Versions by build date: May 2007 – Jul 2008 Aug 2008 – Jun 2010 from Jul 2010
1.
REMOVE REAR CENTER SEAT ASSEMBLY
2.
REMOVE REAR SEAT HEADREST ASSEMBLY (for LH Side)
3.
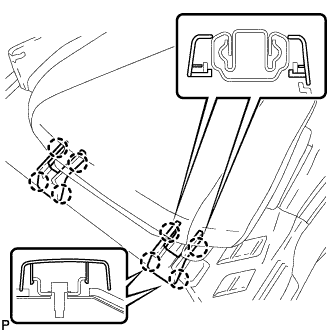
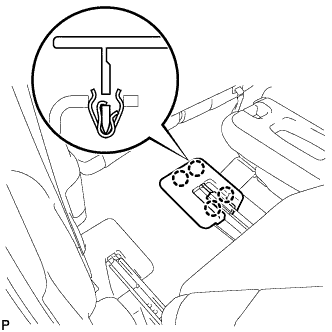
REMOVE REAR SEAT TRACK BRACKET COVER LH
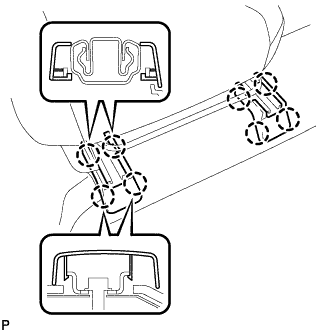
Disengage the 8 claws and remove the 2 rear seat track bracket covers.
4.
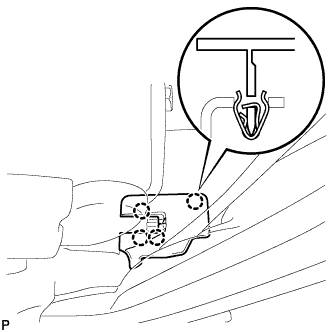
REMOVE REAR OUTER TRACK BRACKET COVER LH
Disengage the 4 claws and remove the rear outer track bracket cover.
5.
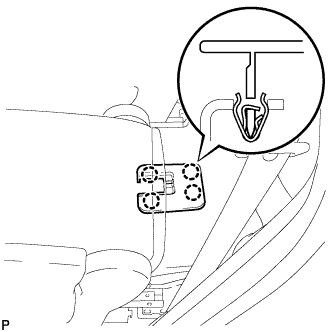
REMOVE REAR INNER TRACK BRACKET COVER LH
Disengage the 4 claws and remove the rear inner track bracket cover.
6.
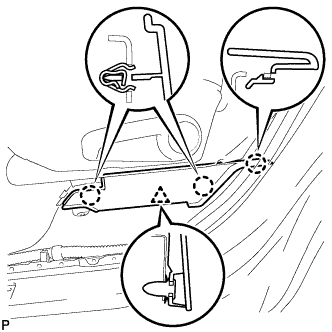
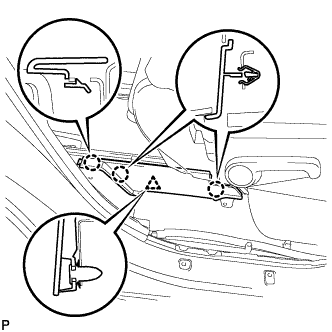
REMOVE REAR SEAT LEG SIDE COVER LH
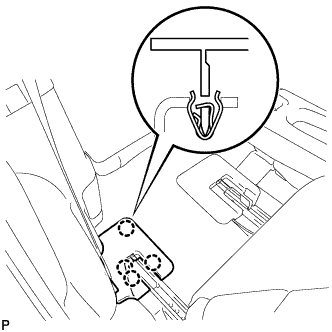
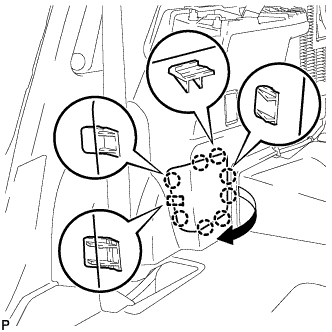
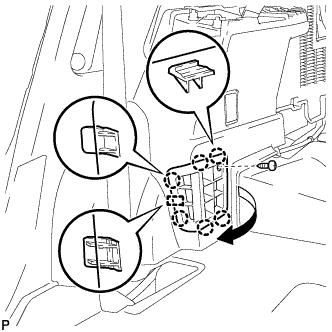
Disengage the 3 claws. Disengage the clip and remove the rear seat leg side cover.
7.
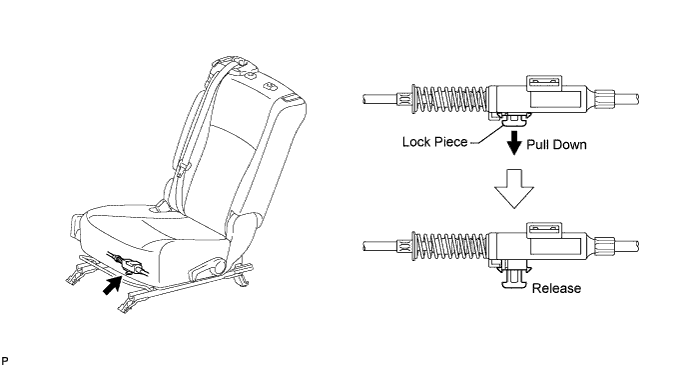
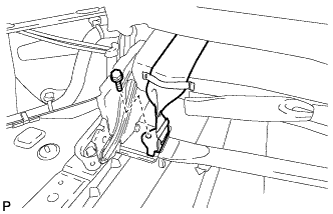
DISCONNECT REAR NO. 1 SEAT LOCK CABLE ASSEMBLY LH (w/ Remote Folding Function)
Pull down the adjuster's lock piece to release the lock as shown in the illustration.
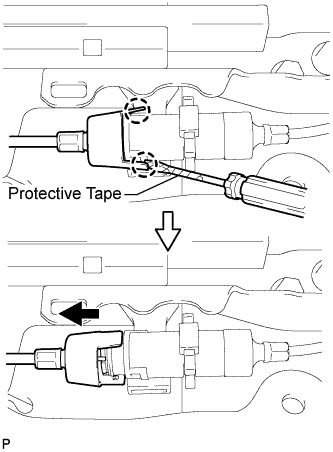
Using a screwdriver wrapped with protective tape, disengage the 2 claws as shown in the illustration.
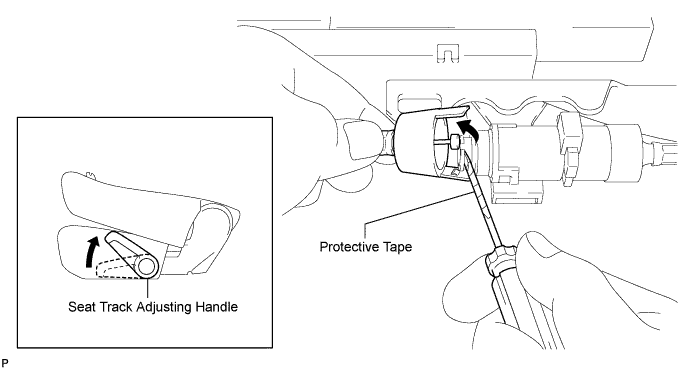
Lift up the seat track adjusting handle to the uppermost position and hold the handle in this position as shown in the illustration.
Using a screwdriver wrapped with protective tape, disconnect the rear No. 1 seat lock cable assembly as shown in the illustration.
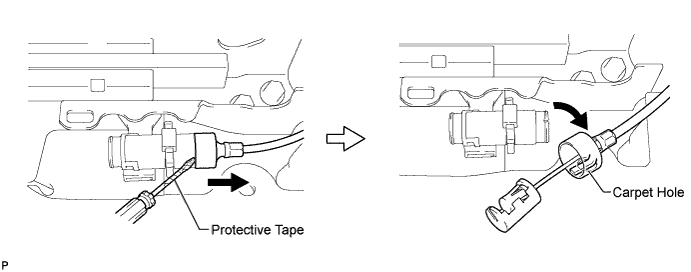
Using a screwdriver wrapped with protective tape, disconnect the rear seat reclining control cable as shown in the illustration.
Secure the rear seat reclining control cable with the carpet hole as shown in the illustration.
8.
REMOVE REAR NO. 1 SEAT ASSEMBLY LH
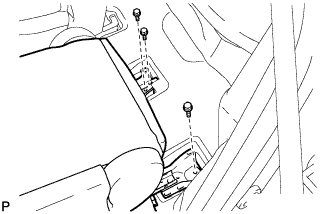
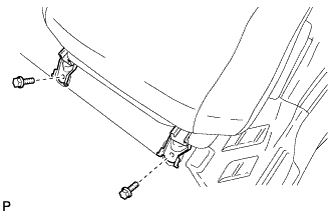
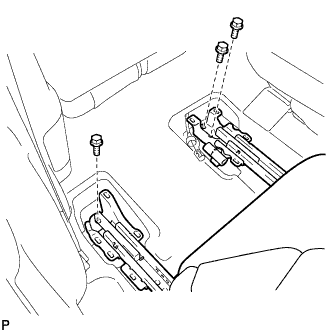
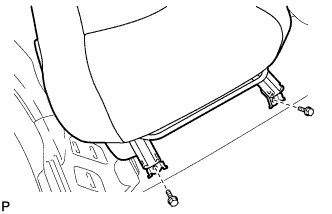
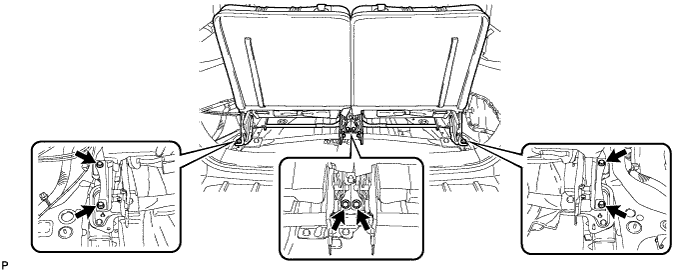
Remove the 3 bolts on the rear side of the seat.
Remove the 2 bolts on the front side of the seat and the rear No. 1 seat assembly.
NOTICE:
Be careful not to damage the vehicle body.
9.
REMOVE REAR SEAT HEADREST ASSEMBLY (for RH Side)
10.
REMOVE REAR SEAT TRACK BRACKET COVER RH
Disengage the 8 claws and remove the 2 rear seat track bracket covers.
11.
REMOVE REAR OUTER TRACK BRACKET COVER RH
Disengage the 4 claws and remove the rear outer track bracket cover.
12.
REMOVE REAR INNER TRACK BRACKET COVER RH
Disengage the 4 claws and remove the rear inner track bracket cover.
13.
REMOVE REAR SEAT LEG SIDE COVER RH
Disengage the 3 claws. Disengage the clip and remove the rear seat leg side cover.
14.
DISCONNECT REAR NO. 1 SEAT LOCK CABLE ASSEMBLY RH (w/ Remote Folding Function)
HINT:
Use the same procedure for the RH side and the LH side.
15.
REMOVE REAR NO. 1 SEAT ASSEMBLY RH
Remove the 3 bolts on the rear side of the seat.
Remove the 2 bolts on the front side of the seat and the rear No. 1 seat assembly.
NOTICE:
Be careful not to damage the vehicle body.
16.
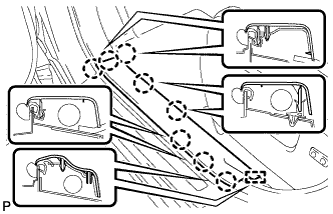
REMOVE FRONT DOOR SCUFF PLATE LH
Disengage the 8 claws and guide, and remove the front door scuff plate LH.
17.
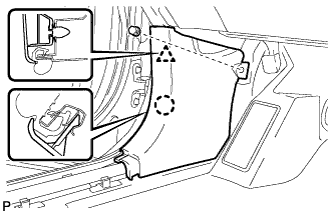
REMOVE COWL SIDE TRIM SUB-ASSEMBLY LH
Remove the clip. Disengage the clip and claw, and remove the cowl side trim sub-assembly LH.
18.
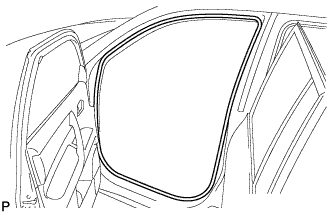
REMOVE FRONT DOOR OPENING TRIM WEATHERSTRIP LH
Remove the front door opening trim weatherstrip LH.
19.
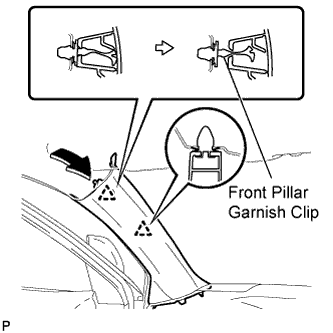
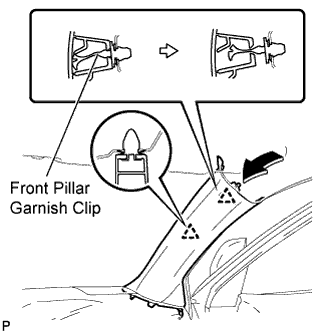
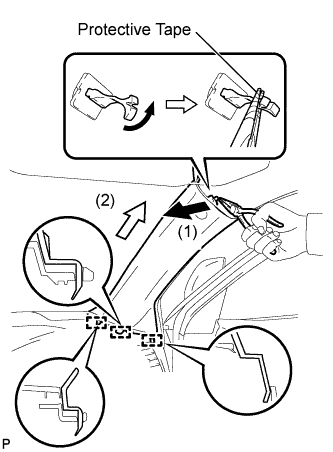
REMOVE FRONT PILLAR GARNISH LH
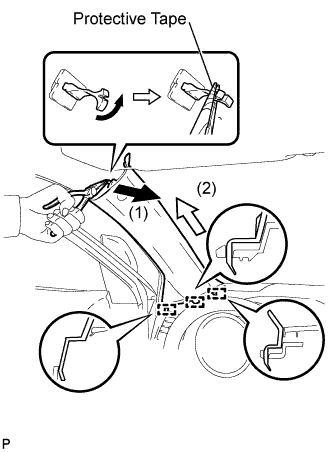
Pull the upper part of the garnish toward the inside of the cabin and disengage the garnish from the base of the 2 clips.
HINT:
Make the front pillar garnish LH hang down from the front pillar garnish clip.
Turn the end of the front pillar garnish clip 90° with needle-nosed pliers and remove it from the front pillar garnish LH.
NOTICE:
Front pillar garnish clips are reusable if they are not removed from the vehicle and have no damage.
Replace the front pillar garnish clips with new ones if they are removed from the vehicle.
Disengage the 3 guides at the front end of the front pillar garnish LH and remove it.
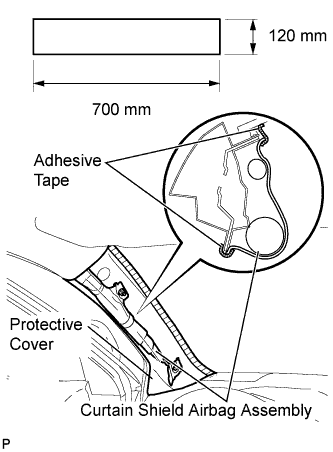
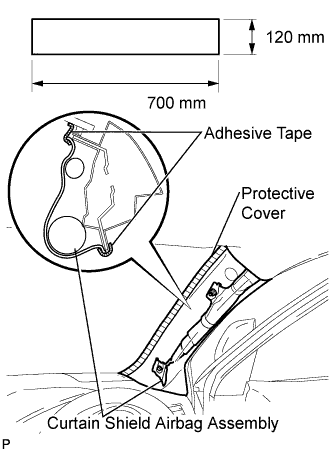
Protect the curtain shield airbag assembly. Cover the airbag with a 700 mm (27.56 in.) x 120 mm (4.72 in.) cloth or piece of nylon and fix the ends of the cover with tape as shown in the illustration.
NOTICE:
Cover the curtain shield airbag with a protective cover as soon as the front pillar garnish is removed.
20.
REMOVE REAR DOOR SCUFF PLATE LH
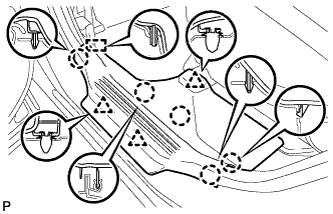
Disengage the 5 claws, 3 clips and guide, and remove the rear door scuff plate LH.
21.
REMOVE REAR DOOR OPENING TRIM WEATHERSTRIP LH
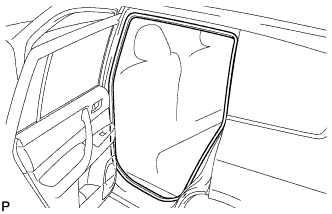
Remove the rear door opening trim weatherstrip LH.
22.
REMOVE FRONT DOOR SCUFF PLATE RH
HINT:
Use the same procedure for the RH side and the LH side.
23.
REMOVE COWL SIDE TRIM SUB-ASSEMBLY RH
HINT:
Use the same procedure for the RH side and the LH side.
24.
REMOVE FRONT DOOR OPENING TRIM WEATHERSTRIP RH
HINT:
Use the same procedure for the RH side and the LH side.
25.
REMOVE FRONT PILLAR GARNISH RH
Pull the upper part of the garnish toward the inside of the cabin and disengage the garnish from the base of the 2 clips.
HINT:
Make the front pillar garnish RH hang down from the front pillar garnish clip.
Turn the end of the front pillar garnish clip 90° with needle-nosed pliers and remove it from the front pillar garnish RH.
NOTICE:
Front pillar garnish clips are reusable if they are not removed from the vehicle and have no damage.
Replace the front pillar garnish clips with new ones if they are removed from the vehicle.
Disengage the 3 guides at the front end of the front pillar garnish RH and remove it.
Protect the curtain shield airbag assembly. Cover the airbag with a 700 mm (27.56 in.) x 120 mm (4.72 in.) cloth or piece of nylon and fix the ends of the cover with tape as shown in the illustration.
NOTICE:
Cover the curtain shield airbag with a protective cover as soon as the front pillar garnish is removed.
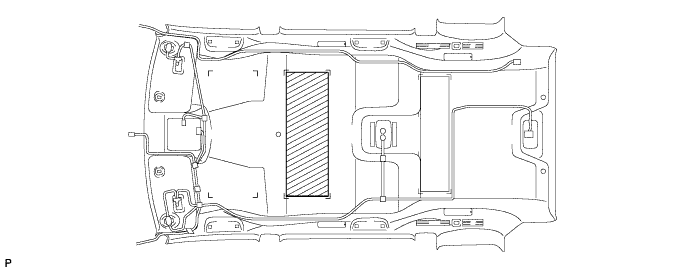
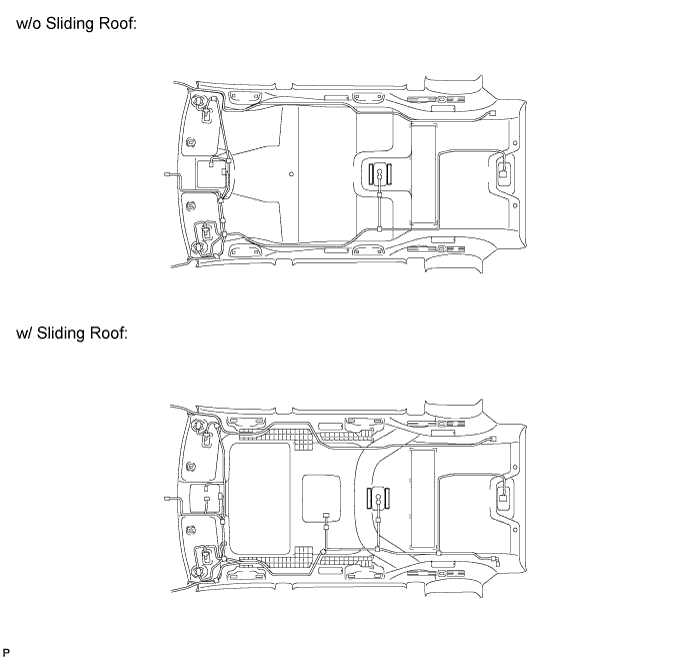
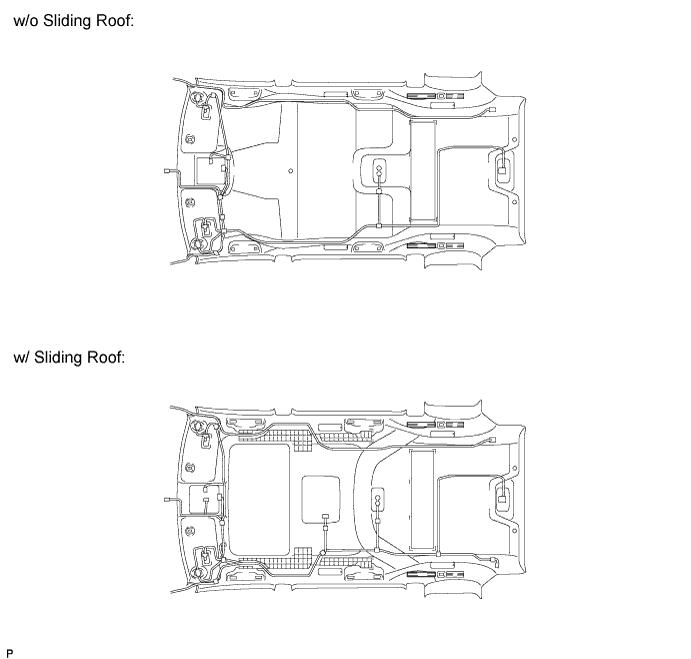
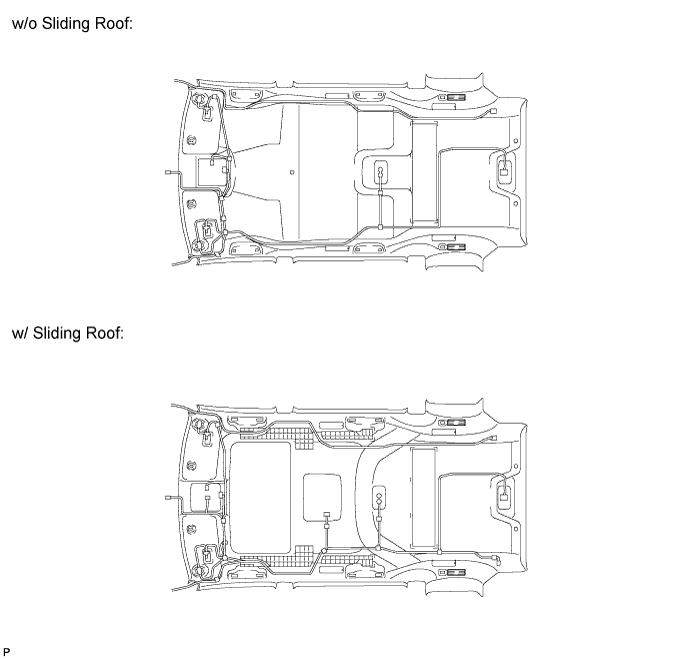
26.
REMOVE REAR DOOR SCUFF PLATE RH
HINT:
Use the same procedure for the RH side and the LH side.
27.
REMOVE REAR DOOR OPENING TRIM WEATHERSTRIP RH
HINT:
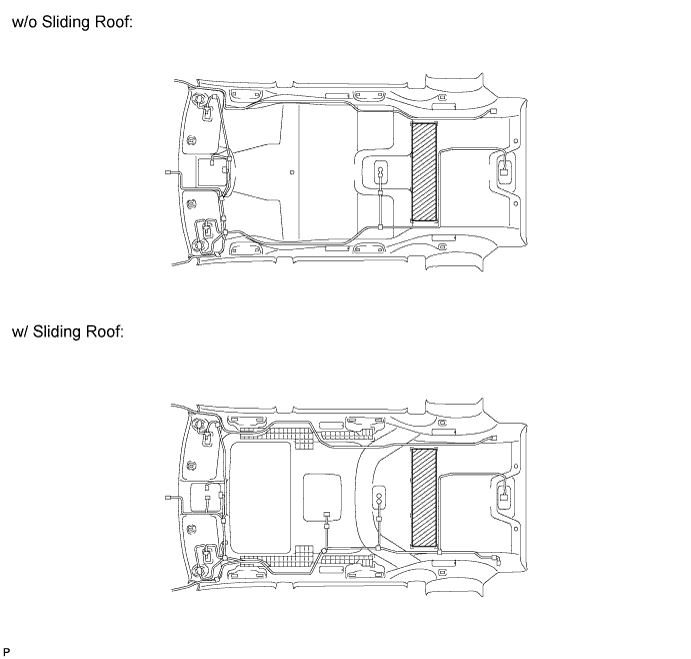
Use the same procedure for the RH side and the LH side.
28.
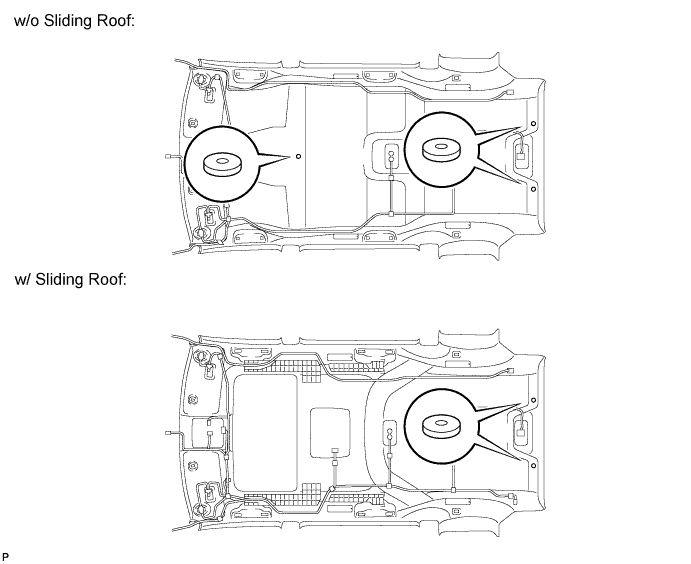
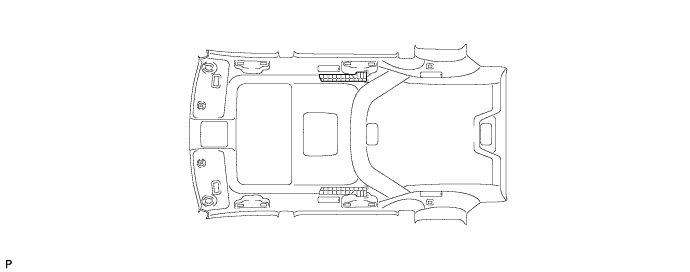
REMOVE LOWER CENTER PILLAR GARNISH LH
Disengage the 2 claws and 2 clips, and remove the lower center pillar garnish LH.
29.
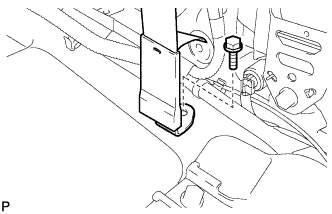
DISCONNECT FRONT SEAT OUTER BELT ASSEMBLY LH
Remove the bolt and disconnect the floor end of the front seat outer belt assembly.
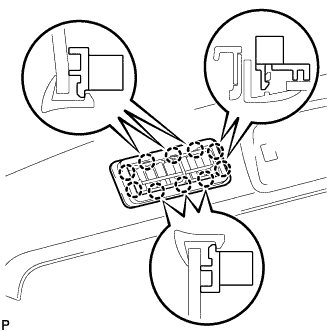
30.
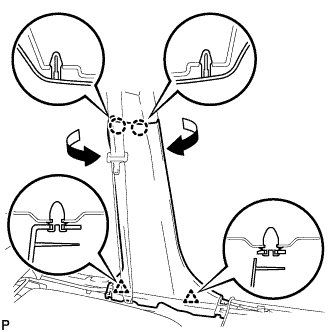
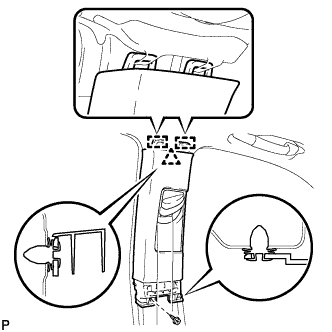
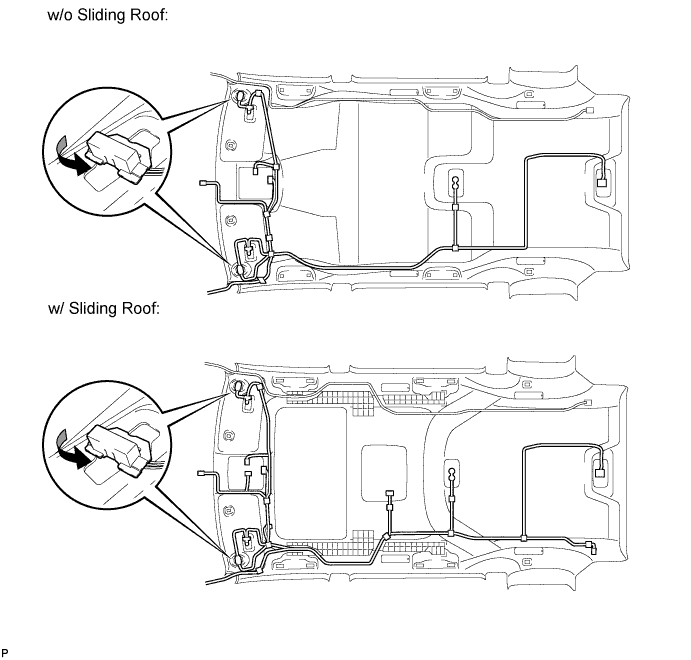
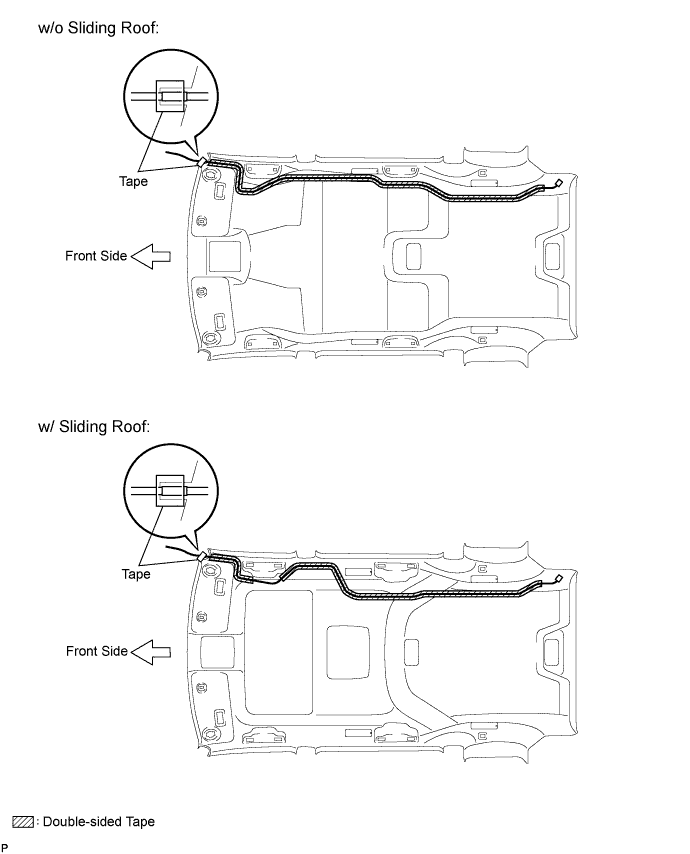
REMOVE CENTER PILLAR GARNISH LH
Remove the screw and clip. Disengage the 2 guides and clip, and remove the center pillar garnish LH.
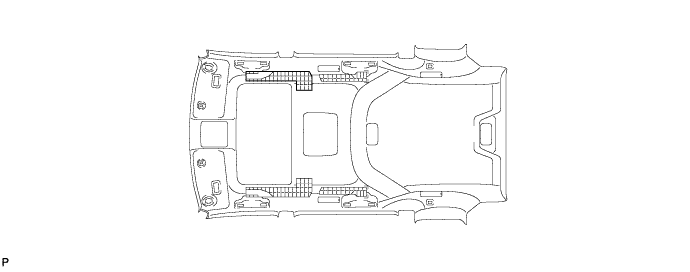
31.
REMOVE LOWER CENTER PILLAR GARNISH RH
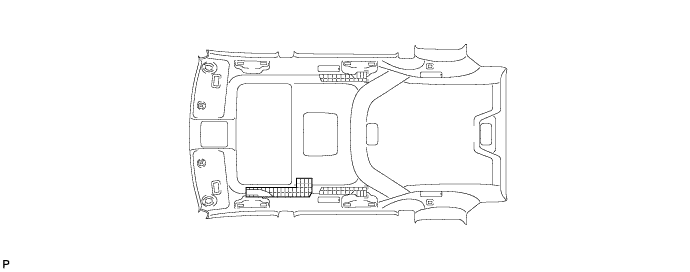
HINT:
Use the same procedure for the RH side and the LH side.
32.
DISCONNECT FRONT SEAT OUTER BELT ASSEMBLY RH
HINT:
Use the same procedure for the RH side and the LH side.
33.
REMOVE CENTER PILLAR GARNISH RH
HINT:
Use the same procedure for the RH side and the LH side.
34.
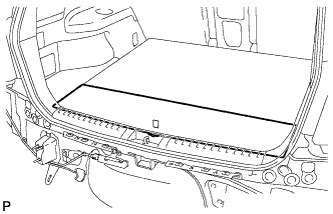
REMOVE DECK BOARD ASSEMBLY
Remove the deck board assembly.
35.
REMOVE NO. 3 DECK BOARD SUB-ASSEMBLY
Disengage the 2 guides and remove the No. 3 deck board sub-assembly.
36.
REMOVE NO. 2 DECK BOARD SUB-ASSEMBLY
Disengage the 2 guides and remove the No. 2 deck board sub-assembly.
37.
REMOVE TONNEAU COVER ASSEMBLY (w/ Tonneau Cover)
Remove the tonneau cover assembly.
38.
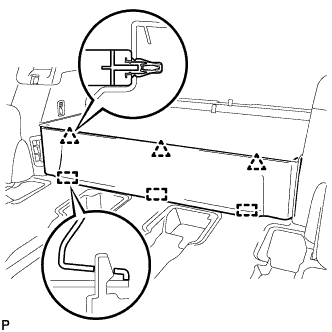
REMOVE REAR NO. 1 FLOOR BOARD (w/o Rear No. 2 Seat)
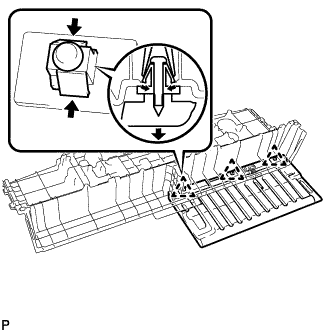
Disengage the 3 clips and 3 guides, and remove the rear No. 1 floor board.
39.
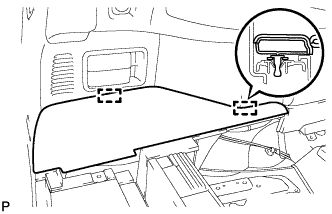
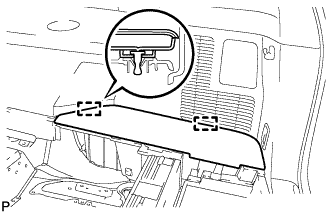
REMOVE REAR SEAT SIDE COVER LH (w/ Rear No. 2 Seat)
Disengage the 2 clips and remove the rear seat side cover LH.
40.
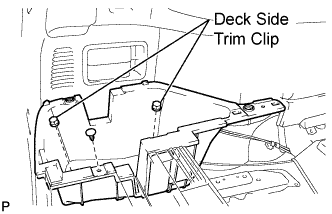
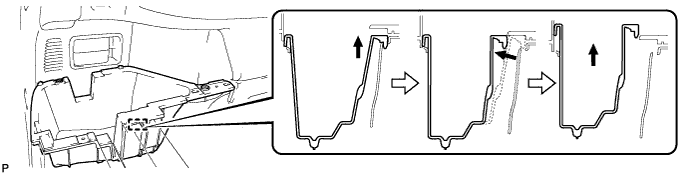
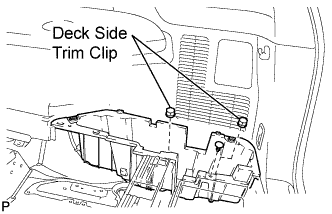
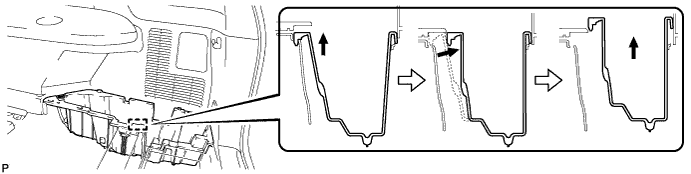
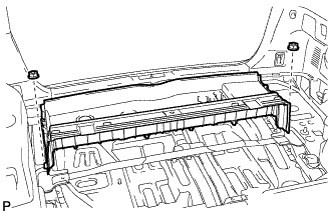
REMOVE DECK SIDE TRIM BOX LH
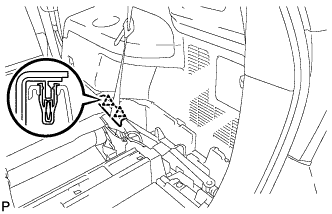
Remove the 2 deck side trim clips and clip.
Remove the deck side trim box LH as shown in the illustration.
41.
REMOVE REAR SEAT SIDE COVER RH (w/ Rear No. 2 Seat)
Disengage the 2 clips and remove the rear seat side cover RH.
42.
REMOVE JACK CARRIER SUPPORT
43.
REMOVE JACK CARRIER CUSHION (for LHD)
Remove the jack carrier cushion.
44.
REMOVE JACK CARRIER CUSHION (for RHD)
Remove the jack carrier cushion.
45.
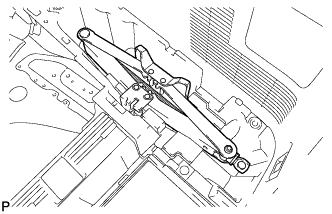
REMOVE JACK ASSEMBLY (for LHD)
Remove the jack assembly.
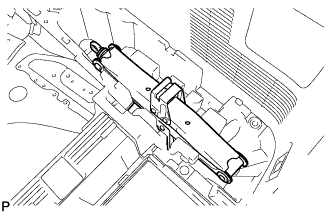
46.
REMOVE JACK ASSEMBLY (for RHD)
Remove the jack assembly.
47.
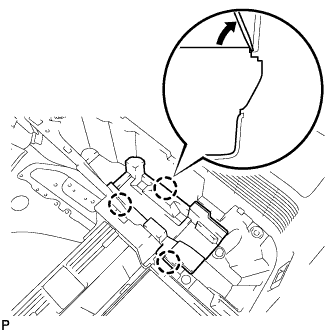
REMOVE JACK CARRIER ASSEMBLY (for LHD)
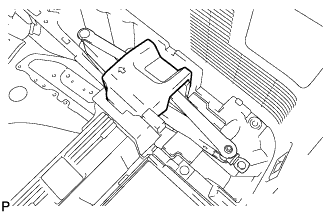
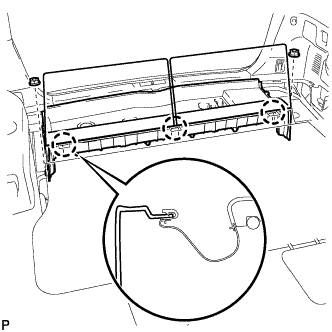
Using a screwdriver, disengage the 3 claws and remove the jack carrier assembly.
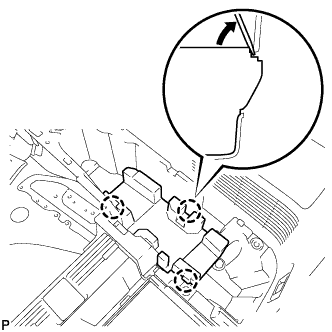
48.
REMOVE JACK CARRIER ASSEMBLY (for RHD)
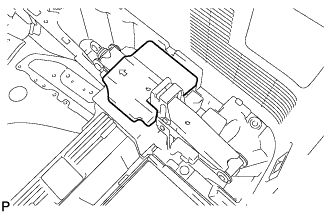
Using a screwdriver, disengage the 3 claws and remove the jack carrier assembly.
49.
REMOVE DECK SIDE TRIM BOX RH
Remove the 2 deck side trim clips and clip.
Remove the deck side trim box RH as shown in the illustration.
50.
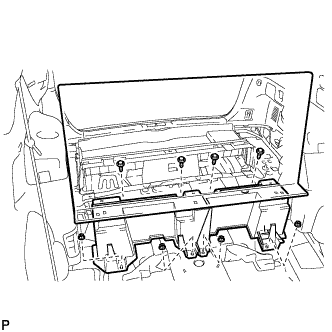
REMOVE DECK FLOOR BOARD ASSEMBLY (w/o Rear No. 2 Seat)
Remove the 4 bolts and 4 nuts. Remove the deck floor board assembly.
51.
REMOVE REAR MAT
Remove the rear mat.
52.
REMOVE DECK FLOOR BOARD ASSEMBLY (w/ Rear No. 2 Seat)
Disengage the 3 claws. Remove the 2 nuts and deck floor board assembly.
53.
REMOVE REAR DECK FLOOR BOX (w/o Rear No. 2 Seat)
Remove the 2 nuts and the deck floor box.
54.
REMOVE NO. 1 DECK BOARD (w/o Rear No. 2 Seat)
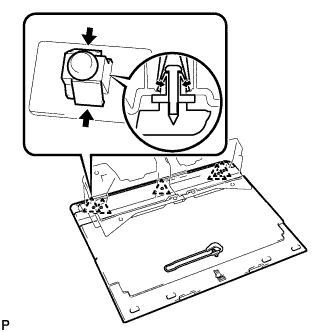
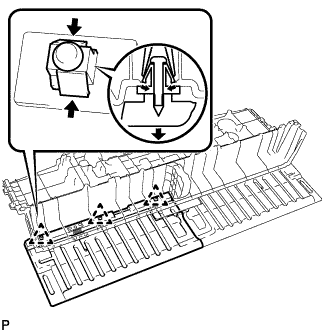
Disengage the 5 clips and remove the rear floor board spacer from No. 1 deck board.
55.
REMOVE NO. 2 DECK BOARD (w/ Rear No. 2 Seat)
Disengage the 3 clips and remove the No. 2 deck board from the rear deck floor box.
56.
REMOVE NO. 1 DECK BOARD (w/ Rear No. 2 Seat)
Disengage the 3 clips and remove the No. 1 deck board from the rear deck floor box.
57.
DISCONNECT REAR NO. 2 SEAT OUTER BELT ASSEMBLY LH (w/ Rear No. 2 Seat)
Remove the bolt and disconnect the rear No. 2 seat outer belt assembly LH.
58.
DISCONNECT REAR NO. 2 SEAT OUTER BELT ASSEMBLY RH (w/ Rear No. 2 Seat)
HINT:
Use the same procedure as for the LH side.
59.
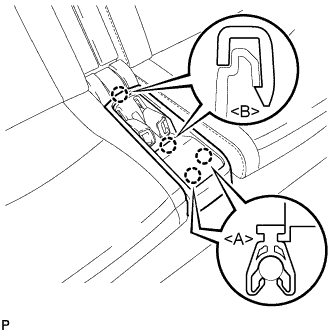
REMOVE CENTER SEAT CUSHION COVER SUB-ASSEMBLY (w/ Rear No. 2 Seat)
Disengage the 2 claws <A>. Disengage the 2 claws <B> and remove the center seat cushion cover sub-assembly.
60.
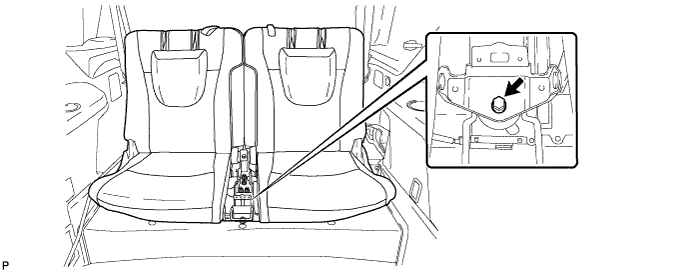
REMOVE REAR NO. 2 SEAT ASSEMBLY (w/ Rear No. 2 Seat)
Remove the bolt on the front of the seat.
Remove the 6 bolts on the rear of the seat and the rear No. 2 seat assembly.
61.
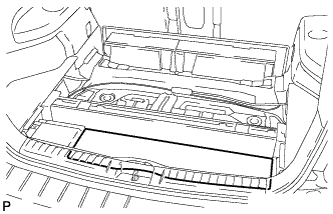
REMOVE REAR FLOOR FINISH PLATE
Disengage the 4 clips and 4 claws, and remove the rear floor finish plate.
62.
REMOVE DECK SIDE TRIM COVER NO.2
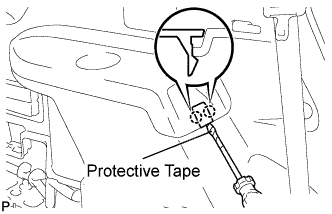
Using a screwdriver, disengage the 2 claws and remove the deck side trim cover LH.
HINT:
Tape the screwdriver tip before use.
63.
REMOVE DECK SIDE TRIM LH
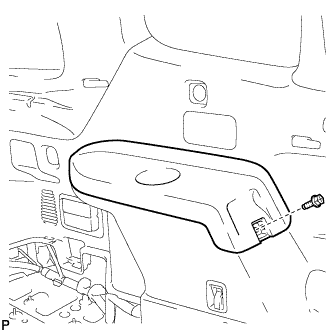
Remove the bolt.
Disengage the 4 claws and 3 guides, and remove the deck side trim LH as shown in the illustration.
64.
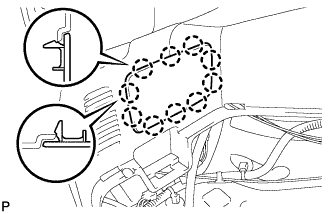
REMOVE SIDE TRIM COVER LH
Disengage the 10 claws and remove the side trim cover LH.
65.
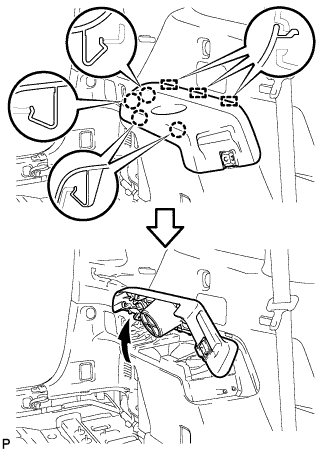
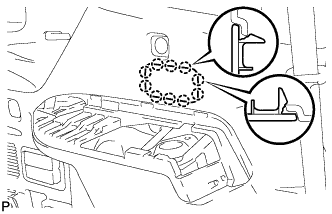
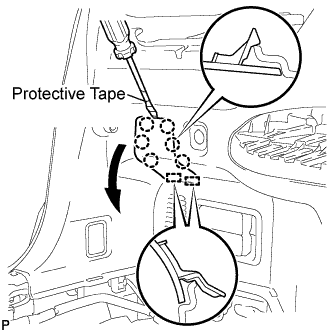
REMOVE REAR COMBINATION LIGHT SERVICE COVER LH
Using a screwdriver, disengage the 6 claws and 2 guides, and remove the rear combination light service cover LH.
HINT:
Tape the screwdriver tip before use.
66.
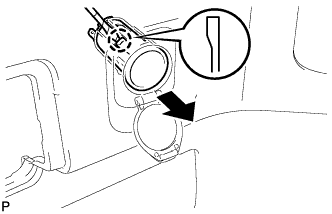
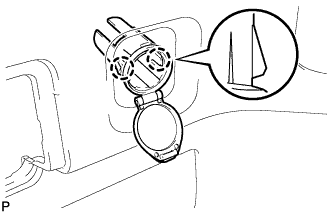
REMOVE REAR POWER POINT SOCKET ASSEMBLY
Disconnect the connector.
Disengage the claw and remove the rear power point socket assembly.
67.
REMOVE REAR POWER OUTLET SOCKET COVER
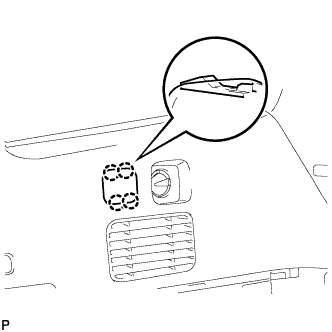
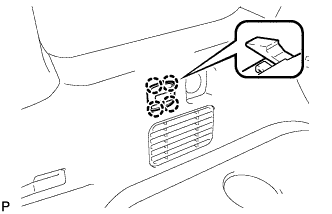
Disengage the 2 claws and remove the rear power outlet socket cover.
68.
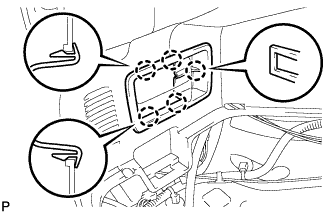
REMOVE REAR DECK TRIM COVER (w/o Remote Folding Function)
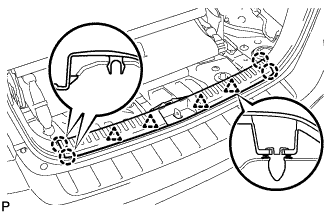
Disengage the 10 claws and remove the rear deck trim cover.
69.
REMOVE RECLINING REMOTE CONTROL LEVER BEZEL LH (w/ Remote Folding Function)
Disengage the 5 claws and remove the reclining remote control lever bezel LH.
70.
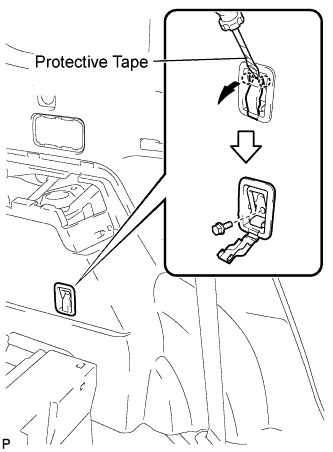
REMOVE ROPE HOOK ASSEMBLY (for LH Side)
for Front Side:
Using a screwdriver, disengage the 2 claws.
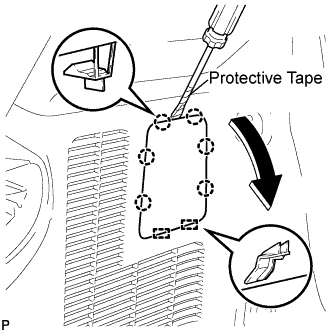
HINT:
Tape the screwdriver tip before use.
Remove the bolt and rope hook assembly.
for Rear Side:
Using a screwdriver, disengage the 2 claws.
HINT:
Tape the screwdriver tip before use.
Remove the bolt and rope hook assembly.
71.
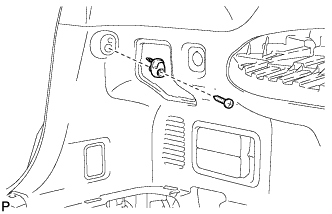
REMOVE NO. 2 DECK SIDE TRIM HOOK
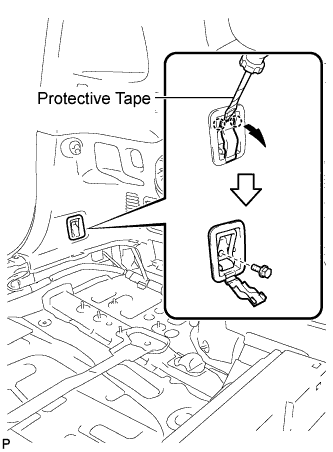
Remove the screw and No. 2 deck side trim hook.
72.
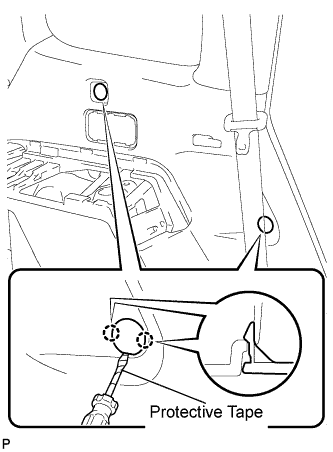
REMOVE FRONT DECK SIDE TRIM COVER LH
Using a screwdriver, disengage the 4 claws and remove the 2 front deck side trim covers LH.
HINT:
Tape the screwdriver tip before use.
73.
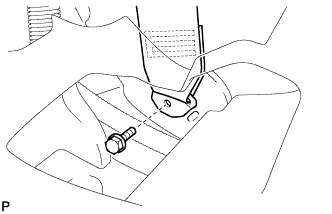
DISCONNECT REAR NO. 1 SEAT OUTER BELT ASSEMBLY LH
Remove the bolt and disconnect the floor end of the rear No. 1 seat outer belt assembly.
74.
REMOVE DECK TRIM SIDE PANEL ASSEMBLY LH
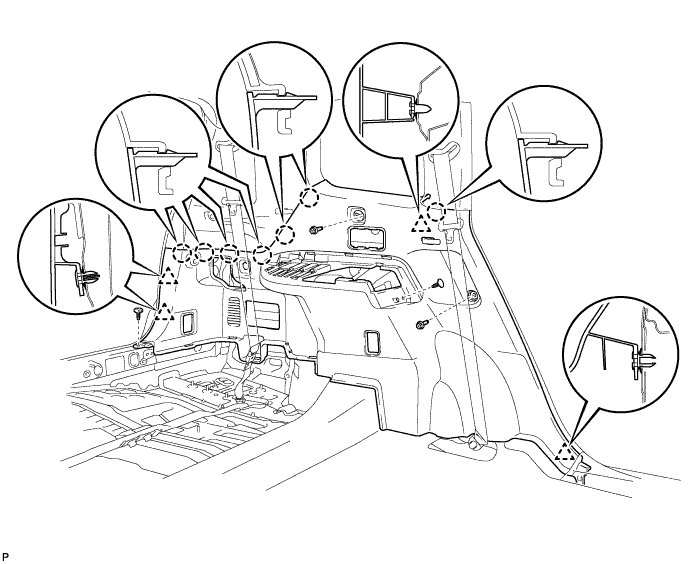
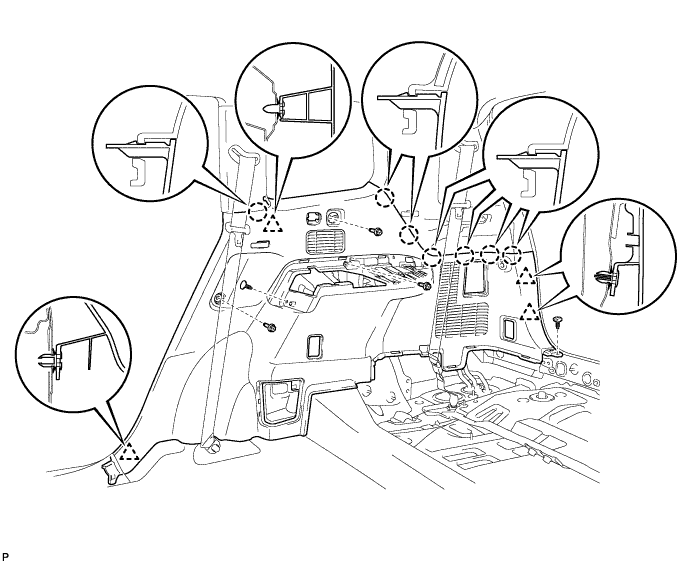
Remove the 2 bolts.
Remove the 2 clips.
Disengage the 7 claws and 4 clips, and remove the deck trim side panel assembly LH.
75.
REMOVE QUARTER PILLAR GARNISH LH
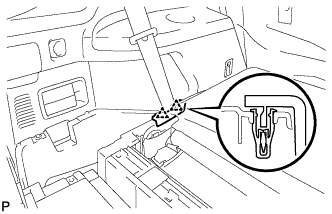
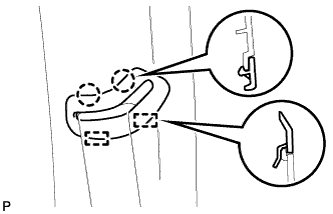
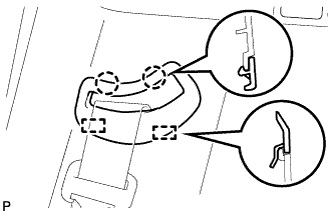
Disengage the 2 claws and 2 guides, and remove the No. 1 seat outer belt guide.
Disengage the 2 clips and 2 guides, and remove the quarter pillar garnish LH.
76.
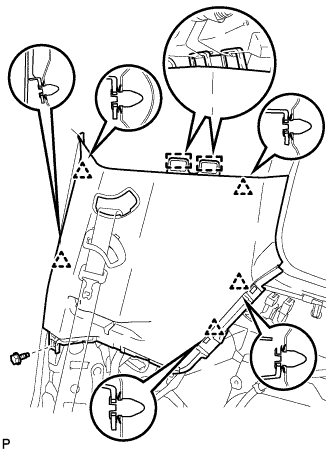
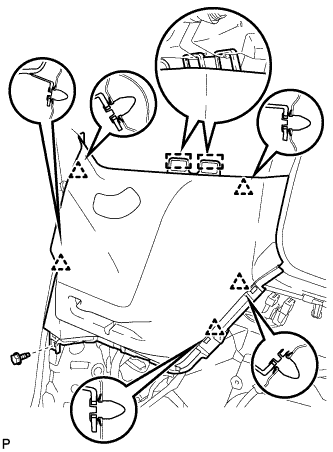
REMOVE ROOF SIDE INNER GARNISH ASSEMBLY LH (w/o Power Back Door)
w/o Rear No. 2 Seat:
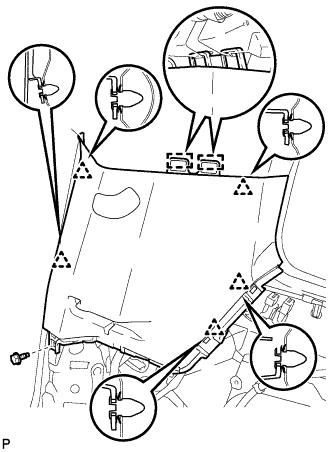
Remove the bolt. Disengage the 5 clips and 2 guides, and remove the roof side inner garnish assembly LH.
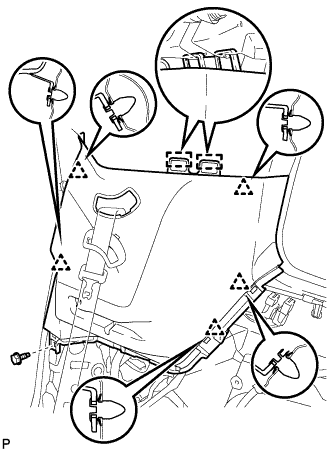
w/ Rear No. 2 Seat:
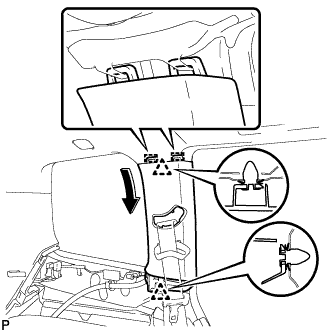
Disengage the 2 claws and 2 guides, and remove the rear No. 2 seat outer belt guide.
Remove the bolt. Disengage the 5 clips and 2 guides, and remove the roof side inner garnish assembly LH.
77.
REMOVE ROOF SIDE INNER GARNISH ASSEMBLY LH (w/ Power Back Door)
w/o Rear No. 2 Seat:
Remove the bolt. Disengage the 5 clips and 2 guides, and remove the roof side inner garnish assembly LH.
w/ Rear No. 2 Seat:
Disengage the 2 claws and 2 guides, and remove the rear No. 2 seat outer belt guide.
Remove the bolt. Disengage the 5 clips and 2 guides, and remove the roof side inner garnish assembly LH.
78.
REMOVE REAR SEAT SIDE GARNISH CAP (w/o Rear Air Conditioning System)
Disengage the 8 claws and guide, and remove the rear seat side garnish cap.
79.
REMOVE REAR SEAT SIDE GARNISH CAP (w/ Rear Air Conditioning System)
Remove the screw. Disengage the 6 claws and the guide, and remove the rear seat side garnish cap.
80.
REMOVE DECK SIDE TRIM COVER NO.1
HINT:
Use the same procedure for the RH side and the LH side.
81.
REMOVE DECK SIDE TRIM RH
HINT:
Use the same procedure for the RH side and the LH side.
82.
REMOVE SIDE TRIM COVER RH (w/o Rear Automatic Air Conditioning System)
Disengage the 4 claws and remove the side trim cover RH.
83.
REMOVE REAR ROOM TEMPERATURE SENSOR (w/ Rear Automatic Air Conditioning System)
Disengage the 4 claws and remove the rear room temperature sensor. Disconnect the connector.
84.
REMOVE REAR COMBINATION LIGHT SERVICE COVER RH
Using a screwdriver, disengage the 6 claws and 2 guides, and remove the rear combination light service cover RH.
HINT:
Tape the screwdriver tip before use.
85.
REMOVE ROPE HOOK ASSEMBLY (for RH Side)
HINT:
Use the same procedure for the RH side and the LH side.
86.
REMOVE NO. 1 LUGGAGE COMPARTMENT TRIM HOOK
HINT:
Use the same procedure for the No. 1 luggage compartment trim hook and the No. 2 deck side trim hook.
87.
REMOVE FRONT DECK SIDE TRIM COVER RH
HINT:
Use the same procedure for the RH side and the LH side.
88.
DISCONNECT REAR NO. 1 SEAT OUTER BELT ASSEMBLY RH
HINT:
Use the same procedure for the RH side and the LH side.
89.
REMOVE DECK TRIM SIDE PANEL ASSEMBLY RH
Remove the 3 bolts.
Remove the 2 clips.
Disengage the 7 claws and 4 clips, and remove the deck trim side panel assembly RH.
90.
REMOVE QUARTER PILLAR GARNISH RH
HINT:
Use the same procedure for the RH side and the LH side.
91.
REMOVE ROOF SIDE INNER GARNISH ASSEMBLY RH (w/o Rear No. 2 Seat)
HINT:
Use the same procedure for the RH side and the LH side.
92.
REMOVE ROOF SIDE INNER GARNISH ASSEMBLY RH (w/ Rear No. 2 Seat)
HINT:
Use the same procedure for the RH side and the LH side.
93.
REMOVE ROOF CONSOLE BOX ASSEMBLY
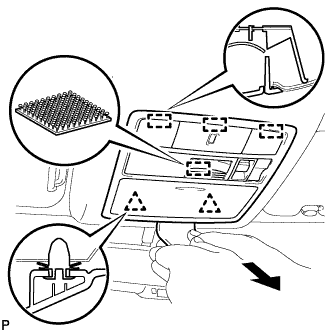
Using a moulding remover, disengage the 2 clips, 3 guides and fastener. Disconnect the connector and remove the roof console box assembly.
94.
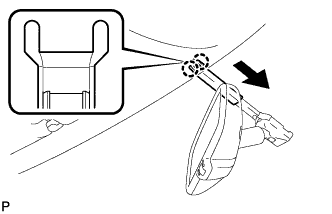
REMOVE VISOR BRACKET COVER (for LH Side)
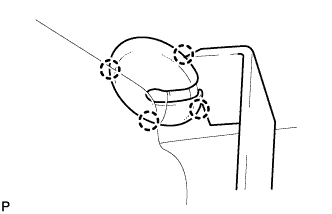
Using a moulding remover, disengage the 4 claws and remove the visor bracket cover.
95.
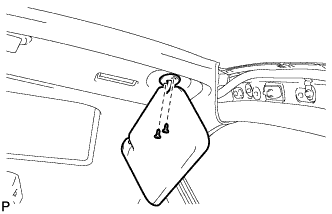
REMOVE VISOR ASSEMBLY LH
Remove the 2 screws and remove the visor assembly LH.
96.
REMOVE VISOR BRACKET COVER (for RH Side)
HINT:
Use the same procedure for the RH side and the LH side.
97.
REMOVE VISOR ASSEMBLY RH
HINT:
Use the same procedure for the RH side and the LH side.
98.
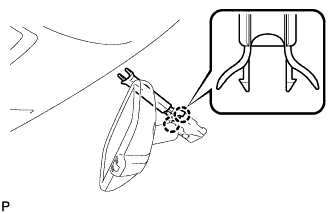
REMOVE INNER REAR VIEW MIRROR STAY HOLDER COVER (w/ EC Mirror)
Disengage the 2 claws and slide the inner rear view mirror stay holder cover as shown in the illustration.
Disengage the 2 claws and remove the inner rear view mirror stay holder cover.
99.
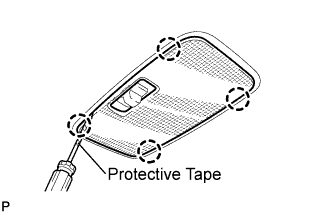
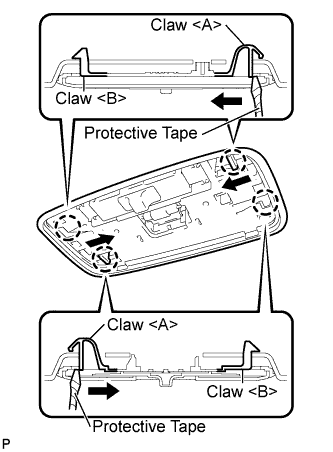
REMOVE NO. 1 ROOM LIGHT ASSEMBLY (for Standard)
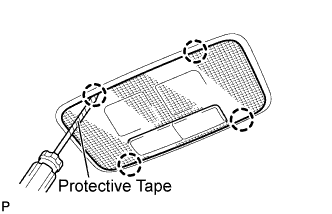
Using a screwdriver, disengage the 4 claws and remove the lens cover.
HINT:
Tape the screwdriver tip before use.
Using a screwdriver, disengage the 2 claws <A> as shown in the illustration.
HINT:
Tape the screwdriver tip before use.
Disengage the 2 claws <B>.
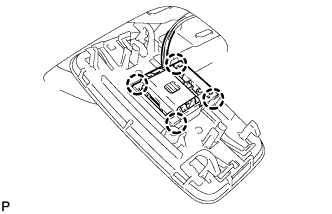
Using a screwdriver, disengage the 4 claws and remove the No. 1 room light assembly.
100.
REMOVE NO. 1 ROOM LIGHT ASSEMBLY (for Independent Type)
Using a screwdriver, disengage the 4 claws and remove the lens cover.
HINT:
Tape the screwdriver tip before use.
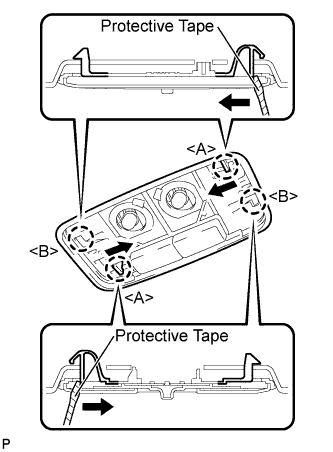
Using a screwdriver, disengage the 2 claws <A> as shown in the illustration.
HINT:
Tape the screwdriver tip before use.
Disengage the 2 claws <B>.
Using a screwdriver, disengage the 8 claws and remove the No. 1 room light assembly.
101.
REMOVE NO. 2 ROOM LIGHT ASSEMBLY
Using a screwdriver, disengage the 4 claws and remove the lens cover.
HINT:
Tape the screwdriver tip before use.
Using a screwdriver, disengage the 2 claws <A> as shown in the illustration.
HINT:
Tape the screwdriver tip before use.
Disengage the 2 claws <B>.
Using a screwdriver, disengage the 4 claws and remove the No. 2 room light assembly.
102.
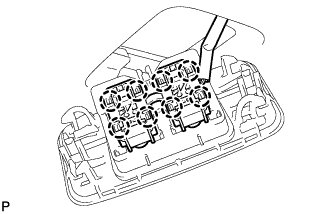
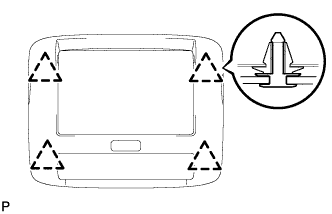
REMOVE TELEVISION BASE (w/ Rear Seat Entertainment System)
Disengage the 4 clips and remove the television base.
103.
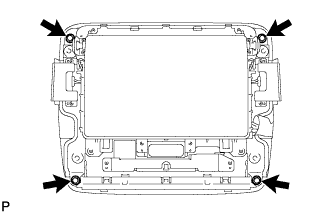
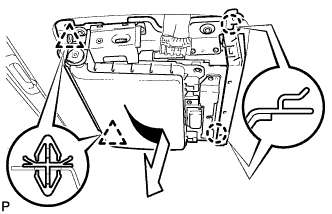
REMOVE TELEVISION DISPLAY ASSEMBLY (w/ Rear Seat Entertainment System)
Disconnect the connector.
Remove the 4 bolts.
Disengage the 2 clips and 2 claws, and then remove the television display.
104.
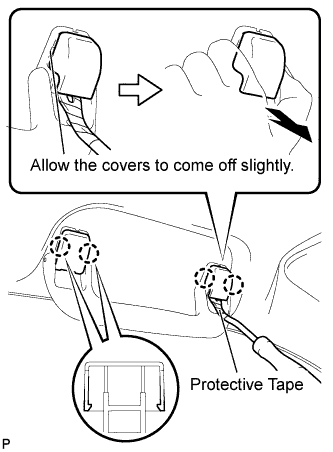
REMOVE FRONT ASSIST GRIP SUB-ASSEMBLY (w/o Sliding Roof)
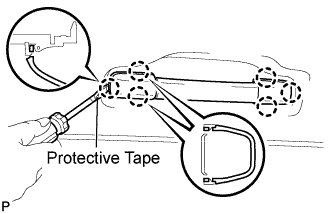
Using a clip remover, disengage the 4 claws.
NOTICE:
Do not forcibly pry the assist grip covers to prevent them from being deformed.
HINT:
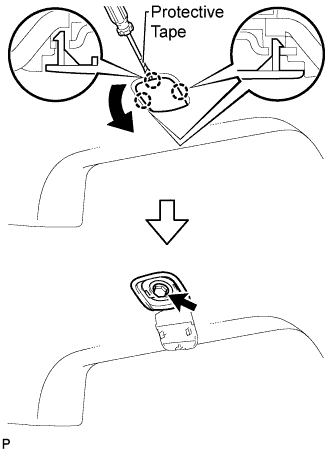
Gently pry on the assist grip covers as shown in the illustration to remove them.
Tape the clip remover tip before use.
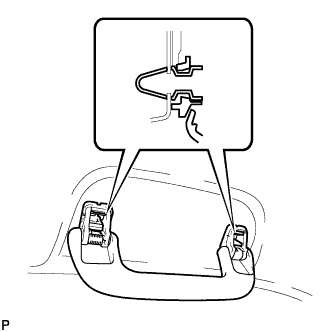
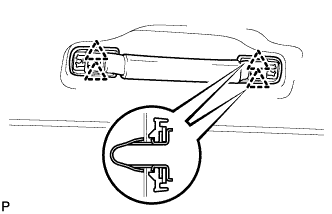
Pull off the 2 assist grip covers by hand. Disengage the 2 clips and remove the front assist grip sub-assembly.
Remove the 2 clips from the vehicle body.
HINT:
Use the same procedure for the RH side and the LH side.
105.
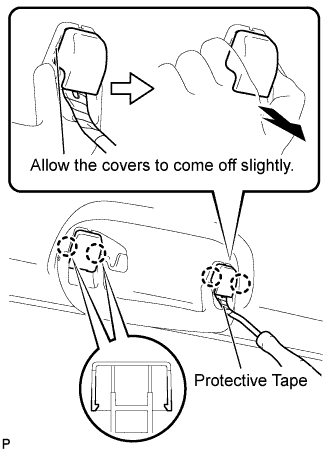
REMOVE REAR ASSIST GRIP SUB-ASSEMBLY (w/o Sliding Roof)
Using a clip remover, disengage the 4 claws.
NOTICE:
Do not forcibly pry the assist grip covers to prevent them from being deformed.
HINT:
Gently pry on the assist grip covers as shown in the illustration to remove them.
Tape the clip remover tip before use.
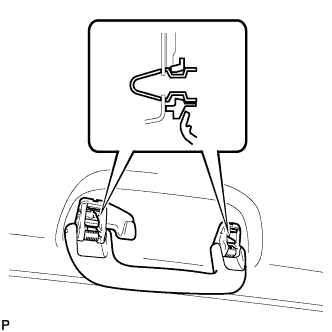
Pull off the 2 assist grip covers by hand.
Disengage the 2 clips and remove the rear assist grip sub-assembly. Remove the 2 clips from the vehicle body.
HINT:
Use the same procedure for the RH side and the LH side.
106.
REMOVE ASSIST GRIP ASSEMBLY (w/ Sliding Roof)
Using a screwdriver, disengage the 6 claws and remove the 2 assist grip covers.
NOTICE:
Do not forcibly pry the assist grip covers to prevent them from being deformed.
HINT:
Tape the screwdriver tip before use.
Disengage the 4 clips and remove the assist grip assembly. Remove the 4 clips from the vehicle body.
HINT:
Use the same procedure for the other 4 assist grips.
107.
REMOVE ROOF HEADLINING TRIM CLIP STOPPER
Using a screwdriver, disengage the 3 claws.
HINT:
Tape the screwdriver tip before use.
Remove the bolt and the roof headlining trim clip stopper.
HINT:
Use the same procedure for the RH side and the LH side.
108.
REMOVE SUN ROOF OPENING TRIM MOULDING (w/ Sliding Roof)
109.
REMOVE VISOR HOLDER
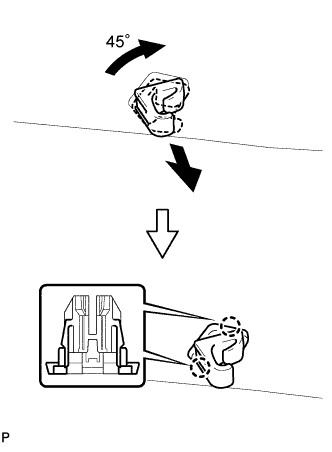
Turn the visor holder approximately 45° and pull it out as shown in the illustration. Disengage the 2 claws and remove the visor holder.
HINT:
Use the same procedure for the RH side and the LH side.
110.
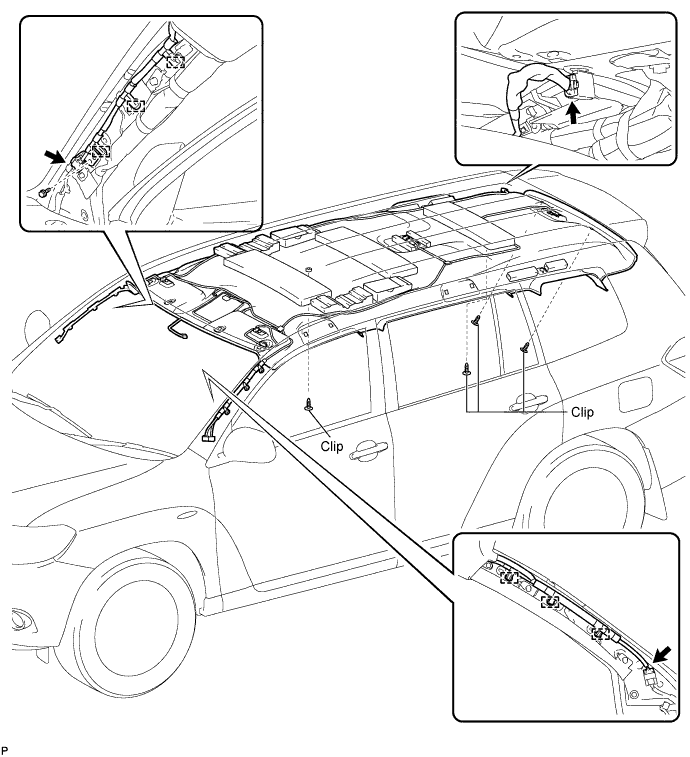
REMOVE ROOF HEADLINING ASSEMBLY (w/o Sliding Roof)
Disconnect the No. 1 roof wire connector and disengage the 3 clamps from the front pillar LH.
Disconnect the No. 2 antenna cord sub-assembly connector, disengage the 3 clamps, and remove the bolt from the front pillar RH.
Disconnect the No. 2 antenna cord sub-assembly connector from the rear pillar RH.
Remove the 4 clips.
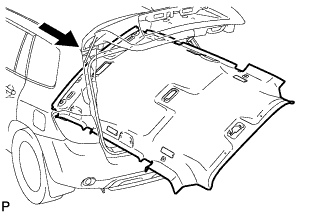
Remove the roof headlining assembly from the vehicle through the back door.
NOTICE:
Do not damage the roof headlining assembly or body interior.
111.
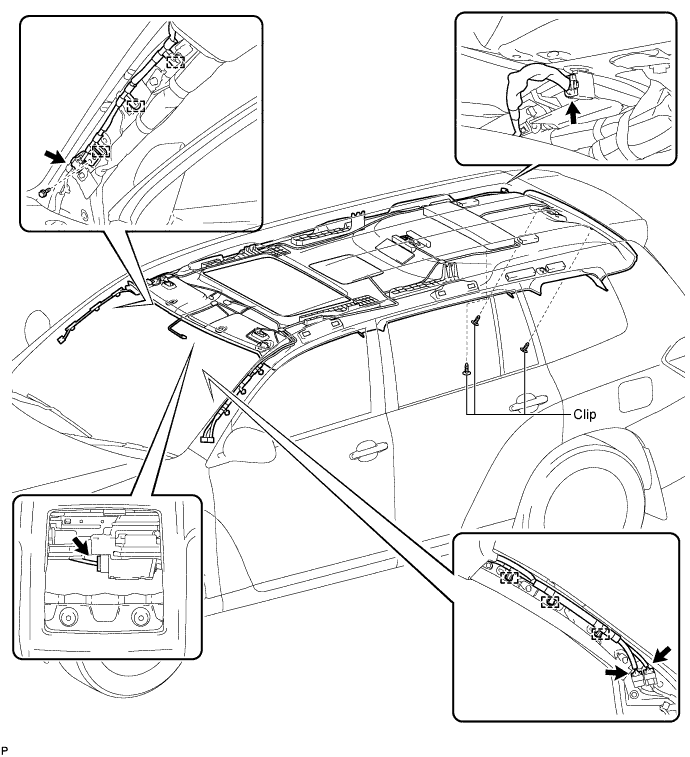
REMOVE ROOF HEADLINING ASSEMBLY (w/ Sliding Roof)
Disconnect the No. 1 roof wire connectors and disengage the 3 clamps from the front pillar LH.
w/ Rear Seat Entertainment System:
Disconnect the No. 1 roof wire connector from the rear pillar LH.
Disconnect the No. 2 antenna cord sub-assembly connector, disengage the 3 clamps and remove the bolt from the front pillar RH.
Disconnect the No. 2 antenna cord sub-assembly connector from the rear pillar RH.
Disconnect the sliding roof drive gear connector.
Remove the 3 clips.
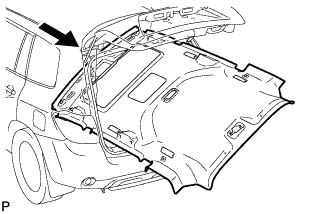
Remove the roof headlining assembly from the vehicle through the back door.
NOTICE:
Do not damage the roof headlining assembly or body interior.
112.
REMOVE VANITY LIGHT ASSEMBLY (w/ Vanity Light)
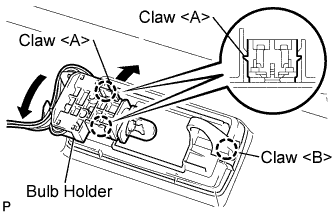
Disengage the 2 claws <A> and separate the bulb holder from the vanity light assembly as shown in the illustration. Disengage the claw <B> and remove the vanity light assembly.
HINT:
Use the same procedure to remove the light on the other side.
113.
REMOVE FRONT SIDE RAIL SPACER LH (w/o Sliding Roof)
Remove the front side rail spacer LH.
114.
REMOVE FRONT SIDE RAIL SPACER RH (w/o Sliding Roof)
HINT:
Use the same procedure for the RH side and the LH side.
115.
REMOVE REAR NO. 2 SIDE RAIL SPACER LH (w/o Sliding Roof)
Remove the rear No. 2 side rail spacer LH.
116.
REMOVE REAR NO. 2 SIDE RAIL SPACER RH (w/o Sliding Roof)
HINT:
Use the same procedure for the RH side and the LH side.
117.
REMOVE NO. 1 ROOF SILENCER PAD (w/o Sliding Roof)
Remove the No. 1 roof silencer pad.
118.
REMOVE NO. 2 ROOF SILENCER PAD (w/o Sliding Roof)
Remove the No. 2 roof silencer pad.
119.
REMOVE NO. 1 ROOF HEADLINING SUPPORT
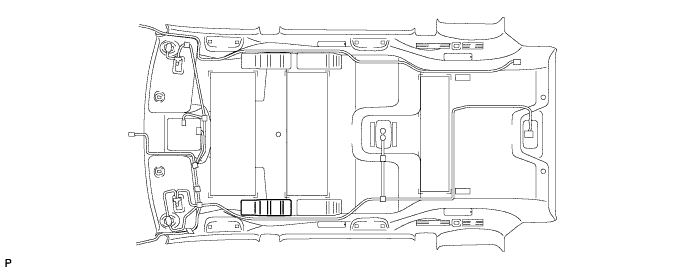
Remove the 2 No. 1 roof headlining supports.
120.
REMOVE ROOF HEADLINING PAD
Remove the 2 roof headlining pads.
121.
REMOVE NO. 2 ROOF HEADLINING PAD
Remove the 2 No. 2 roof headlining pads.
122.
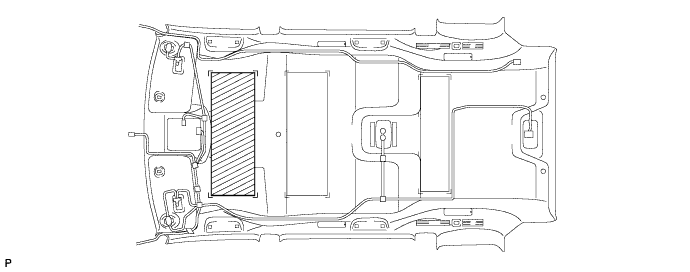
REMOVE NO. 4 ROOF SILENCER PAD
Remove the No. 4 roof silencer pad.
123.
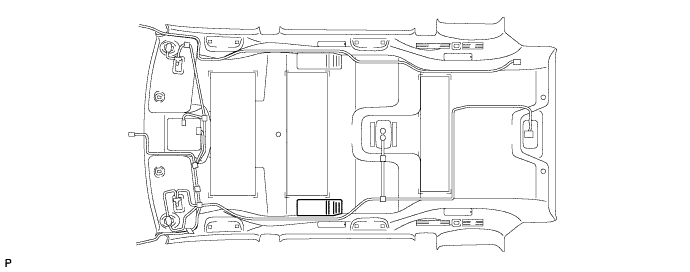
REMOVE NO. 2 ROOF HEADLINING SUPPORT
Remove each No. 2 roof headlining support.
124.
REMOVE NO. 1 AIR OUTLET REGISTER ASSEMBLY (w/ Rear Air Conditioning System)
Disengage the 10 claws, and remove the No. 1 air outlet register assembly from the roof side outlet register.
125.
REMOVE NO. 1 ROOF WIRE
w/ Vanity Light:
Turn the visor connectors counterclockwise approximately 90° and disconnect the connectors from the roof headlining assembly.
Remove the No. 1 roof wire from the roof headlining assembly.
Remove the double-sided tape from the roof headlining assembly.
126.
REMOVE NO. 2 ANTENNA CORD SUB-ASSEMBLY
Peel the strips of the tape used to secure the antenna cord only to the extent that allows removal of the antenna cord.
HINT:
Tape is not available as a supply part. Try to leave as much tape as possible on the roof headlining so that the tape can be reused.
Remove the No. 2 antenna cord sub-assembly from the roof headlining.
127.
REMOVE ROOF SIDE RAIL GARNISH PAD RH (w/ Sliding Roof)
Remove the roof side rail garnish pad RH.
128.
REMOVE ROOF SIDE RAIL GARNISH PAD LH (w/ Sliding Roof)
Remove the roof side rail garnish pad LH.
129.
REMOVE REAR ROOF SIDE RAIL PAD RH (w/ Sliding Roof)
Remove the rear roof side rail pad RH.
130.
REMOVE REAR ROOF SIDE RAIL PAD LH (w/ Sliding Roof)
Remove the rear roof side rail pad LH.