REASSEMBLY
Removal / installation · Vehicles built from May 2007
| 1. INSTALL REAR SEATBACK STOPPER SUB-ASSEMBLY |

Temporarily install the rear seatback stopper sub-assembly with the nut.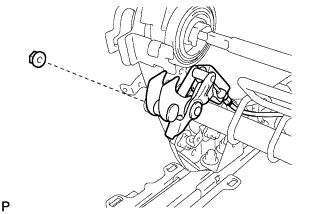

- Torque:
- 18 N*m{ 184 kgf*cm , 13 ft.*lbf }
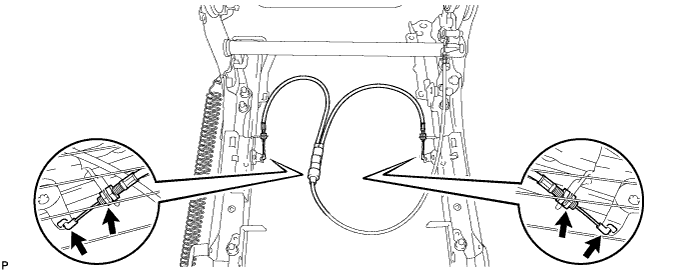
Connect the 4 cable clamps.
| 2. INSTALL REAR SEATBACK LOCK CONTROL LEVER SUB-ASSEMBLY |
Engage the guide.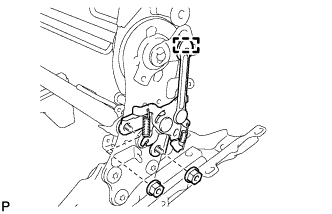
Install the rear seatback lock control lever sub-assembly with the 2 nuts.
- Torque:
- 18 N*m{ 184 kgf*cm , 13 ft.*lbf }
| 3. INSTALL REAR SEAT CUSHION SPRING ASSEMBLY |
Using a T45 "TORX" socket, tighten the 4 "TORX" bolts, bushes and install the rear seat cushion spring assembly.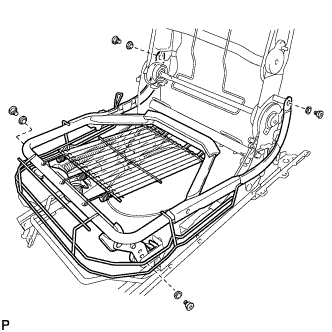
- Torque:
- 21 N*m{ 214 kgf*cm , 16 ft.*lbf }
| 4. INSTALL REAR SEAT RECLINING CONTROL CABLE SUB-ASSEMBLY (w/o Rear No. 2 Seat) |
Connect the 4 cable clamps to install the No. 1 rear seat reclining control cable sub-assembly.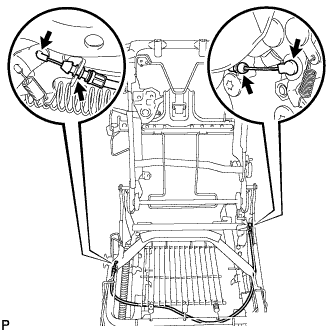
| 5. INSTALL REAR SEAT RECLINING CONTROL CABLE SUB-ASSEMBLY (w/ Rear No. 2 Seat) |
Connect the 6 cable clamps to install the No. 1 rear seat reclining control cable sub-assembly.
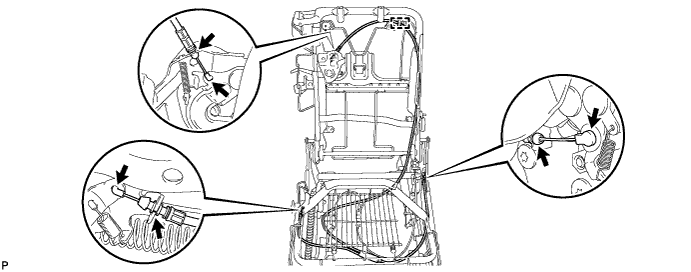
Install the clamp.
| 6. INSTALL SEAT TRACK CONTROL CABLE ASSEMBLY |
Connect the 2 cable clamps to install the seat track control cable assembly.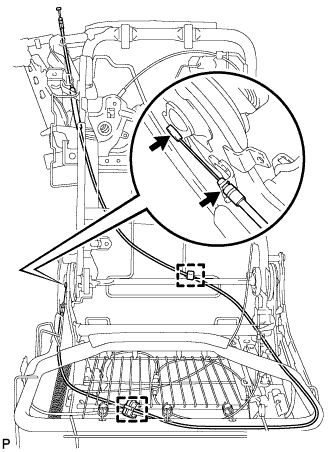
Install the 2 clamps.
| 7. INSTALL REAR SEAT HOOK |
Engage the claw to install the rear seat hook to the seat adjuster control cable assembly.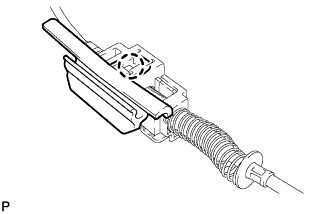
| 8. INSTALL SEAT ADJUSTER CONTROL CABLE ASSEMBLY |
Engage the claw.
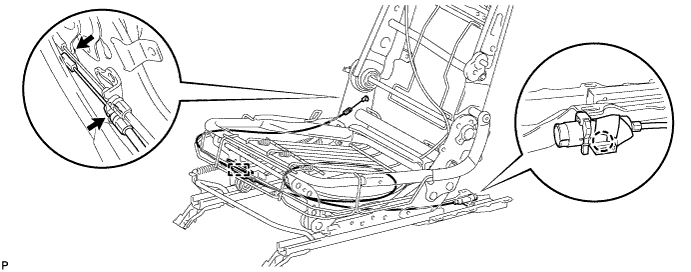
Connect the 2 cable clamps to install the seat adjuster control cable assembly.
Engage the hook to install the rear seat hook to the rear seat cushion spring assembly.
| 9. INSTALL NO. 1 REAR SEAT COVER |
Engage the hook to install the No. 1 rear seat cover.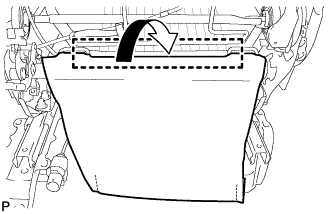
| 10. INSTALL NO. 1 REAR SEAT RECLINING COVER |
Engage the 2 guides.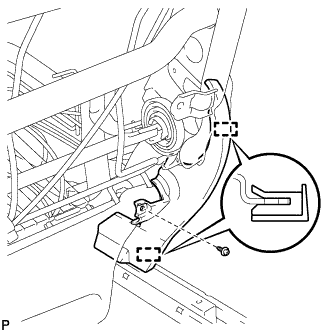
Install the rear seat reclining cover with the screw.
| 11. INSTALL RECLINING ADJUSTER INSIDE COVER RH |
Engage the guide.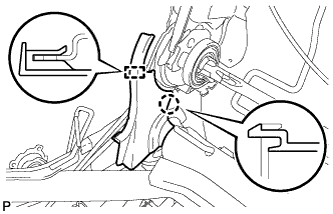
Engage the claw to install the reclining adjuster inside cover RH.
| 12. INSTALL REAR SEATBACK INNER COVER |
Engage the claw.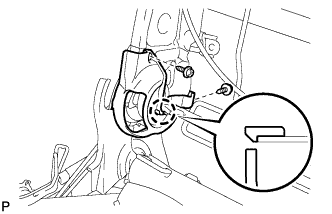
Install the rear seatback inner cover with the 2 screws.
| 13. INSTALL REAR SEAT RECLINING INNER FRONT COVER |
Install the rear seat reclining inner front cover with the screw.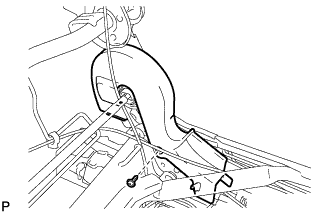
| 14. INSTALL REAR SEAT RECLINING INNER REAR COVER |
Engage the claw.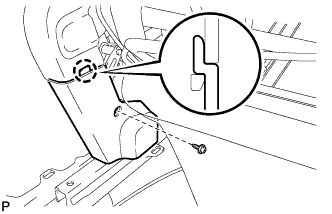
Install the rear seat reclining inner rear cover with the screw.
| 15. INSTALL REAR SEAT RECLINING INNER PROTECTOR |
Engage the claw to install the rear seat reclining inner protector.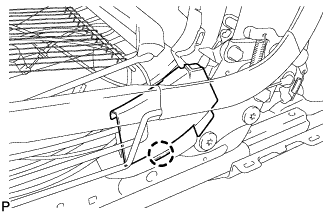
| 16. INSTALL SEPARATE TYPE REAR NO. 1 SEATBACK COVER |
Using hog ring pliers, install the separate type rear No. 1 seatback cover with 10 new hog rings.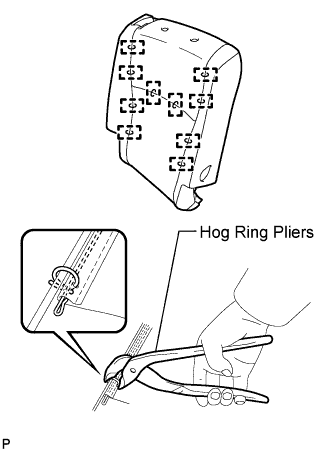
- NOTICE:
- Be careful not to damage the cover.
- When installing the hog rings, take care to minimize wrinkles as much as possible.
- Be careful not to damage the cover.
| 17. INSTALL REAR NO. 1 SEATBACK COVER WITH PAD (w/o Rear No. 2 Seat) |
Engage the hook to install the rear No. 1 seatback cover with pad.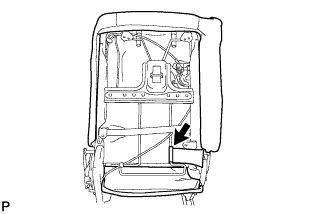
| 18. INSTALL REAR NO. 1 SEATBACK COVER WITH PAD (w/ Rear No. 2 Seat) |
Using hog ring pliers, install 2 new hog rings.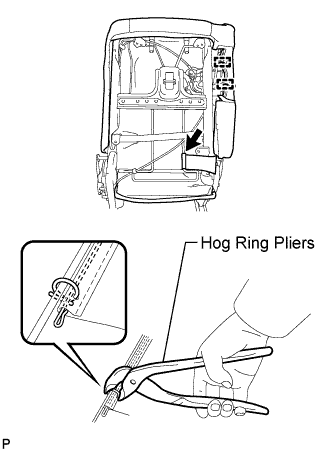
- NOTICE:
- Be careful not to damage the cover.
- When installing the hog rings, take care to minimize wrinkles as much as possible.
- Be careful not to damage the cover.
Engage the hook to install the rear No. 1 seatback cover with pad.
| 19. INSTALL REAR NO. 1 SEAT HEADREST SUPPORT ASSEMBLY RH |
Engage the 2 claws to install the rear No. 1 seat headrest support assembly RH.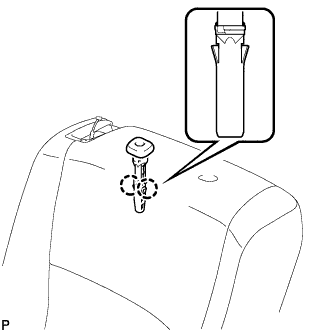
| 20. INSTALL REAR NO. 1 SEAT HEADREST SUPPORT ASSEMBLY LH |
Engage the 2 claws to install the rear No. 1 seat headrest support assembly LH.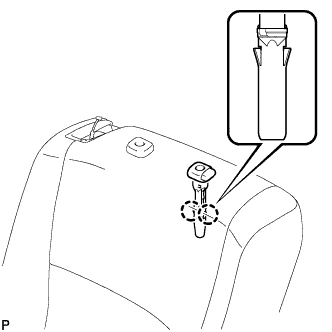
| 21. INSTALL REAR SEATBACK BOARD CARPET ASSEMBLY (w/o Rear No. 2 Seat) |
Engage the 2 guides.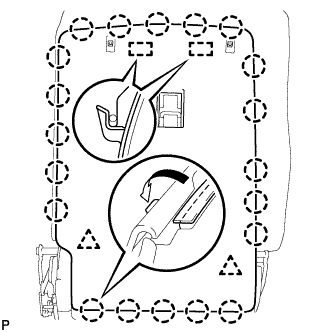
Engage the 2 clips.
Engage the 20 claws to install the rear seatback board carpet assembly as shown in the illustration.
| 22. INSTALL REAR SEATBACK BOARD CARPET ASSEMBLY (w/ Rear No. 2 Seat) |
Engage the 2 guides.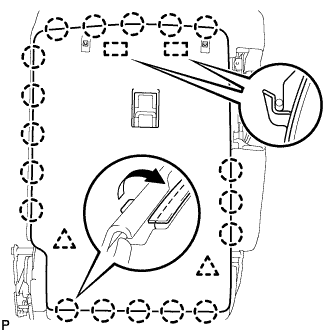
Engage the 2 clips.
Engage the 18 claws to install the rear seatback board carpet assembly as shown in the illustration.
| 23. INSTALL REAR SEAT LOCK CONTROL LEVER SUB-ASSEMBLY |
Connect the rear seat lock control cable as shown in the illustration.
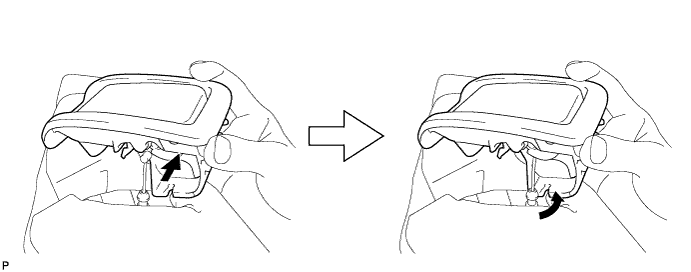
Engage the guide.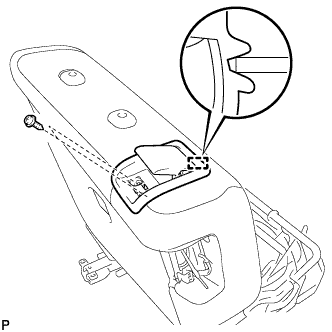
Install the rear seat lock control lever sub-assembly with the 2 screws.
| 24. INSTALL REAR SEAT LOCK STRIKER COVER |
Engage the guide.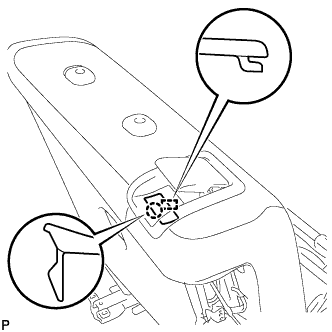
Engage the claw to install the rear seat lock striker cover.
| 25. INSTALL NO. 1 REAR SEAT BEZEL COVER (w/ Rear No. 2 Seat) |
Install the No. 1 rear seat bezel cover with the 3 screws.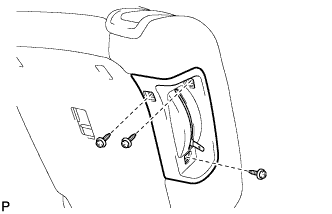
| 26. INSTALL NO. 1 REAR SEATBACK LOCK STRIKER COVER (w/ Rear No. 2 Seat) |
Engage the 2 craws to install the No. 1 rear seatback lock striker cover.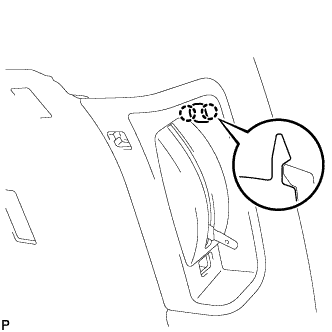
| 27. INSTALL REAR SEAT LOCK STRIKER COVER CAP (w/ Rear No. 2 Seat) |
Engage the 4 craws to install the 2 rear seat lock striker cover caps.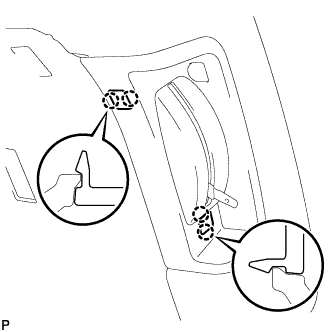
| 28. INSTALL RECLINING REMOTE CONTROL LEVER KNOB (w/ Rear No. 2 Seat) |
Install the remote control lever knob with the screw as shown in the illustration.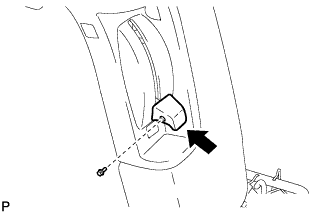
| 29. INSTALL REAR SEATBACK COVER |
Engage the 4 claws to install the rear seatback cover.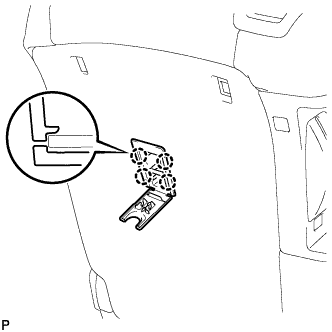
| 30. INSTALL TONNEAU COVER HOOK HOLDER |
Install the 2 tonneau cover hook holders with the 2 screws.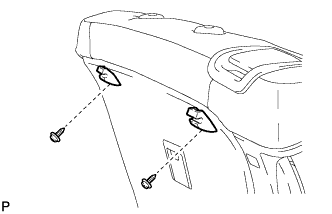
| 31. INSTALL REAR SEAT ARMREST ASSEMBLY |
Install the rear seat armrest assembly with the bolt, washer and wave washer.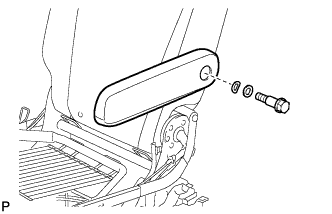
- Torque:
- 33 N*m{ 337 kgf*cm , 24 ft.*lbf }
| 32. INSTALL NO. 1 REAR SEAT ARMREST CAP |
Engage the 2 claws to install the No. 1 rear seat armrest cap.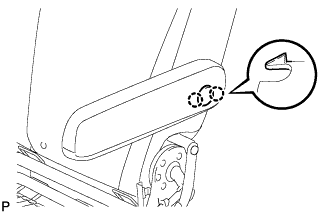
| 33. INSTALL SEPARATE TYPE REAR NO. 1 SEAT CUSHION COVER |
Using hog ring pliers, install the separate type rear No. 1 seat cushion cover with 11 new hog rings.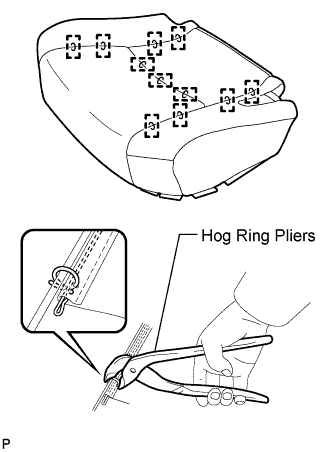
- NOTICE:
- Be careful not to damage the cover.
- When installing the hog rings, take care to minimize wrinkles as much as possible.
- Be careful not to damage the cover.
| 34. INSTALL NO. 2 REAR SEAT COVER |
Engage the 2 hooks to install the No. 2 rear seat cover.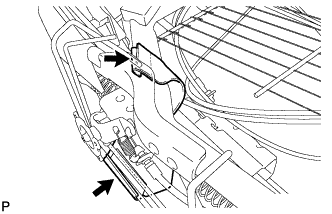
| 35. INSTALL NO. 1 REAR SEAT COVER RH |
Engage the 4 hooks to install the No. 1 rear seat cover RH.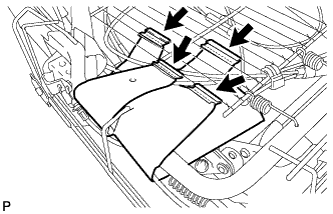
| 36. INSTALL NO. 1 REAR SEAT COVER LH |
Engage the 2 hooks to install the No. 1 rear seat cover LH.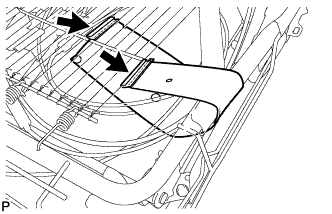
| 37. INSTALL REAR NO. 1 SEAT CUSHION COVER WITH PAD |
Using hog ring pliers, install 4 new hog rings.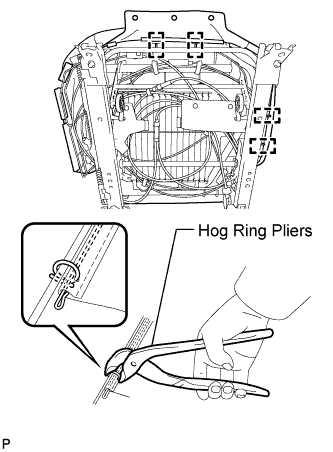
- NOTICE:
- Be careful not to damage the cover.
- When installing the hog rings, take care to minimize wrinkles as much as possible.
- Be careful not to damage the cover.
Engage the 12 hooks.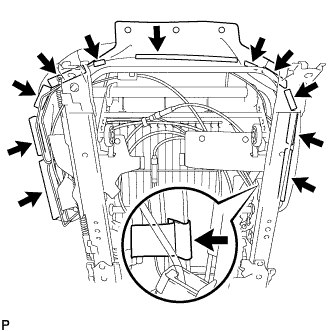
Attach the 3 buttons.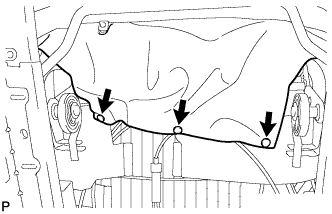
Using hog ring pliers, install 2 new hog rings.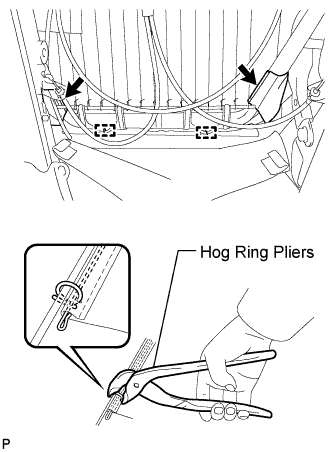
- NOTICE:
- Be careful not to damage the cover.
- When installing the hog rings, take care to minimize wrinkles as much as possible.
- Be careful not to damage the cover.
Engage the 2 hooks.
Engage the 2 hooks to the rear No. 1 seat cushion cover with pad.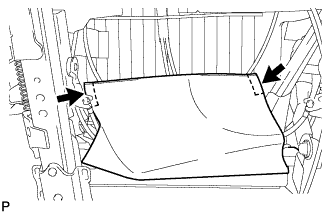
| 38. INSTALL REAR SEAT CUSHION MOULDING RH |
Engage the guide.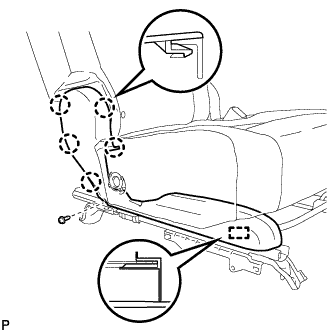
Engage the 5 claws.
Install the rear seat cushion moulding RH with the screw.
| 39. INSTALL REAR SEAT CUSHION MOULDING LH |
Engage the guide.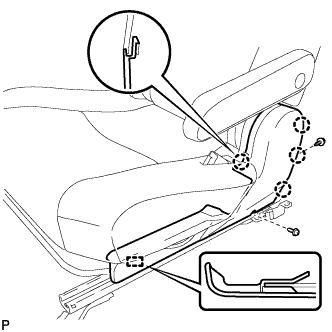
Engage the 4 claws.
Install the rear seat cushion moulding LH with the 2 screws.
| 40. INSTALL SEAT ADJUSTER COVER CAP |
Engage the 2 claws to install the seat adjuster cover cap.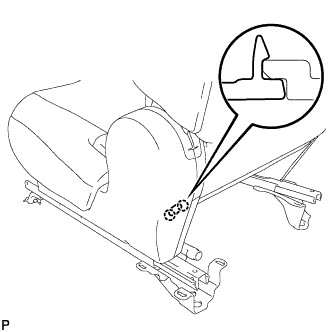
| 41. INSTALL NO. 1 RECLINING ADJUSTER RELEASE HANDLE |
Install the No. 1 reclining adjuster release handle with the 3 screws.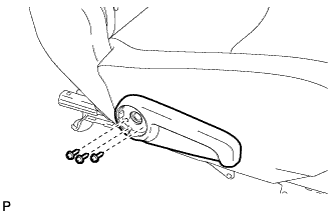
| 42. INSTALL REAR SEAT RECLINING UPPER COVER |
Engage the 3 claws to install the rear seat reclining upper cover.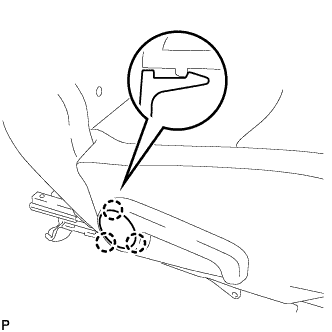
| 43. INSTALL REAR NO. 1 SEAT INNER BELT ASSEMBLY |
Install the rear No. 1 seat inner belt assembly with the bolt.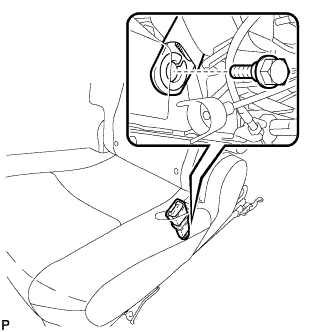
- Torque:
- 42 N*m{ 428 kgf*cm , 31 ft.*lbf }