Home › SUSPENSION & AXLE › TIRE AND WHEEL › TIRE PRESSURE WARNING SYSTEM

TIRE PRESSURE WARNING SYSTEM > Tire Pressure Warning Light Circuit

for Preparation Click here


DESCRIPTION

If the ECU detects any trouble, the tire pressure warning light blinks (stays on after blinking for 1 minute) and tire pressure monitor is cancelled at the same time. At this time, the ECU records a DTC in the memory.
Connecting terminals TC and CG of the DLC3 makes the tire pressure warning light blink to output DTCs.

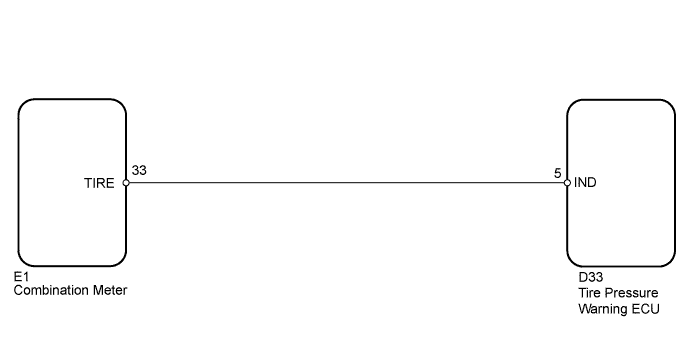
WIRING DIAGRAM


E115290E85


INSPECTION PROCEDURE

NOTICE:
  1. When replacing the tire pressure warning ECU, read the transmitter IDs stored in the old ECU using Techstream and write them down before removal.
  2. It is necessary to perform initialization (Click here) after registration (Click here) of the transmitter IDs into the tire pressure warning ECU if the ECU has been replaced.

1.PERFORM ACTIVE TEST USING TECHSTREAM (COMBINATION METER)
  1. Turn the ignition switch off.

  1. Connect Techstream to the DLC3.

  1. Turn the ignition switch on (IG) and turn the tester on.

  1. Enter the following menus: Body / Combination Meter / Active Test.

  1. Check the condition of the tire pressure warning light by operating the tester.

    Combination Meter  
    Tester Display
    Test Part
    Control Range
    Diagnostic Note
    Indicat. Tire Pressure Warning System
    Tire Pressure Warning Light
    Tire pressure warning light is OFF/ON
    Confirm that the vehicle is stopped, engine idling

OK:
The warning light turns on or off according to tester operation.


NG
REPLACE COMBINATION METER (Click here)
OK


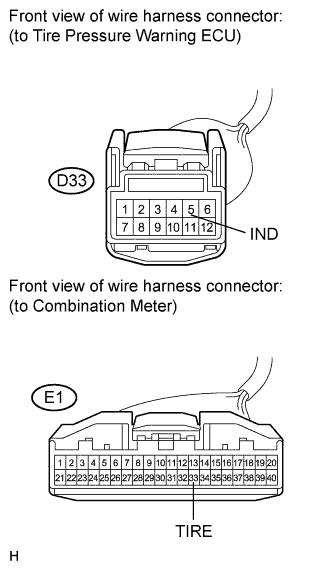
2.CHECK HARNESS AND CONNECTOR (COMBINATION METER - ECU AND BODY GROUND)


    C159184E07
  1. Disconnect the D33 ECU connector.

  1. Disconnect the E1 meter connector.

  1. Measure the resistance according to the value(s) in the table below.

    Standard resistance:
    Tester Connection
    Condition
    Specified Condition
    D33-5 (IND) - E1-33 (TIRE)
    Always
    Below 1 Ω
    D33-5 (IND) - Body ground
    Always
    10 kΩ or higher


NG
REPAIR OR REPLACE HARNESS OR CONNECTOR
OK

PROCEED TO NEXT CIRCUIT INSPECTION SHOWN IN PROBLEM SYMPTOMS TABLE (Click here)