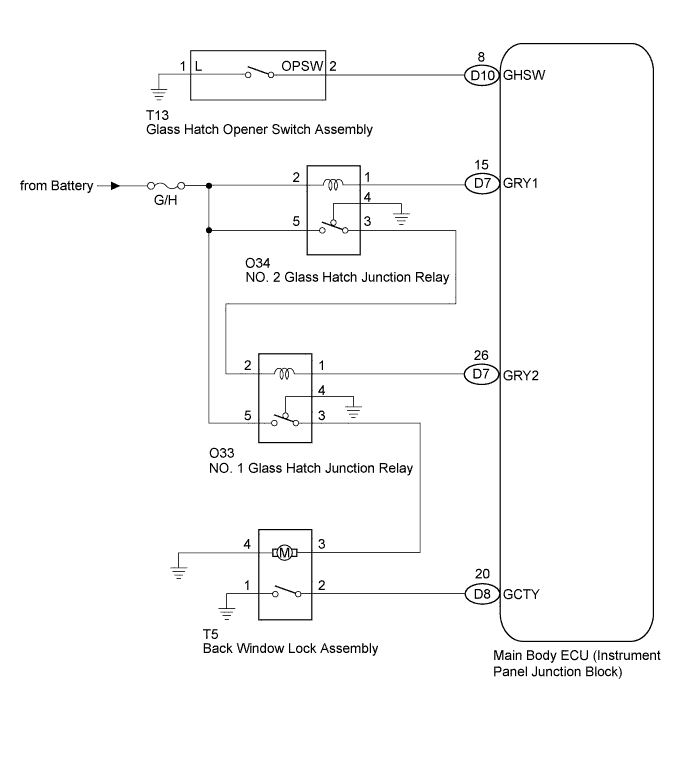
GLASS HATCH OPENER SYSTEM > Glass Hatch Opener System does not Operate |
| 1.SYSTEM CHECK |
Confirm that the vehicle is equipped with the smart key system.
| Result | Proceed to |
| w/ Smart Key System | A |
| w/o Smart Key System | B |
|
| ||||
| A | |
 |
| 2.CHECK SMART KEY SYSTEM |
When the back door entry lock switch is operated, check that the back door locks.
|
| ||||
| OK | |
|
| 3.PERFORM ACTIVE TEST BY TECHSTREAM |
Connect Techstream to the DLC3.
Turn the ignition switch on (IG) and Turn on Techstream.
Select the item below in the ACTIVE TEST and then check that the relay operates.
| Tester Display | Test Part | Control Range | Diagnostic Note |
| Glass Hatch Open | Operate Glass Hatch | ON or OFF | - |
|
| ||||
| OK | |
|
| 4.READ VALUE ON TECHSTREAM (GLASS HATCH COURTESY SWITCH) |
Connect Techstream to the DLC3.
Turn the ignition switch on (IG) and Turn on Techstream.
Select the items below in the DATA LIST, and read the displays on Techstream.
| Tester Display | Measurement Item/Range | Normal Condition | Diagnostic Note |
| Glass Hatch Courtesy Switch | Glass hatch courtesy switch signal / ON or OFF | ON: Glass hatch is open OFF: Glass hatch is closed | - |
|
| ||||
| OK | |
|
| 5.READ VALUE ON TECHSTREAM (GLASS HATCH OPENER SWITCH) |
Connect Techstream to the DLC3.
Turn the ignition switch on (IG) and Turn on Techstream.
Select the items below in the DATA LIST, and read the displays on Techstream.
| Tester Display | Measurement Item/Range | Normal Condition | Diagnostic Note |
| Glass Hatch Opener Switch | Glass hatch opener switch signal / ON or OFF | ON: Glass hatch opener switch Operates OFF: Glass hatch opener switch does not Operate | - |
|
| ||||
| OK | ||
 | ||
| ||
| 6.INSPECT BACK WINDOW LOCK ASSEMBLY |
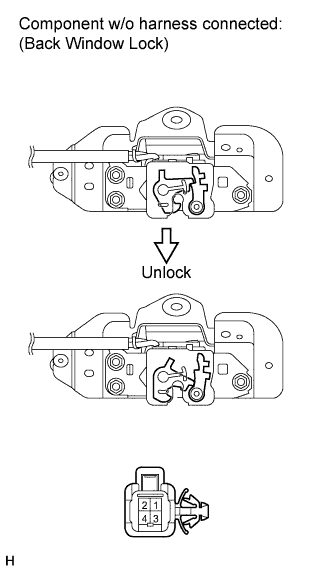 |
Measure the resistance according to the value(s) in the table below.
| Tester Connection | Condition | Specified Condition |
| 1 - 2 | Voltage is not applied between terminals 3 and 4 | 10 kΩ or higher |
| 1 - 2 | Apply battery voltage between terminals 3 and 4 | Below 1 Ω |
|
| ||||
| OK | |
|
| 7.INSPECT GLASS HATCH OPENER SWITCH ASSEMBLY |
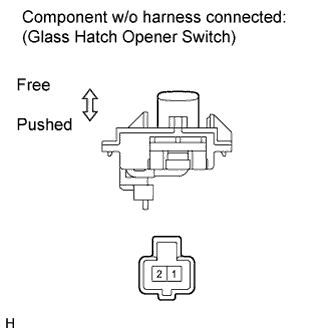 |
Measure the resistance according to the value(s) in the table below.
| Tester Connection | Condition | Specified Condition |
| 1 - 2 | Switch free | 10 kΩ or higher |
| 1 - 2 | Switch pushed | Below 1 Ω |
|
| ||||
| OK | |
|
| 8.CHECK NO. 2 GLASS HATCH JUNCTION RELAY |
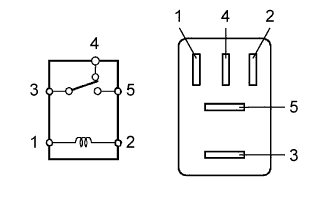 |
Measure the resistance according to the value(s) in the table below.
| Tester Connection | Condition | Specified Condition |
| 3 - 4 | Voltage is not applied between terminals 1 and 2 | Below 1 Ω |
| 3 - 4 | Apply battery voltage between terminals 1 and 2 | 10 kΩ or higher |
| 3 - 5 | Voltage is not applied between terminals 1 and 2 | 10 kΩ or higher |
| 3 - 5 | Apply battery voltage between terminals 1 and 2 | Below 1 Ω |
|
| ||||
| OK | |
|
| 9.CHECK NO. 1 GLASS HATCH JUNCTION RELAY |
|
Measure the resistance according to the value(s) in the table below.
| Tester Connection | Condition | Specified Condition |
| 3 - 4 | Voltage is not applied between terminals 1 and 2 | Below 1 Ω |
| 3 - 4 | Apply battery voltage between terminals 1 and 2 | 10 kΩ or higher |
| 3 - 5 | Voltage is not applied between terminals 1 and 2 | 10 kΩ or higher |
| 3 - 5 | Apply battery voltage between terminals 1 and 2 | Below 1 Ω |
|
| ||||
| OK | |
|
| 10.CHECK HARNESS AND CONNECTOR (MAIN BODY ECU - Glass Hatch Opener Switch) |
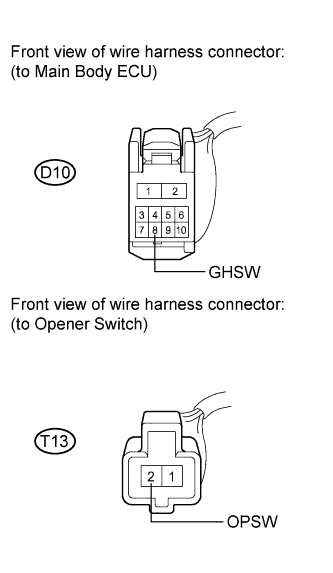 |
Disconnect the D10 and T13 connectors.
Measure the resistance according to the value(s) in the table below.
| Tester Connection | Condition | Specified Condition |
| D10-8 (GHSW) - T13-2 (OPSW) | Always | Below 1 Ω |
| D10-8 (GHSW) or T13-2 (OPSW) - Body ground | Always | 10 kΩ or higher |
|
| ||||
| OK | |
|
| 11.CHECK HARNESS AND CONNECTOR (MAIN BODY ECU - NO. 2 JUNCTION RELAY) |
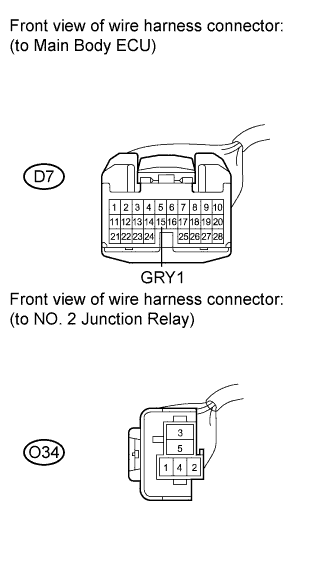 |
Disconnect the D7 and O34 connectors.
Measure the resistance according to the value(s) in the table below.
| Tester Connection | Condition | Specified Condition |
| D7-15 (GRY1 ) - O34-1 | Always | Below 1 Ω |
| D7-15 (GRY1 ) or O34-1 - Body ground | Always | 10 kΩ or higher |
|
| ||||
| OK | |
|
| 12.CHECK HARNESS AND CONNECTOR (NO.2 JUNCTION RELAY - NO. 1 JUNCTION RELAY) |
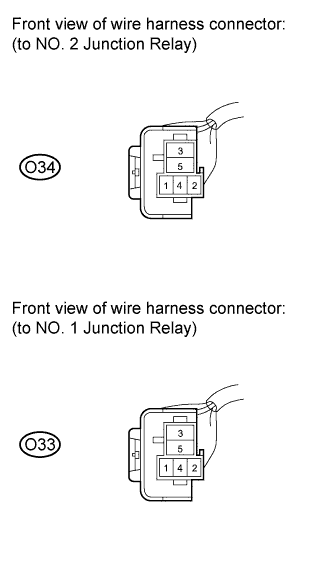 |
Disconnect the O34 and O33 connectors.
Measure the resistance according to the value(s) in the table below.
| Tester Connection | Condition | Specified Condition |
| O34-3 - O33-2 | Always | Below 1 Ω |
| O34-3 or O33-2 - Body ground | Always | 10 kΩ or higher |
|
| ||||
| OK | |
|
| 13.CHECK HARNESS AND CONNECTOR (NO. 1 JUNCTION RELAY - MAIN BODY ECU) |
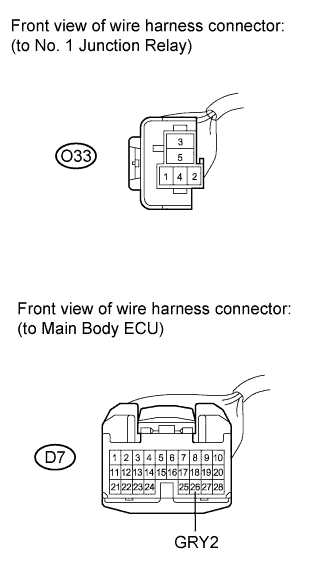 |
Disconnect the O33 and D7 connectors.
Measure the resistance according to the value(s) in the table below.
| Tester Connection | Condition | Specified Condition |
| O33-1 - D7-26 (GRY2) | Always | Below 1 Ω |
| O33-1 or D7-26 (GRY2) - Body ground | Always | 10 kΩ or higher |
|
| ||||
| OK | |
|
| 14.CHECK HARNESS AND CONNECTOR (NO. 1 JUNCTION RELAY - BACK WINDOW LOCK ASSEMBLY)) |
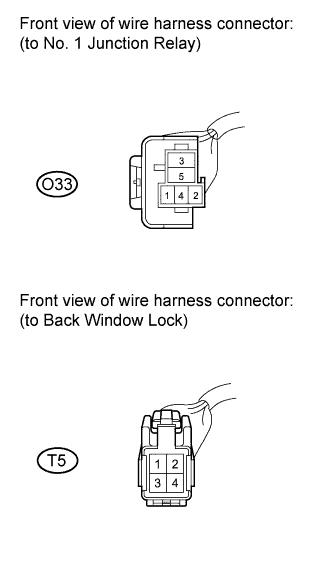 |
Disconnect the O33 and T5 connectors.
Measure the resistance according to the value(s) in the table below.
| Tester Connection | Condition | Specified Condition |
| O33-3 - T5-3 | Always | Below 1 Ω |
| O33-3 or T5-3 - Body ground | Always | 10 kΩ or higher |
|
| ||||
| OK | |
|
| 15.CHECK HARNESS AND CONNECTOR (MAIN BODY ECU - BACK WINDOW LOCK ASSEMBLY)) |
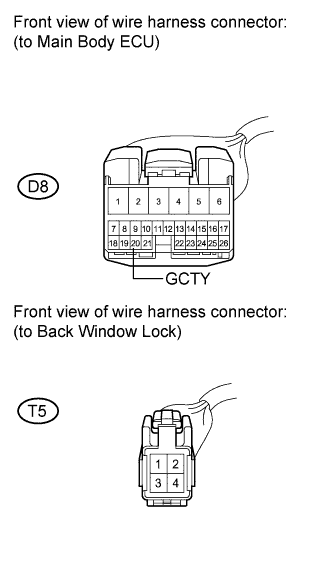 |
Disconnect the D8 and T5 connectors.
Measure the resistance according to the value(s) in the table below.
| Tester Connection | Condition | Specified Condition |
| D8-20 (GCTY) - T5-2 | Always | Below 1 Ω |
| D8-20 (GCTY) or T5-2 - Body ground | Always | 10 kΩ or higher |
|
| ||||
| OK | ||
| ||
| ||

