 |
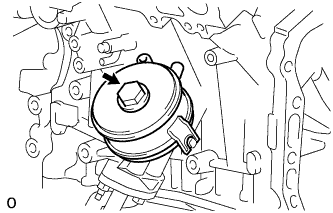
Install a new O-ring to the oil cooler.
ENGINE OIL COOLER > INSTALLATION |
| 1. INSTALL ENGINE OIL COOLER |
Clean the oil cooler contact surface on the cooler mounting.
|
Install a new O-ring to the oil cooler.
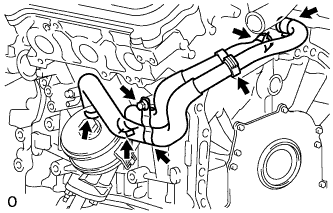 |
Install the oil cooler assembly with the union bolt.
Install the 2 water by-pass hoses with the bolt, 2 clamps, and 4 clips.
| 2. INSTALL EXHAUST MANIFOLD ASSEMBLY LH |
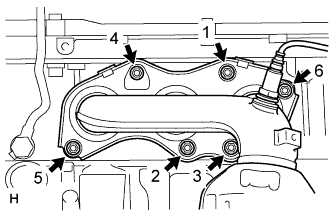 |
Install a new gasket.
Install the exhaust manifold assembly LH by tightening the 6 nuts in the order shown in the illustration.
| 3. INSTALL NO. 2 MANIFOLD STAY |
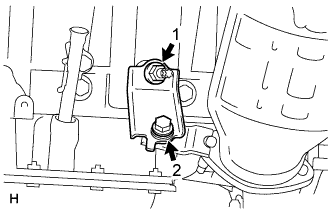 |
Install the No. 2 manifold stay by tightening the bolt and nut in the order shown in the illustration.
| 4. INSTALL FRONT EXHAUST PIPE ASSEMBLY |
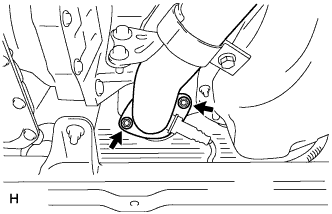 |
Install a new gasket to the front exhaust pipe assembly.
Install the front exhaust pipe assembly with 2 new nuts.
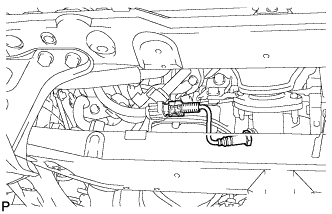 |
Connect the heated oxygen sensor (for bank 2 sensor 2) connector.
| 5. INSTALL CENTER EXHAUST PIPE ASSEMBLY |
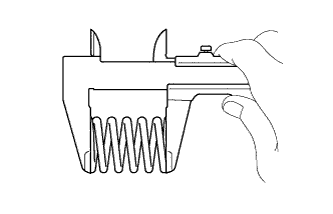 |
Using vernier calipers, measure the free length of the compression spring.
| Minimum | 41.5 mm (1.63 in.) |
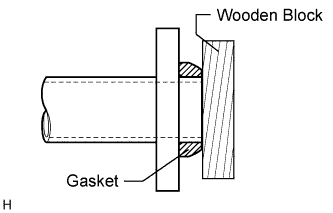 |
Using a plastic-faced hammer and wooden block, tap in a new gasket until its surface is flush with the front No. 3 exhaust pipe sub-assembly.
Connect the 3 exhaust pipe supports, and install the center exhaust pipe assembly.
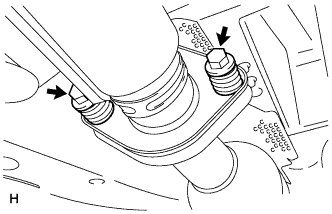 |
Install the 2 compression springs and 2 bolts.
| 6. INSTALL TAIL EXHAUST PIPE ASSEMBLY |
|
Using vernier calipers, measure the free length of the compression spring.
| Minimum | 40.5 mm (1.59 in.) |
|
Using a plastic-faced hammer and wooden block, tap in a new gasket until its surface is flush with the center exhaust pipe assembly.
Connect the exhaust pipe support, and install the tail exhaust pipe assembly.
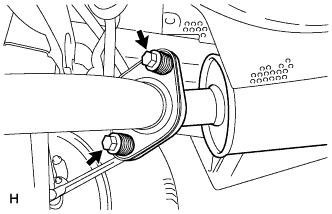 |
Install the 2 compression springs and 2 bolts.
| 7. INSTALL FRONT NO. 3 EXHAUST PIPE SUB-ASSEMBLY |
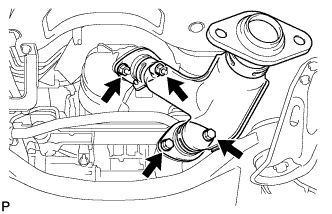 |
Install 2 new gaskets to the front No. 3 exhaust pipe sub-assembly.
Install the front No. 3 exhaust pipe sub-assembly with 2 new nuts and the 2 bolts.
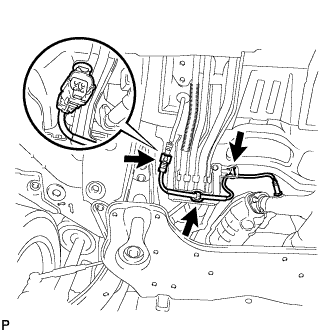 |
Install the 3 clamps and connect the heated oxygen sensor (for bank 1 sensor 2) connector.
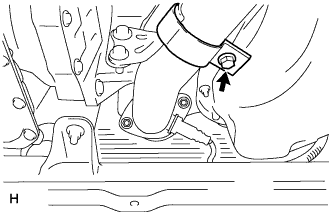 |
Tighten the front exhaust pipe assembly bolt.
| 8. TEMPORARILY TIGHTEN PROPELLER WITH CENTER BEARING SHAFT ASSEMBLY (for 4WD) |
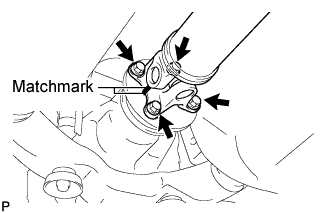 |
Align the matchmarks on the propeller shaft flange and differential companion flange, and connect the shaft with the 4 bolts, 4 washers and 4 nuts.
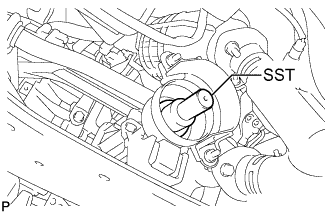 |
Remove SST from the transaxle.
Insert the yoke into the transaxle.
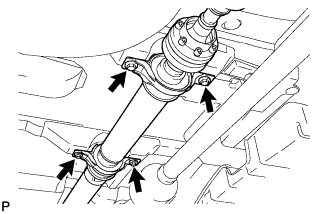 |
Install the 4 adjusting shims and propeller shaft with center bearing, and temporarily tighten the 4 bolts.
|
Tighten the 4 bolts.
| 9. FULLY TIGHTEN PROPELLER WITH CENTER BEARING SHAFT ASSEMBLY (for 4WD) |
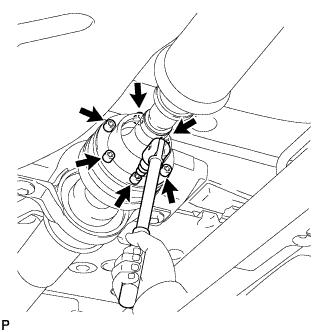 |
Remove the piece of cloth from the joint.
Using a hexagon wrench (6 mm), tighten the 6 bolts.
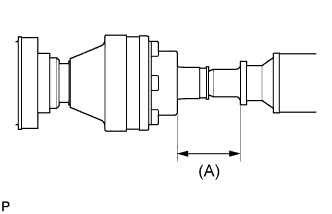 |
With the vehicle unloaded, adjust the dimension between the rear side of the cover and shaft as shown in the illustration.
Under the same condition as above, adjust the front and rear dimensions between the edge surface of the center support bearing and the edge surface of the cushion respectively as shown, and then tighten the bolts.
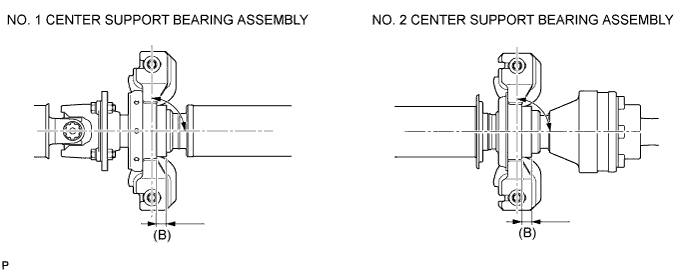
Check that the center line of the bracket is at the right angle in the shaft axial direction.
If any vibration or noise occurs, perform joint angle check as follows and replace the adjusting shim with a proper one.
Turn the propeller shaft several times by hand to stabilize the center support bearings.
Using a jack, raise and lower the differential to stabilize the differential mounting cushion.
Remove the transfer dynamic damper.
Using SST, measure the transfer installation angle (A) and front propeller shaft installation angle (B).
Using SST, measure the rear propeller shaft installation angle (C) and rear differential shaft installation angle (D).
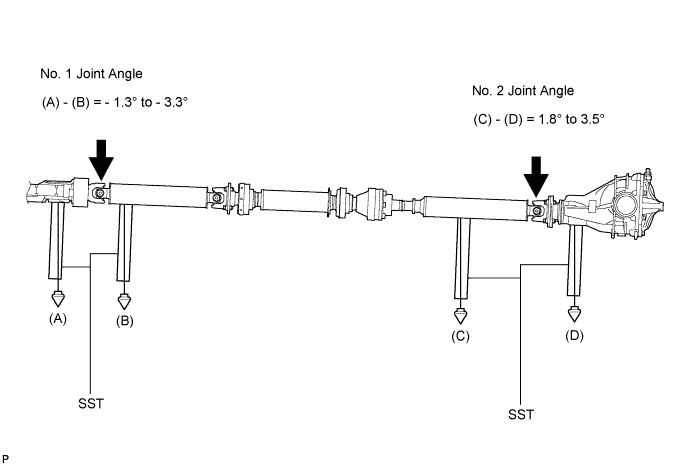
| Thickness mm (in.) | Thickness mm (in.) |
| 3.2 (0.126) | 11.0 (0.433) |
| 4.5 (0.177) | 13.5 (0.531) |
| 6.5 (0.256) | 15.5 (0.610) |
| 9.0 (0.354) | 17.5 (0.689) |
Install the transfer dynamic damper.
| 10. INSTALL NO. 2 EXHAUST MANIFOLD HEAT INSULATOR |
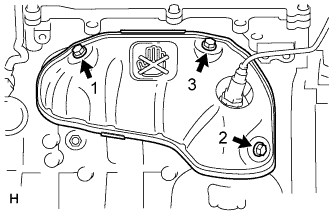 |
Install the No. 2 exhaust manifold heat insulator by tightening the 3 bolts in the order shown in the illustration.
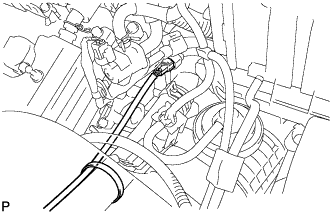 |
Connect the air fuel ratio sensor connector and install the clamp.
| 11. INSTALL NO. 2 ENGINE OIL LEVEL DIPSTICK GUIDE |
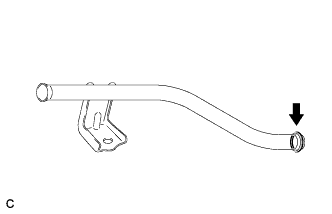 |
Install a new O-ring to the No. 2 engine oil level dipstick guide.
Apply a light coat of engine oil to the O-rings.
Push in the No. 2 engine oil level dipstick guide end into the No. 1 engine oil level dipstick guide.
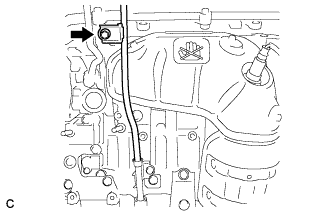 |
Install the No. 2 engine oil level dipstick guide with the bolt.
Install the engine oil level dipstick.
| 12. INSTALL RADIATOR RESERVE TANK ASSEMBLY |
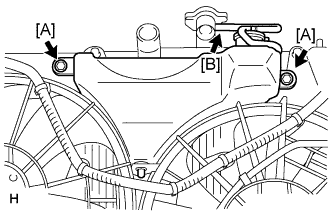 |
Install the radiator reserve tank assembly with the 2 bolts [A].
Connect the hose [B].
| 13. CONNECT NO. 1 RADIATOR HOSE |
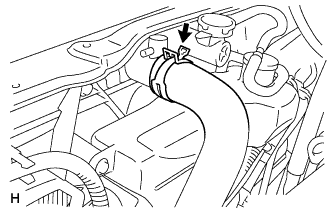 |
Connect the No. 1 radiator hose to the radiator.
| 14. INSTALL AIR CLEANER CASE SUB-ASSEMBLY |
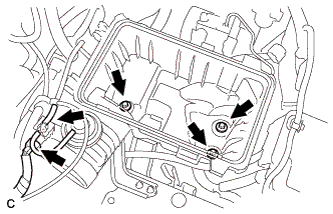 |
Install the air cleaner case with the 3 bolts.
Connect the hose and connector.
| 15. INSTALL AIR CLEANER CAP SUB-ASSEMBLY |
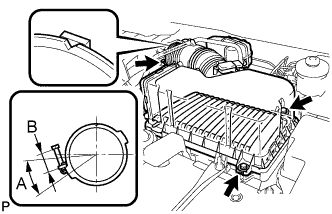 |
Install the air cleaner filter element, align the groove on the air cleaner hose with the throttle body alignment tab and tighten the clamp as shown in the illustration.
Install the air cleaner cap with the 2 bolts and clips
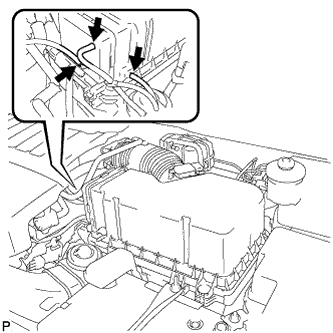 |
Connect the 3 vacuum hoses.
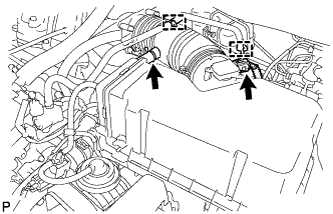 |
Connect the mass air flow meter connector.
Connect the No. 2 ventilation hose and fuel vapor feed hose assembly.
| 16. INSTALL NO. 1 AIR CLEANER INLET |
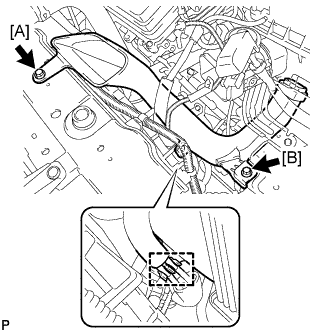 |
Install the No. 1 air cleaner inlet with the 2 bolts.
Connect the 2 vacuum hoses.
| 17. INSTALL NO. 2 AIR CLEANER INLET |
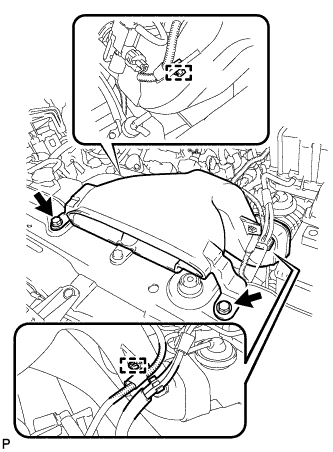 |
Install the No. 2 air cleaner inlet with the 2 bolts.
Connect the 2 vacuum hoses and harness clamps.
| 18. INSTALL COOL AIR INTAKE DUCT SEAL |
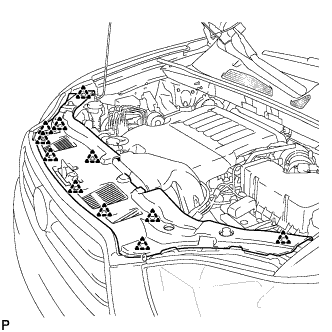 |
Install the cool air intake duct seal with the 11 clips.
| 19. INSTALL BATTERY |
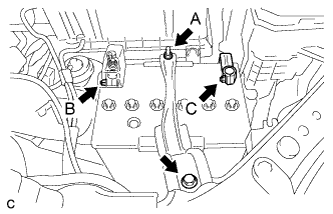 |
Install the battery tray and battery.
Install the battery clamp with the bolt and nut.
Connect the positive battery terminal, and tighten the nut.
Connect the negative battery terminal, and tighten the nut.
| 20. ADD ENGINE COOLANT |
Tighten the radiator drain cock plug by hand.
Tighten the 2 cylinder block drain cock plugs.
Loosen the air drain cock plug from the water inlet housing.
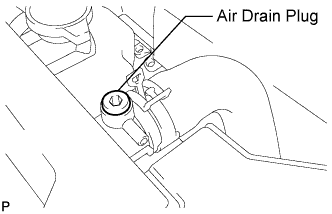 |
Loosen the air drain plug at the top of the radiator 3 or 4 turns.
Add TOYOTA Super Long Life Coolant (SLLC) to the radiator inlet opening until coolant overflows from the engine air drain cock hole. Then tighten the air drain cock plug to the water inlet housing.
Continue to add TOYOTA Super Long Life Coolant (SLLC) to the radiator inlet opening until coolant overflows from the radiator air drain hole. Then close the air drain plug at the top of the radiator.
Slowly fill the radiator with TOYOTA Super Long Life Coolant (SLLC).
| Condition | Specified Condition |
| w/ Rear Heater | 11.0 liters (11.6 US qts, 9.7 Imp. qts) |
| w/o Rear Heater | 8.8 liters (9.3 US qts, 7.7 Imp. qts) |
| Condition | Specified Condition |
| w/ Rear Heater | 11.7 liters (12.4 US qts, 10.3 Imp. qts) |
| w/o Rear Heater | 9.5 liters (10.1 US qts, 8.4 Imp. qts) |
Slowly pour coolant into the radiator reservoir tank until it reaches the FULL line.
Squeeze the No. 1 and No. 2 radiator hoses several times by hand, and then check the level of the coolant.
If the coolant level is low, add coolant.
Bleed air from the cooling system.
Warm up the engine until the thermostat opens. While the thermostat is open, circulate the coolant for several minutes.
Maintain the engine speed at 2500 to 3000 rpm.
Squeeze the inlet and outlet radiator hoses several times by hand to bleed air.
Stop the engine and wait until the engine coolant cools down.
Add engine coolant to the FULL line on the radiator reservoir.
| 21. ADD ENGINE OIL |
Add clean engine oil and install the oil filler cap.
| Oil Grade | Oil Viscosity (SAE) |
| ILSAC multigrade engine oil | 5W-30 |
| Item | Standard Condition |
| Drain and refill with oil filter change | 6.1 liters (6.4 US qts, 5.4 lmp. qts) |
| Drain and refill without oil filter change | 5.7 liters (6.0 US qts, 5.0 lmp. qts) |
| Dry fill | 7.1 liters (7.5 US qts, 6.2 lmp. qts) |
| Item | Standard Condition |
| Drain and refill with oil filter change | 6.1 liters (6.4 US qts, 5.4 lmp. qts) |
| Drain and refill without oil filter change | 5.7 liters (6.0 US qts, 5.0 lmp. qts) |
| Dry fill | 6.8 liters (7.2 US qts, 6.0 lmp. qts) |
| 22. INSPECT FOR COOLANT LEAK |
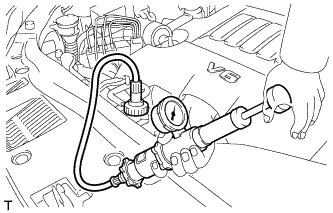 |
Fill the radiator with coolant and attach a radiator cap tester.
Warm up the engine.
Using the radiator cap tester, increase the pressure inside the radiator to 118 kPa (1.2 kgf/cm2, 17 psi), and check that the pressure does not drop.
If the pressure drops, check the hoses, radiator and water pump for leaks. If no external leaks are found, check the heater core, cylinder block and cylinder head.
| 23. INSPECT FOR OIL LEAK |
Start the engine.
Check for engine oil leaks from the oil cooler assembly and the union bolt.
| 24. INSPECT FOR EXHAUST GAS LEAK |
| 25. INSTALL NO. 2 ENGINE UNDER COVER |
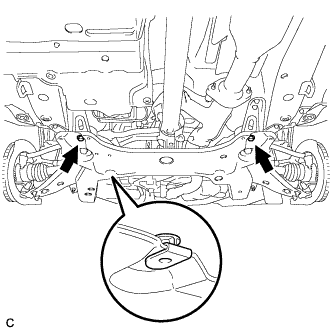 |
Install the No. 2 engine under cover with the 2 bolts.
| 26. INSTALL ENGINE UNDER COVER ASSEMBLY |
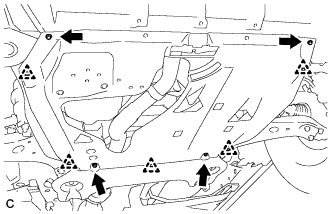 |
Install the engine under cover assembly with the 4 bolts and 5 clips.
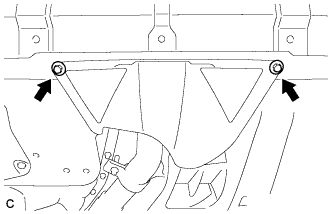 |
Install the engine under cover assembly RR with the 2 bolts.
| 27. INSTALL NO. 1 ENGINE UNDER COVER |
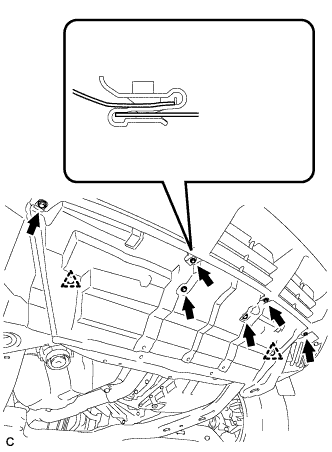 |
Install the No. 1 engine under cover with the 6 bolts and 2 clips.
| 28. INSTALL V-BANK COVER SUB-ASSEMBLY |
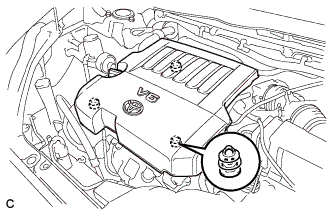 |
Fit the 3 retainers and install the V-bank cover.
| 29. CHECK ENGINE OIL LEVEL |
Warm up the engine, stop the engine and wait for 5 minutes.
Check that the engine oil level is between the L and F marks of the oil dipstick. If low, check for leakage and add oil up to the F mark.