Home › HYBRID SYSTEM ยท P310 › HYBRID VEHICLE CONTROL › HYBRID CONTROL SYSTEM

DTC    P0A78-523    Drive Motor "A" Inverter Performance

for Preparation Click here


DESCRIPTION

Refer to the description of the inverter .

HINT:
The term "drive motor A" indicates MG2.


DTC No.
INF Code
DTC Detection Condition
Trouble Area
P0A78
523
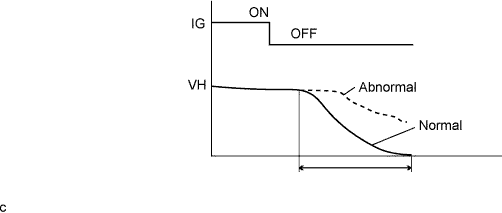
Inverter voltage (VH) sensor offset malfunction
  1. HV relay assembly
  2. Inverter with converter assembly

HINT:
Turning the power switch off causes the voltage in the inverter to discharge. The inverter voltage is almost 0 V after discharge. The DTC will be stored if the inverter voltage is more than the specified value after discharge.


A111758E01


MONITOR DESCRIPTION

The hybrid vehicle control ECU monitors the inverter voltage (VH) sensor signal. If the hybrid vehicle control ECU detects a fault in the sensor signal, the hybrid vehicle control ECU will interpret this as a VH sensor failure. The hybrid vehicle control ECU will illuminate the MIL and set a DTC.

MONITOR STRATEGY


Related DTCs
P0A78 (INF 523): Voltage (VH) sensor deviation
Required sensors / components
Motor inverter
Frequency of operation
Continuous
Duration
TMC's intellectual property
MIL operation
Immediately
Sequence of operation
None

TYPICAL ENABLING CONDITIONS


The monitor will run whenever the DTCs listed are not present
TMC's intellectual property
Other conditions belong to TMC's intellectual property
-

TYPICAL MALFUNCTION THRESHOLDS


TMC's intellectual property
-

COMPONENT OPERATING RANGE


Hybrid vehicle control ECU
DTC P0A78 (INF 523) is not detected

INSPECTION PROCEDURE

CAUTION:
  1. Before inspecting the high-voltage system or disconnecting the low voltage connector of the inverter with converter assembly, take safety precautions such as wearing insulated gloves and removing the service plug grip to prevent electrical shocks. After removing the service plug grip, put it in your pocket to prevent other technicians from accidentally reconnecting it while you are working on the high-voltage system.
  2. After disconnecting the service plug grip, wait for at least 5 minutes before touching any of the high-voltage connectors or terminals. After waiting for 5 minutes, check the voltage at the terminals in the inspection point in the inverter with converter assembly. The voltage should be 0 V before beginning work.

HINT:
Waiting for at least 5 minutes is required to discharge the high-voltage capacitor inside the inverter with converter assembly.

1.READ VALUE USING TECHSTREAM (VL AND VH)
  1. Connect the Techstream to the DLC3.

  1. Turn the power switch on (IG).

  1. Select the following menu items: Powertrain / Hybrid Control / Data List / VL-Voltage before Boosting and VH-Voltage after Boosting.

    Standard voltage:

    ECU Data List
    Specified Condition
    Pre-boost voltage (VL-Voltage before Boosting)
    Below 50 V
    Post-boost voltage (VH-Voltage after Boosting)
    Below 50 V


NG
REPLACE INVERTER WITH CONVERTER ASSEMBLY (Click here)
OK


2.CHECK FREEZE FRAME DATA (PWR RESOURCE VB, VL AND VH)
  1. Connect the Techstream to the DLC3.

  1. Turn the power switch on (IG).

  1. Select the following menu items: Powertrain / Hybrid Control / Data List / Power Resource VB, VL-Voltage before Boosting and VH-Voltage after Boosting.

    Result:

    Result
    Proceed to
    Both of the following conditions are met:
    1. HV battery voltage (Power Resource VB), pre-boost voltage (VL-Voltage before Boosting), and post-boost voltage (VH-Voltage after Boosting) are also equal.
    2. The difference among them is within 55 V.
    A
    Other than above
    B


B
REPLACE INVERTER WITH CONVERTER ASSEMBLY (Click here)
A

REPLACE HV RELAY ASSEMBLY (Click here)