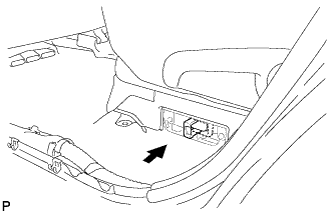
Home › HYBRID SYSTEM ยท P310 › HYBRID VEHICLE CONTROL › FRAME WIRE

FRAME WIRE > INSTALLATION

for Preparation Click here


1. INSTALL NO. 3 FRAME WIRE


  1. Install the No. 3 frame wire.
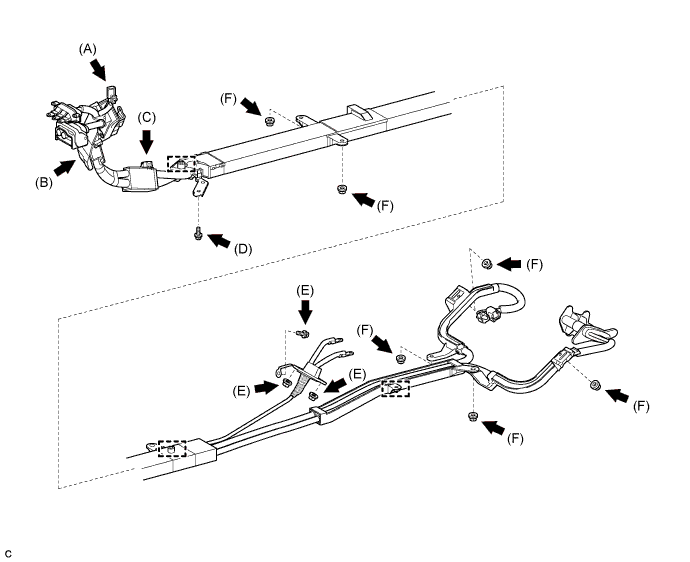

    A175948E01

    CAUTION:
    Wear insulating gloves.


      A175950
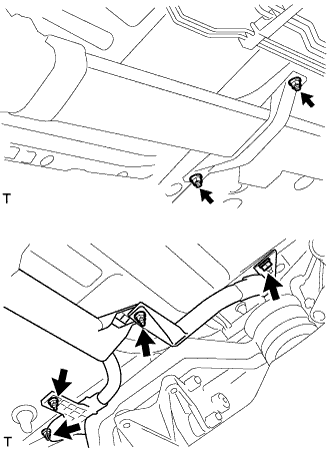
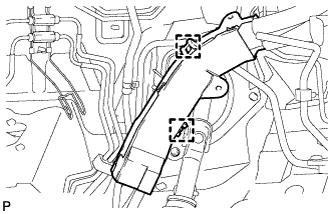
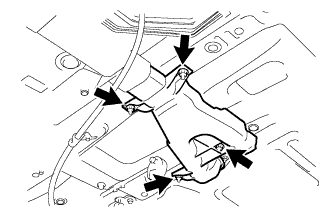
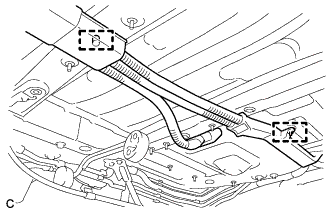
    1. Install the No. 3 frame wire with the 2 clamps.


    2. A109801
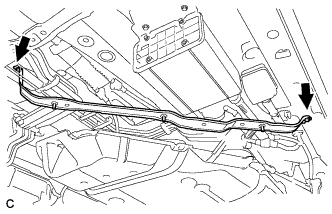
    3. Install the No. 3 frame wire with the 6 nuts. (F)

      Torque:
      8.5 N*m{ 87 kgf*cm , 75 in.*lbf }


    4. A110012
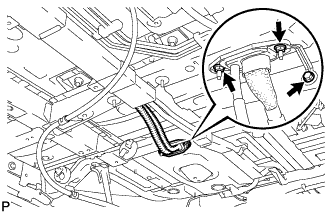
    5. Pass the No. 3 frame wire into the cabin and install the 2 nuts and bolt shown in the illustration. (E)

      Torque:
      Bolt:
      8.0 N*m{ 82 kgf*cm , 71 in.*lbf }
      Nut:
      8.5 N*m{ 87 kgf*cm , 75 in.*lbf }


    6. A175949
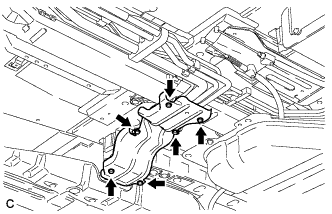
    7. Install the bolt and clamp as shown in the illustration. (D)

      Torque:
      8.5 N*m{ 87 kgf*cm , 75 in.*lbf }


    8. A177969
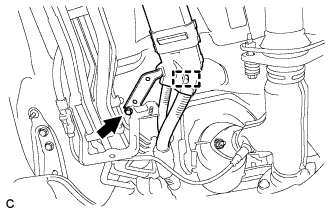
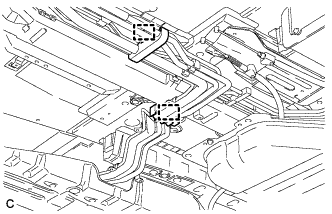
    9. Connect the clamp as shown in the illustration. (C)


    10. A177968
    11. Connect the 2 clamps as shown in the illustration. (B)


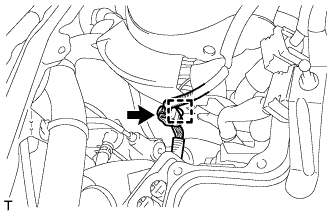
    12. A175856
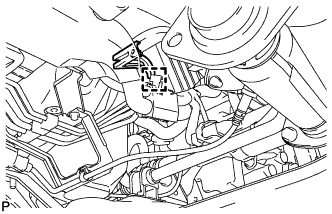
    13. Connect the connector and clamp as shown in the illustration. (A)


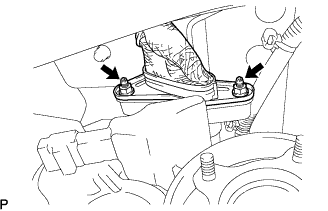
    C105715
  1. Connect the No. 3 frame wire to the rear traction motor assembly with the 2 nuts.

    Torque:
    15 N*m{ 153 kgf*cm , 11 ft.*lbf }


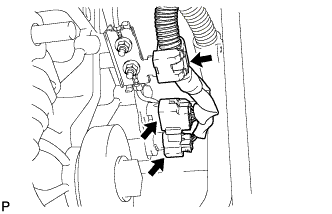
    C105713
  1. Connect the 2 connectors and clamp to the rear traction motor assembly.


2. INSTALL WIRING HARNESS PROTECTOR


    A112394
  1. Install the wiring harness protector with the 4 nuts.

    Torque:
    8.5 N*m{ 87 kgf*cm , 75 in.*lbf }


3. INSTALL AIR CONDITIONER ACCESSORY ASSEMBLY (w/ Rear Air Conditioning System)


    A175940
  1. Install the 2 clamps and air conditioner accessory assembly.


4. INSTALL HEATER COVER (w/ Rear Air Conditioning System)


    A175939
  1. Install the heater cover with the 6 bolts.

    Torque:
    5.0 N*m{ 51 kgf*cm , 44 in.*lbf }


5. INSTALL REAR ENGINE SERVICE COVER ASSEMBLY (w/ Rear Air Conditioning System)


    A175991
  1. Install the 2 bolts and rear engine service cover assembly.

    Torque:
    13 N*m{ 130 kgf*cm , 9 ft.*lbf }


6. CHECK HIGH VOLTAGE CABLE CONNECTION

NOTICE:
Be sure to wear insulated gloves and protective goggles.


    C105715
  1. Make sure that the No. 3 frame wire is securely installed with the nuts.

    NOTICE:
    1. Do not install the No. 3 frame wire at an angle.
    2. Be sure to tighten the nuts securely.


7. REMOVE INVERTER COVER


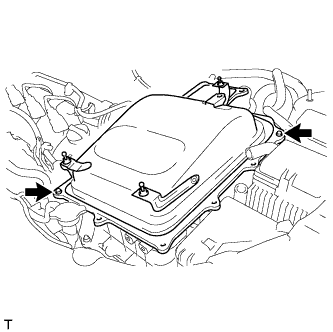
    A181827
  1. Remove the 2 bolts and inverter cover from the inverter with converter assembly.


8. CONNECT NO. 3 FRAME WIRE

CAUTION:
Wear insulating gloves.

NOTICE:
  1. Make sure that the inverter with converter assembly is temporarily installed before working on the inverter with converter assembly (Click here).
  2. Do not allow any foreign objects or waterdrops to enter the inverter with converter assembly.


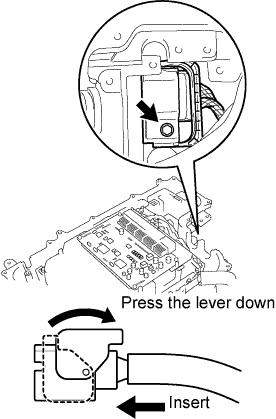
    A109800E01
  1. After connecting the cable, press the lever down to connect the No. 3 frame wire with the bolt to the inverter with converter assembly.

    Torque:
    10 N*m{ 102 kgf*cm , 7 ft.*lbf }


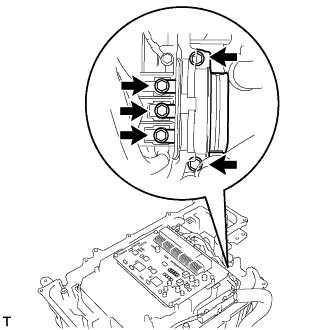
    A108521
  1. Connect the No. 3 frame wire (high voltage cable of the rear motor (MGR)) with new 5 bolts to the inverter with converter assembly.

    Torque:
    10 N*m{ 102 kgf*cm , 7 ft.*lbf }

    NOTICE:
    Make sure that the tightening torque is between 8.0 and 12 N*m (82 and 122kgf*cm, 6 and 9 ft.*lbf).


9. CHECK HIGH VOLTAGE CABLE CONNECTION

CAUTION:
Wear insulating gloves.

NOTICE:
  1. Make sure that the inverter with converter assembly is temporarily installed before working on the inverter with converter assembly (Click here).
  2. Do not allow any foreign objects or waterdrops to enter the inverter with converter assembly.


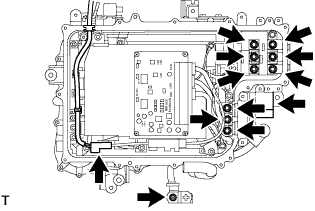
    A108527
  1. Check that each connector and terminal is firmly installed.

    NOTICE:
    1. Make sure that the connectors are fully engaged.
    2. Make sure that the bolts are fully tightened.


10. INSTALL INVERTER COVER


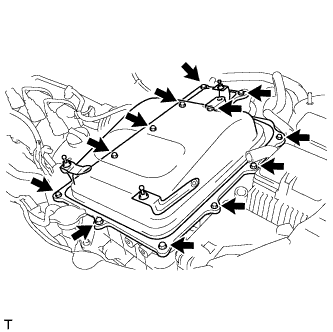
    A181826
  1. Install the inverter cover with the 12 bolts to the inverter with converter assembly.

    Torque:
    10 N*m{ 102 kgf*cm , 7 ft.*lbf }


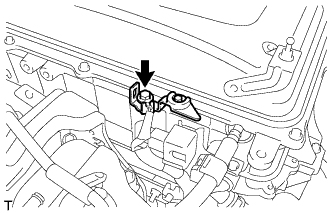
    A175851
  1. Install the interlock bracket with the bolt to the inverter with converter assembly.

    Torque:
    10 N*m{ 102 kgf*cm , 7 ft.*lbf }


11. INSTALL INVERTER RESERVE TANK SUB-ASSEMBLY


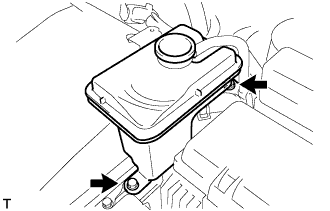
    A108512
  1. Install the inverter reserve tank sub-assembly with the 2 bolts.

    Torque:
    10 N*m{ 102 kgf*cm , 7 ft.*lbf }


12. CONNECT NO. 2 ENGINE ROOM WIRE


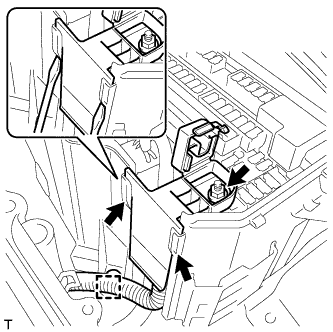
    A175855
  1. Connect the No. 2 engine room wire with the nut.

    Torque:
    8.5 N*m{ 87 kgf*cm , 75 in.*lbf }

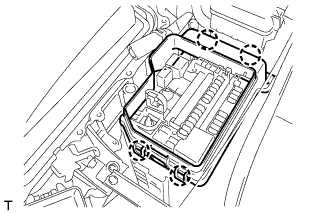
  1. Connect the clamp.


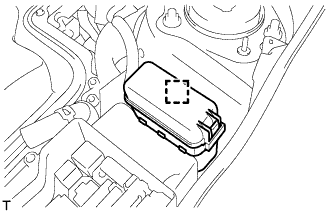
    A175854
  1. Install the No. 2 relay block cover with the 4 claws.


    A175852
  1. Install the engine room relay block assembly.

  1. Install the relay block cover.


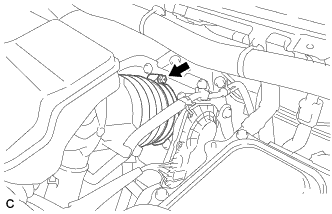
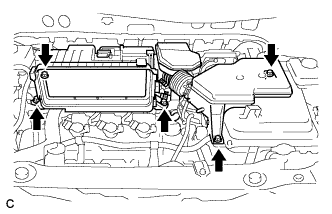
13. INSTALL AIR CLEANER CASE SUB-ASSEMBLY


    A173493
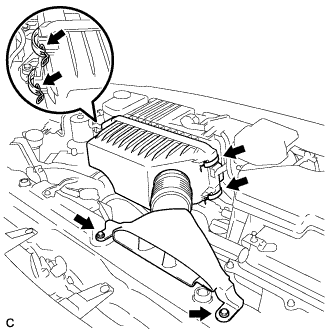
  1. Align the tab on the throttle body with the groove on the air cleaner hose and tighten the hose clamp.


    A173492
  1. Install the air cleaner case sub-assembly with the 5 bolts.

    Torque:
    5.0 N*m{ 51 kgf*cm , 44 in.*lbf }


    A173491
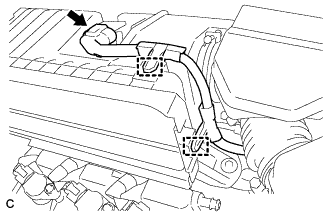
  1. Connect the intake air flow meter connector.

  1. Connect the 2 wire harness clamps to the air cleaner case.


    A173490
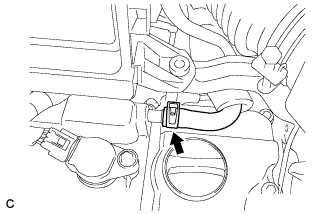
  1. Connect the No. 1 ventilation hose.


14. INSTALL AIR CLEANER CAP SUB-ASSEMBLY
  1. Install the air cleaner filter element to the air cleaner case.


    A175875
  1. Install the 2 bolts, 4 clamps and air cleaner cap sub-assembly.

    Torque:
    7.0 N*m{ 71 kgf*cm , 62 in.*lbf }


15. INSTALL NO. 2 ENGINE ROOM SIDE COVER LH


    A173813
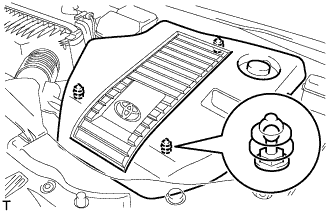
  1. Fit the clips and install the No. 2 engine room side cover LH.

    NOTICE:
    1. Be sure to engage the clips securely.
    2. Do not apply excessive force or do not hit the cover to engage the clips. This may cause the cover to break.


16. CONNECT NO. 3 FRAME WIRE

CAUTION:
Wear insulating gloves.


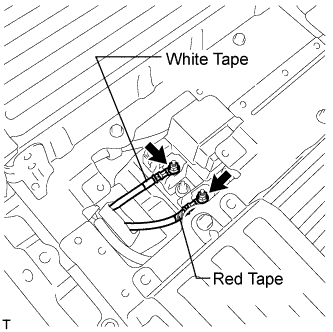
    A175850E01
  1. Connect the No. 3 frame wire to the hybrid vehicle relay assembly with the 2 nuts.

    Torque:
    9.0 N*m{ 92 kgf*cm , 80 in.*lbf }

    NOTICE:
    1. Make sure that the ends of the No. 3 frame wire are not crossed over each other.
    2. Be sure to connect the No. 3 frame wire to each correct terminal as shown in the illustration.


17. CHECK HIGH VOLTAGE CABLE CONNECTION

CAUTION:
Wear insulated gloves and protective goggles.


  1. Check that each wire harness is being installed securely.


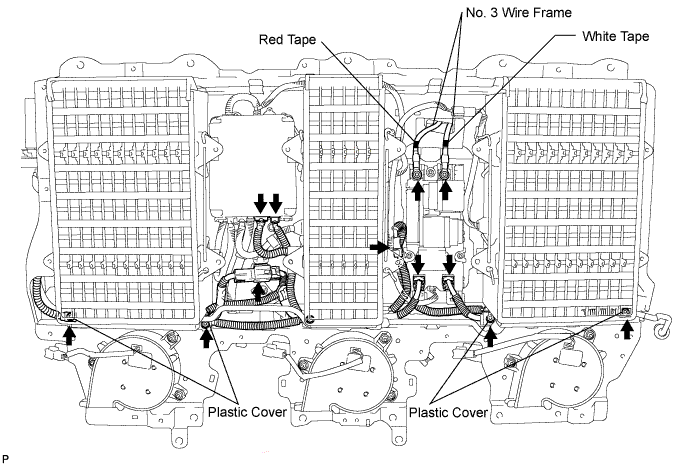
    A175650E01

    NOTICE:
    1. Make sure that the No. 3 wire frames do not cross each other.
    2. Be sure to connect the No. 3 frame wire to each correct terminal as shown in the illustration.
    3. The connectors should be connected securely.
    4. The nuts should be fastened securely.
    5. Make sure that the 4 plastic covers are engaged securely.


18. INSTALL HYBRID BATTERY SERVICE HOLE COVER

HINT:
Refer to the procedures for "INSTALL HV BATTERY" (Click here).


19. INSTALL OUTER COWL TOP PANEL SUB-ASSEMBLY


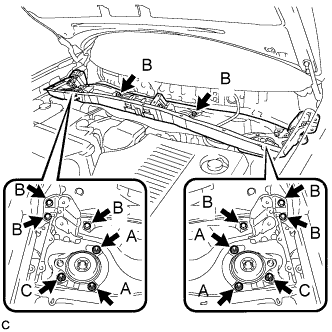
    C175030E01
  1. Install the outer cowl top panel sub-assembly with the 8 bolts and 6 nuts.

    Torque:
    Nut A:
    85 N*m{ 866 kgf*cm , 63 ft.*lbf }
    Bolt B:
    8.8 N*m{ 90 kgf*cm , 78 in.*lbf }
    Nut C:
    8.8 N*m{ 90 kgf*cm , 78 in.*lbf }


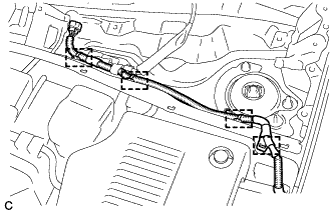
    C175029
  1. Engage the 4 clamps.


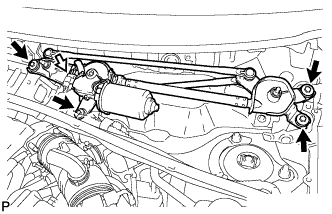
20. INSTALL WINDSHIELD WIPER MOTOR AND LINK ASSEMBLY


    E150150
  1. Install the windshield wiper motor and link assembly with the 4 bolts.

    Torque:
    7.0 N*m{ 71 kgf*cm , 62 in.*lbf }

  1. Connect the connector.


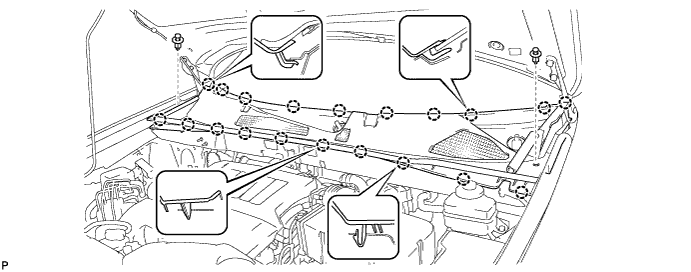
21. INSTALL COWL TOP VENTILATOR LOUVER SUB-ASSEMBLY


  1. Engage the 20 claws.


    E150149

  1. Install the cowl top ventilator louver sub-assembly with the 2 clips.


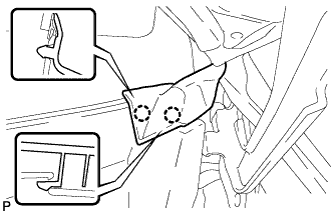
    E150146
  1. Engage the 2 claws and connect the front fender to cowl side seal LH.


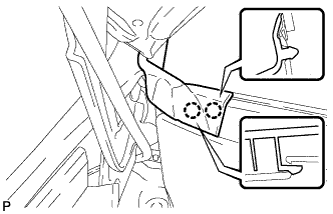
    E150147
  1. Engage the 2 claws and connect the front fender to cowl side seal RH.


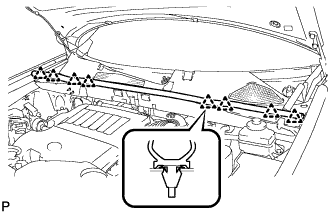
22. INSTALL HOOD TO COWL TOP SEAL


    E150148
  1. Engage the 8 clips and install the hood to cowl top seal.


23. INSTALL FRONT WIPER ARM AND BLADE ASSEMBLY RH
  1. Operate the wiper and stop the windshield wiper motor at the automatic stop position.


  1. When reinstalling:


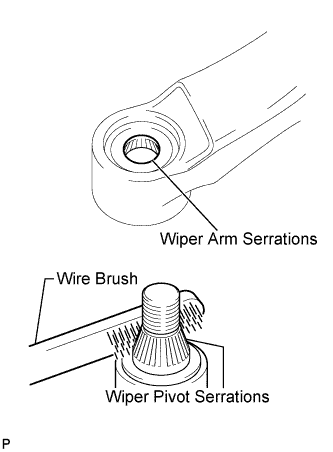
      E112237E01
    1. Clean the wiper arm serrations.

    2. Clean the wiper pivot serrations with a wire brush.


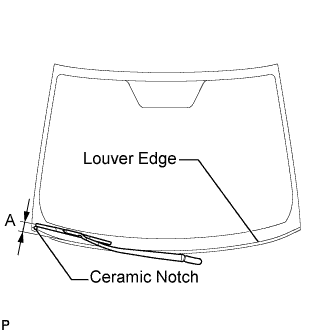
    E147125E01
  1. Install the front wiper arm and blade assembly RH with the nut to the position shown in the illustration.

    Torque:
    24 N*m{ 245 kgf*cm , 18 ft.*lbf }

    HINT:
    Hold the wiper arm by hand when tightening the nut.

    Area
    Measurement
    A
    25.6 mm (1.00 in.)


24. INSTALL FRONT WIPER ARM AND BLADE ASSEMBLY LH
  1. Operate the wiper and stop the windshield wiper motor at the automatic stop position.


  1. When reinstalling:


      E112237E01
    1. Clean the wiper arm serrations.

    2. Clean the wiper pivot serrations with a wire brush.


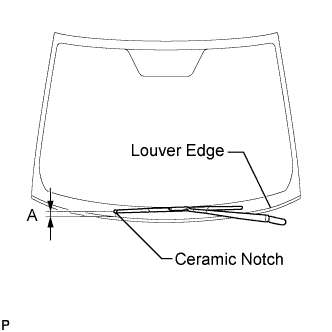
    E152618E01
  1. Install the front wiper arm and blade assembly LH with the nut to the position shown in the illustration.

    Torque:
    24 N*m{ 245 kgf*cm , 18 ft.*lbf }

    HINT:
    Hold the wiper arm by hand when tightening the nut.

    Area
    Measurement
    A
    31.9 mm (1.26 in.)

  1. Operate the front wipers while spraying washer fluid onto the windshield glass. Make sure that the front wipers function properly and the wipers do not come into contact with the vehicle body.


25. INSTALL SERVICE PLUG GRIP

NOTICE:
Before connecting the service plug, check that no parts and tools remain and that the high voltage terminals and connectors are connected securely.


    A176049
  1. Wear insulated gloves, then insert the service plug.

  1. Push down on the grip to lock.


    A175635
  1. Close the reclining hinge cover.

    NOTICE:
    Check that the 2 clips are securely connected to the battery carrier bracket (click sound).


    A175634
  1. Close the rear door scuff plate LH.

    NOTICE:
    Check that the 5 clips are securely connected to the battery carrier bracket (click sound).


26. CONNECT CABLE TO NEGATIVE BATTERY TERMINAL

NOTICE:
When disconnecting the cable, some systems need to be initialized after the cable is reconnected (Click here).