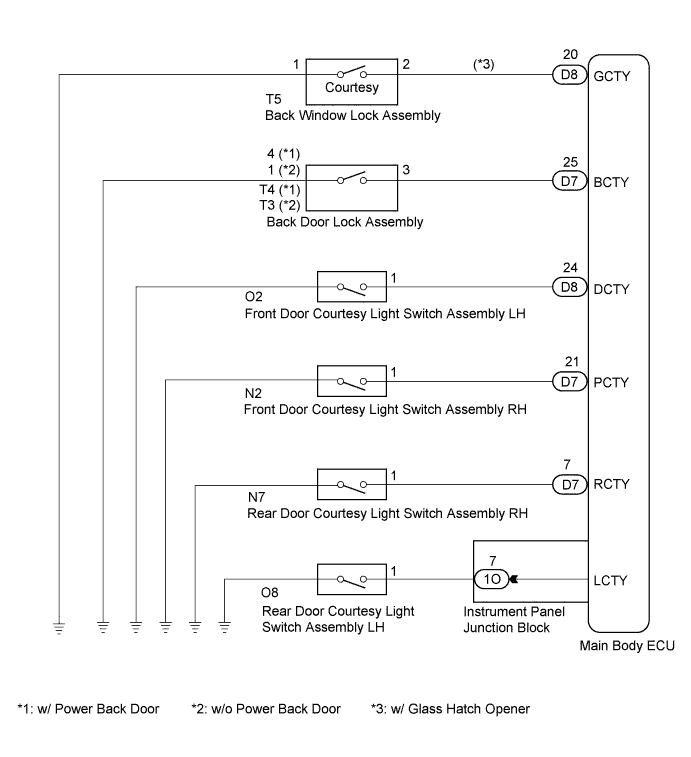
LIGHTING SYSTEM > Door Courtesy Switch Circuit |
| 1.READ VALUE USING TECHSTREAM |
Connect the Techstream to the DLC3.
Turn the power switch on (IG).
Turn the Techstream on.
Enter the following menus: Body Electrical / Main Body / Data List.
Read the display on the Techstream.
| Tester Display | Measurement Item/Range | Normal Condition | Diagnostic Note |
| D door Courtesy SW | Driver side door courtesy switch signal / ON or OFF | ON: Driver side door open OFF: Driver side door closed | - |
| P door Courtesy SW | Passenger side door courtesy switch signal / ON or OFF | ON: Passenger side door open OFF: Passenger side door closed | - |
| RR door Courtesy SW | Rear door RH courtesy switch signal / ON or OFF | ON: Rear door RH open OFF: Rear door RH closed | - |
| RL door Courtesy SW | Rear door courtesy switch LH signal / ON or OFF | ON: Rear door LH open OFF: Rear door LH closed | - |
| Back door Courtesy SW | Back door Courtesy switch signal / ON or OFF | ON: Back door open OFF: Back door closed | - |
| Glass Hatch Courtesy Switch | Back window Courtesy Switch signal / ON or OFF | ON: Back window open OFF: Back window closed | - |
|
| ||||
| OK | ||
 | ||
| ||
| 2.INSPECT COURTESY SWITCH |
Inspect the front door courtesy switches (Click here).
Inspect the rear door courtesy switches (Click here).
Inspect the back door courtesy switch (Click here).
Inspect the back window courtesy switch (Click here).
|
| ||||
| OK | |
 |
| 3.CHECK HARNESS AND CONNECTOR (MAIN BODY ECU - DOOR COURTESY SWITCH) |
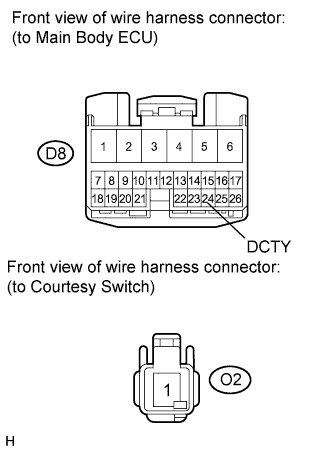 |
Check the harness and connector between the main body ECU and front door courtesy switch LH.
Disconnect the D8 main body ECU connector.
Disconnect the O2 switch connector.
Measure the resistance according to the value(s) in the table below.
| Tester Connection | Condition | Specified Condition |
| D8-24 (DCTY) - O2-1 | Always | Below 1 Ω |
| D8-24 (DCTY) - Body ground | Always | 10 kΩ or higher |
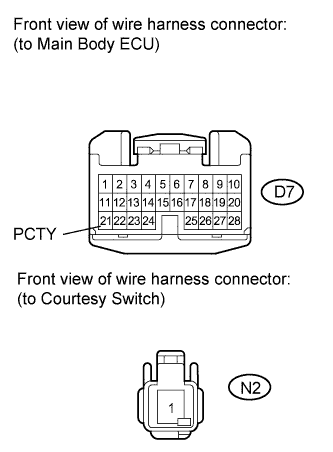 |
Check the harness and connector between the main body ECU and front door courtesy switch RH.
Disconnect the D7 main body ECU connector.
Disconnect the N2 switch connector.
Measure the resistance according to the value(s) in the table below.
| Tester Connection | Condition | Specified Condition |
| D7-21 (PCTY) - N2-1 | Always | Below 1 Ω |
| D7-21 (PCTY) - Body ground | Always | 10 kΩ or higher |
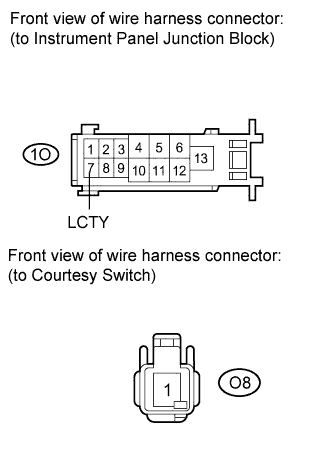 |
Check the harness and connector between the instrument panel junction block and rear door courtesy switch LH.
Disconnect the 1O instrument panel junction block connector.
Disconnect the O8 switch connector.
Measure the resistance according to the value(s) in the table below.
| Tester Connection | Condition | Specified Condition |
| 1O-7 (LCTY) - O8-1 | Always | Below 1 Ω |
| 1O-7 (LCTY) - Body ground | Always | 10 kΩ or higher |
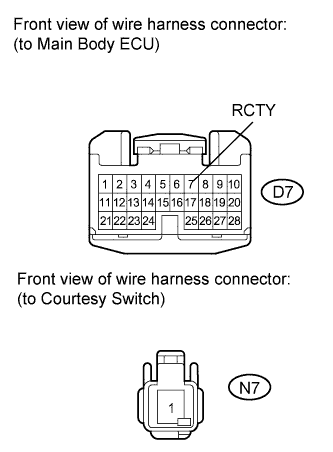 |
Check the harness and connector between the main body ECU and rear door courtesy switch RH.
Disconnect the D7 main body ECU connector.
Disconnect the N7 switch connector.
Measure the resistance according to the value(s) in the table below.
| Tester Connection | Condition | Specified Condition |
| D7-7 (RCTY) - N7-1 | Always | Below 1 Ω |
| D7-7 (RCTY) - Body ground | Always | 10 kΩ or higher |
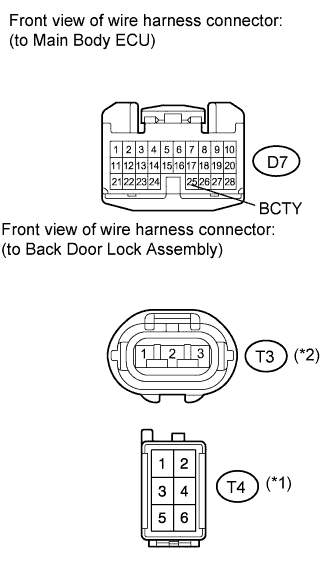 |
Check the harness and connector between the main body ECU and back door lock assembly.
Disconnect the D7 main body ECU connector.
Disconnect the T4*1 or T3*2 back door lock assembly connector.
Measure the resistance according to the value(s) in the table below.
| Tester Connection | Condition | Specified Condition |
| D7-25 (BCTY) - T4-3*1
| Always | Below 1 Ω |
| D7-25 (BCTY) - T3-3*2
| Always | Below 1 Ω |
| D7-25 (BCTY) - Body ground | Always | 10 kΩ or higher |
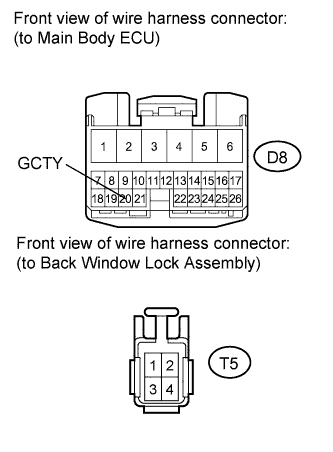 |
Check the harness and connector between the main body ECU and back window lock assembly (w/ Glass Hatch Opener).
Disconnect the D8 main body ECU connector.
Disconnect the T5 back window lock assembly connector.
Measure the resistance according to the value(s) in the table below.
| Tester Connection | Condition | Specified Condition |
| D8-20 (GCTY) - T5-2 | Always | Below 1 Ω |
| D8-20 (GCTY) - Body ground | Always | 10 kΩ or higher |
|
| ||||
| OK | ||
| ||
| ||

